This was a class that I’d been looking forward to for a long while and it did not disappoint.
Gear
My primary rifle for this class was my FS2000. Not only does the bullpup design make it short and handy, it also dribbles empty cases out the front ejection port rather than flinging them out with reckless abandon. This is a nice feature when you’re working in a vehicle in close proximity to others. Mine is kitted out with a forward mounted Aimpoint Micro red dot, an AAC Mini4 suppressor, and the tri-rail handguard with a stubby VFG and a surefire flashlight.
The class had a mixture of AKs and ARs. The AKs were mostly of the folding stock variety, making them a bit handier. Some of the ARs were AR “pistols” with short barrels and bare buffer tubes which helped considerably with handiness but probably didn’t do any favors when it came to muzzle blast. There were a couple of other suppressors in the class as well.
For the class and any “social purposes” that came up during the trip I brought an iron sighted G17. I also brought along a G21 converted to 10mm for some hiking that I’d be doing after the class. Most of the other students were running Glocks, though there was at least on M&P in attendance.
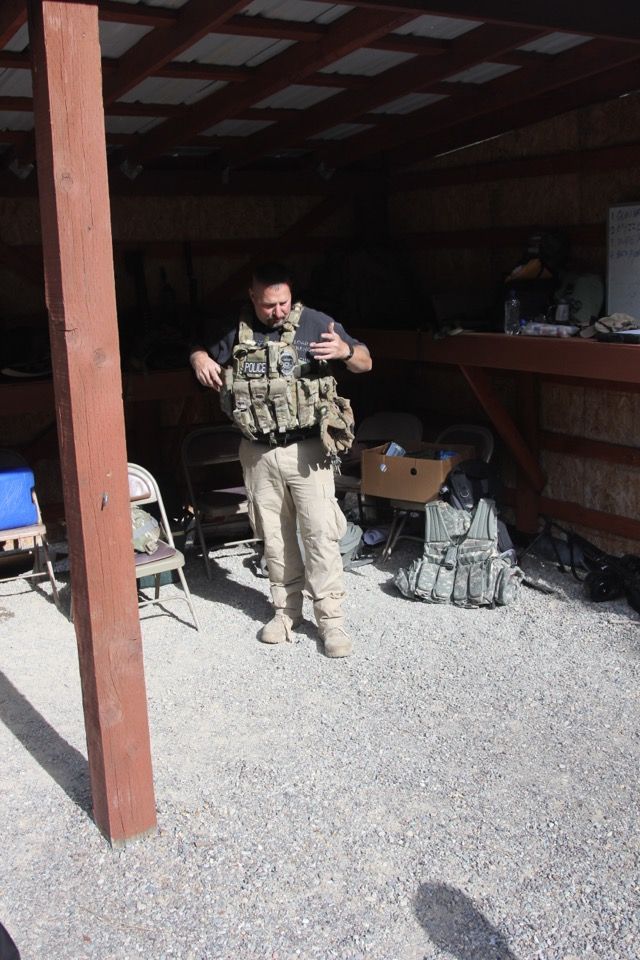
My primary support gear for the class was a Velocity Systems UW Gen VI chest rig. I’m not a huge fan of chest rigs for running around in the woods, but they are a good choice for vehicle work. They keep everything easily accessible when seated and don’t have stuff hanging out to either side to get caught on something as you pile in or out of the vehicle. They also pack much more compactly than most war belts, which is a consideration when you’re going to be flying into a class.
In the past my chest rig of choice has been the Infidel, which is a nice, slick, minimalist, four mag pouch setup. While the fact that it doesn’t carry mags three deep, have pockets on top of pouches, and isn’t totally covered in MOLLE is a plus, I have occasionally wanted just a bit more storage than the Infidel offers (particularly when I was using one of the mag pouches for a pistol). After doing some shopping around I settled on the UW Gen VI. It’s still a fairly slick setup, just four mags, but it has two bigger pouches on either side and three smaller ones (plus a pistol mag pouch) across the front. It also integrates nicely with the Velocity Systems plate carriers, which is something else I’ve been playing with (though not on this trip).
One of the issues with vehicle operations is how to run the handgun. A CCW type belt holster with a chest rig runs the risk of getting tangled up on the draw, which can have catastrophic results. Thigh rigs and dropped and offset holsters are absolutely awful in a vehicle (even just hopping into a car and driving with them can be uncomfortable, much less all of the climbing in and out that we’d be doing in this class). As I mentioned earlier, I ended up sacrificing one of the mag pouches in the chest rig to hold my pistol. While you can just stick a pistol in there, I prefer sticking a kydex holster in the mag pouch. The Dale Fricke Gideon is a good choice for this since it’s fairly slick and compact. The holster provides some protection for the trigger and adds a bit of retention (though I’d still recommend using the mag pouch’s flap or bungee retention). You definitely need to retain the holster somehow (zip ties through the mag pouch’s drain grommet usually work well) so you don’t draw the pistol and come out with the holster as well.
And then, of course, there was the usual miscellaneous gun gear. I also brought along a pile of Motorola i355s to play around with for radio comms (even without service the phone to phone push to talk feature works as a walkie talkie).
I’d be doing some backpacking after the class and while I’d sent most of my gear for that ahead I still had a fair amount of hiking kit that had to fit in my luggage as well. I ended up dragging a big roller suitcase and a big duffle bag (both pushing the airline’s size and weight limits) plus a carry on and a day pack. Wrangling all that through the airport was a bit of a challenge.
Friday
The closes airports are Missoula and Kalispell, but I ended up flying into Great Falls because that was more convenient for the other end of my trip, after the backpack I was planning. It meant a four hour drive on Friday afternoon though. I’d reserved a midsize SUV, but when I got to the rental car desk at the Great Falls airport all they had available was a big Ford Explorer. Since the extra size would be rather useful for the class, I was pretty happy about this.
It was a beautiful day and the drive on two-lane blacktop winding through the Montana mountains was pretty fantastic by itself. I stopped at Walmart in Missoula and got to Eric’s place around 7pm. We drove over to Quinn’s, a local eatery, and had a good dinner with some great conversation.
Saturday
When Eric and I rolled up to The Butcher’s Nook to get some breakfast on Saturday morning we found about half the class there doing the same (this is not exactly a coincidence, since it’s one of the few places in Plains, Montana to get a decent breakfast on Saturday morning). Eric went on ahead to the range while I was deputized to lead the rest of the crew out there when they were finished with breakfast.
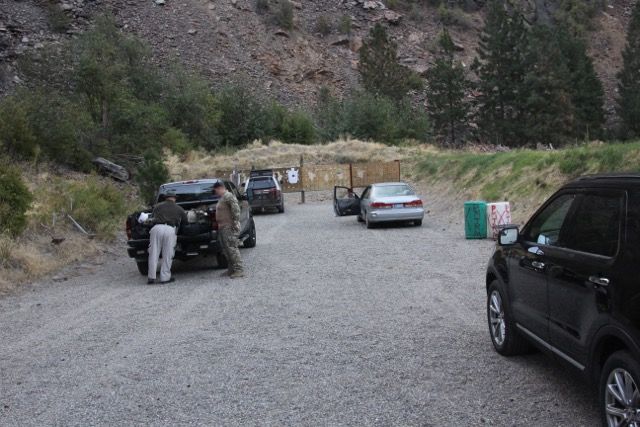
After we arrived Eric had us pull a couple of vehicles out on the range for use during the class. Eric provided a small Honda sedan and a Toyota 4Runner SUV, while one of the other students brought out a full size extended cab Chevy Silverado and I volunteered the big Ford Escape. We’d be doing all of the live shooting out of Eric’s old 4Runner so no risk of extra holes showing up in my rental car that I’d have to explain.
We started out with the usual admin stuff, signing waivers and getting gear unloaded and squared away. Eric had us go around and do some introductions. There were plenty of folks in the class I knew from previous courses with Eric or other instructors, and there were a few who were new to me or who I only knew online.
He went through the emergency briefing, laying out a plan in the event that someone got shot and assigning emergency roles. When he gave the safety brief, Eric emphasized the need to be more proactive with the mechanical safeties on our rifles than we would in other contexts. While leaving the safety disengaged and maintaining good muzzle and trigger finger discipline is sufficient in a lot of situations, it runs into some issues inside a vehicle. For one thing, there’s a much greater potential for the trigger to snag on a bit of gear even if you’re keeping your trigger finger nice and straight. This is compounded by the fact that when you’ve got four or more guys crammed into a vehicle it’s not always possible to keep the muzzle pointed in a safe direction (particularly when you consider there’s parts of the vehicle you really don’t want to shoot either). This makes the extra layer of protection that a manual safety can provide a necessity. Essentially wait until you’ve got the gun out the window and pointed in on the target before disengaging the safety and re-engage the safety before pulling it back in.
On a similar vein, the default direction for long guns inside the vehicle is muzzle up. This makes it less likely that you’ll sweep yourself or someone else in the car when bringing the gun to bear on a target. It also makes it much less likely that you’ll muzzle a teammate who’s proned out next to the vehicle when you get out of the car.
There are a couple of different perspectives that you could teach a class like this from: The class could emphasize how these skills apply to the CCW holder (essentially an anti-carjacking class), it could be taught with an eye towards executive protection, and it could be a full tactical class, emphasizing light-infantry tactics when mounted in unarmored vehicles. Eric’s got experience in all of these areas, but he noted that in this class the tactical elements would get the majority of the emphasis. However, there’s still quite a bit of material that applies to the other areas as well.
We spent some time talking about guns and gear for vehicle operations. As usual, Eric had a phenomenal spread of gear to illustrate these points.
First up was pistols. Eric noted that if you spend a lot of time driving, a cross draw holster can be a good choice both from a comfort perspective and in terms of getting the gun out and on target while seated. Another alternative is a dedicated car gun, in a concealed holster mounted to the vehicle (this should be in addition to a concealed pistol on your person, of course).
For the driver in particular, there is a role for a very short, handy weapon with more capability than a standard pistol. This could be a stocked pistol, submachine gun, or a folding stock short barreled rifle or short barreled shotgun (or an AR pistol with a Law Tactical folder). In situations where driving around with a gun visible on your lap isn’t a viable option, something like a large messenger bag can provide a lower profile.
While the driver really places the greatest premium on short handy weapons, all of these are good options for other people in the vehicle as well. However, non-drivers can go a bit longer: bullpups, SBRs without folding stocks, or full length rifles with folding stocks. Something like a Para FAL or folding stock M1A or G3 can provide quite a bit more punch in a slightly larger package. For these sorts of weapons Eric likes a muzzle up position between the knees. If you need a lower profile option, something like the Sneaky Rifle Case can conceal the rifle in that same position.
One of the other guns Eric brought out really went in the other direction from the short, handy weapons he’d covered earlier: a 18” heavy barrel FAL with a drum magazine. It’s essentially intended to fill the role of a support weapon for those of us without access to belt-fed machineguns. It’s not an easy weapon to use out of a vehicle (maybe from the bed of a pickup truck or standing in the sun roof of an SUV), but it’s the kind of heavy duty weapon that a vehicle makes much easier to carry around with you.
For support gear, Eric likes chest rigs or vests (for the same reasons I mentioned earlier). One nice piece of kit that he showed off that he uses in his day job as a police officer is a drop leg rig with three rifle mag pouches on it. He keeps the belt attachment for this on his duty belt, but leaves the drop leg in his cruiser clipped to another belt attachment. In the event of an active shooter situation all he has to do is pop the fastex buckle and clip it to the one on his belt (he can do up the leg strap when he gets a chance).
Eric talked a bit about the advantages of body armor in vehicle operations (armored vehicles are nice too, but they’re getting a bit outside the topic of the class). For one thing, in a vehicle (particularly a stopped vehicle) you’re a bit of a sitting duck and armor helps with that. On the flip side, unlike foot-mobile infantry operations, you don’t have to carry that heavy armor the whole time, you get to ride around in the vehicle.
Speaking of protective gear, Eric also talked about the importance of eye protection. When glass, metal, spent casings, and other stuff start flying around it’s very important to provide your eyes with some protection. He’s got some personal experience with this with some road debris when he had someone pulled over on the side of the highway.
One of the unique aspects of vehicle operations compared to other tactical environments is the greater danger of fire. A lot of “tactical” clothing are synthetic fabrics, which tend to melt to your skin in a fire. For vehicle operations what you really want is either cotton, or some sort of fire retardant fabric. It’s best if you can get coverage of the face and hands as well.
Eric’s not a huge fan of slings for vehicle operations. They’re far to easy to snag on stuff or get tangled up with other gear. There is a role for a short, single point sling for the driver (who needs his hands free for driving duties). Slings that attach you to your weapon may also be desirable if you are someplace like Iraq or Afghanistan where the threat of improvised explosive devices looms large. With those exceptions he’d rather slings be snugged up tight until you get out of the vehicle (a rubber band or a bit of bicycle inner tube works well for this purpose).
A traditional way of thinking about your gear that Eric uses in many of his classes is to divide it into tiers: Tier I gear is the stuff you have on your person, Tier II is your battle belt/chest rig, Tier III is the stuff in your pack. The oft neglected Tier IV is gear that you’ve cached or carry in your vehicle. Given the subject of this class, Tier IV gear got quite a bit of attention in Eric’s lecture.
He started out with modifications to the vehicle itself. If you’re going to be using a vehicle in a tactical environment, you may want to disable the airbags (so you can keep driving in the event you need to ram your way through an obstacle or hit another vehicle). Another important aspect is the ability to control all of the vehicle’s lights (both interior and exterior) including stuff you can’t normally switch off, like brake lights. If you can, fit stuff like push bumpers, heavier suspension, and better brakes.
In the vehicle, you need maps and navigational gear, communications (especially when operating multiple vehicles), and binoculars (especially important in an environment with an IED threat). You also want to take advantage of the extra carrying capacity to carry more ammo, medical gear, etc. than you can on your person. Finally, you need kit for clearing obstacles, like shovels and chainsaws, and for dealing with damaged or disabled vehicles, including fire extinguishers, tow straps, spare tires, and jacks. All of this critical gear needs to be easily accessible, not buried under a ton of other stuff at the bottom of the trunk. It also needs to be properly secured. Any big heavy stuff that’s not strapped down will turn into a projectile in a collision.
With another of Eric’s epic gear lectures done, we all got our own gear on. Eric had everyone completely unload their weapons and buddy check both our guns and that we didn’t have any other ammo on our persons.
Eric got in the 4Runner and did some demos. He showed a technique for removing the seatbelt and opening the door that uses just one hand and makes getting tangled in the belt a lot less likely. You pop the belt buckle with the left hand (assuming you’re in the driver’s seat) and keep control of the belt as you swing it wide of your body across the steering wheel and use that same hand (with the belt still captured) to open the door, only letting go of the belt once the door is open and you’ve got it completely clear of your body. I’ve been taught the “pop the belt with the left hand” trick before, but in that context we just let the belt slide over the body as you exit the car. That works fine in a t-shirt, but with a bunch of gear on it would probably hang up on something. This method is a lot more likely to get you out without snagging whether or not you’ve got a chest rig or other tactical gear on.
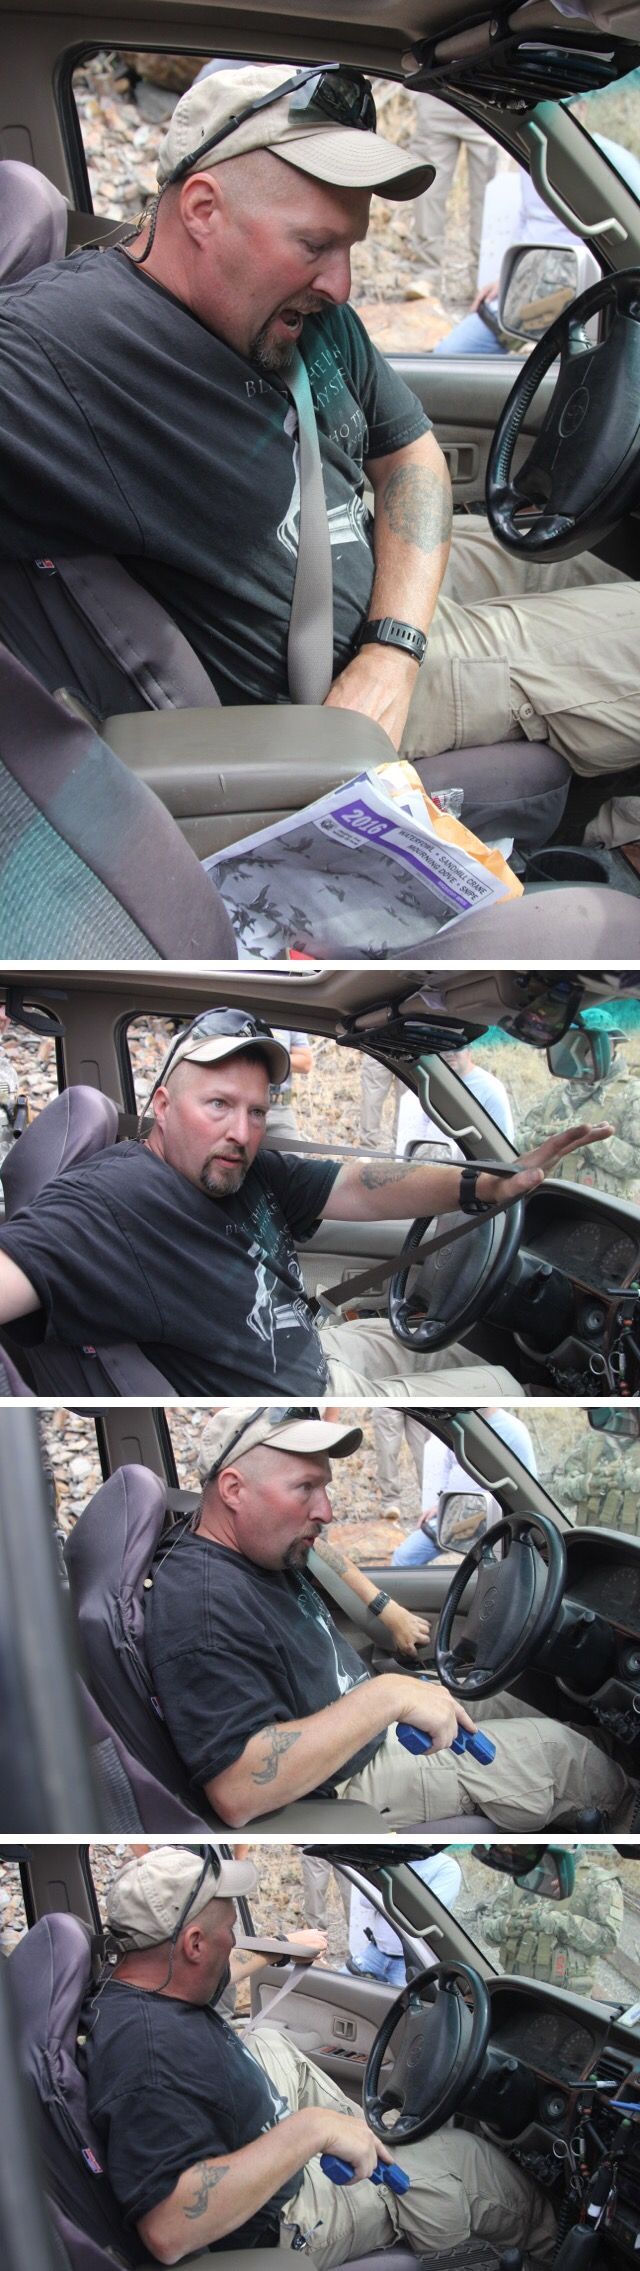
He also talked about how to draw a pistol while seated. A lot of anti-carjacking type classes teach to bring the muzzle up and over the steering wheel, to avoid sweeping yourself. Even in that context I’m a bit skeptical about taking the time to do that in a high stress situation. In the team context making that your default vehicle draw really doesn’t work. If you’re in the back seat and you do that motion you’ve just swept the guy in the front seat. Inside a vehicle there isn’t always a safe direction, and in that case it’s better to sweep yourself than someone else. That’s why Eric teaches drawing and keeping the muzzle down as you bring it across your body and then up and out the window.
Eric talked about the differentness seating positions and went through individual sectors of fire for each seat, which can vary depending on how many shooters you have in the vehicle. One fundamental principle that applies regardless is that the driver’s primary role is to drive rather than shoot. When the vehicle is halted he may be prepared to fire out the driver’s side window with a handgun, but on the move he should concentrate on driving.
With four operators, the three non-drivers basically each cover 1/3 of the area around the vehicle. The front passenger gets the forward and right sides, rear passenger gets the right-rear and rear, and the driver rear gets the left and left-rear.
With three operators, one shooter in the front passenger seat gets the forward and right sides while the other in the driver rear seat gets the left and rear. The passenger rear seat is either unoccupied or contains a protectee or noncombatant.
With two operators the one not driving has responsibility for 360 security. The best way to do this is go put him alone in the rear seat where he can slide side to side to shoot out either window or fire forward through the windshield between the front seats.
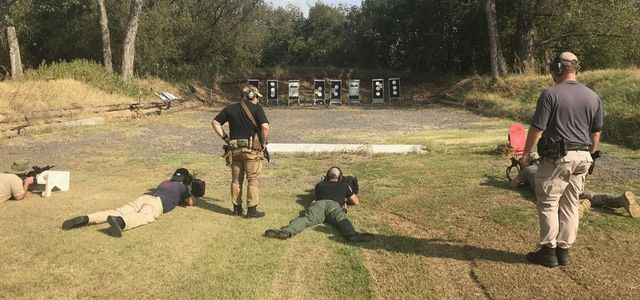
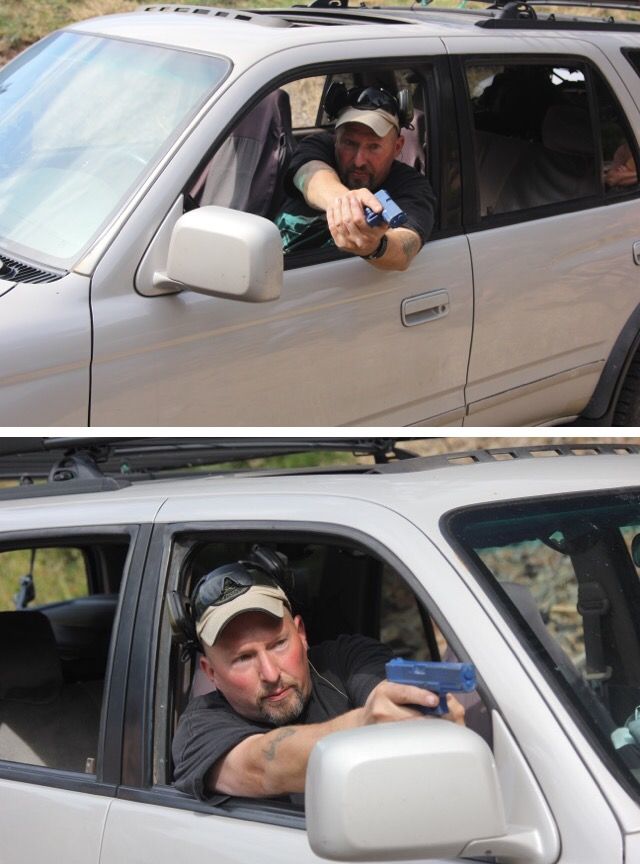
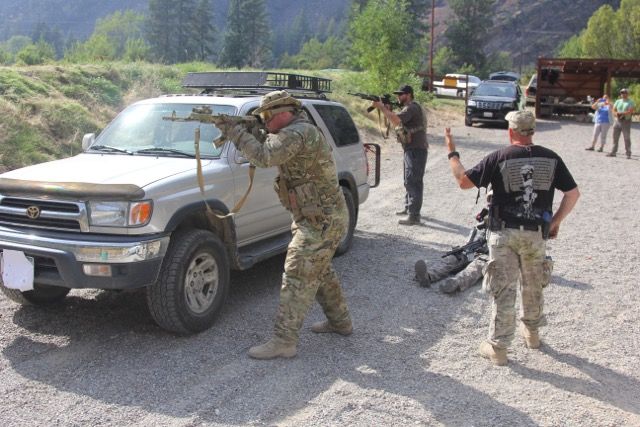
Eric basically organized the class into single operator skills, working within a vehicle team, and integrating multiple vehicles. We had twelve students, so the class divided nicely into three teams of four people each. We had four vehicles out on the range to work with: a small Honda sedan, a Toyota Forerunner SUV, a 4-door Chevy Silverado pickup and a Ford Escape SUV. We split up into our teams and did dry work practicing drawing our handguns and engaging notional targets out the windows. We rotated around so that everyone got to try each position in each vehicle. While we were doing this in our vehicle teams, it was an individual exercise, concentrating on drawing and bringing the pistol to bear. As might be expected, some of these vehicles were easier to maneuver in than others.
Eric pulled the 4Runner up near the berm and set up some targets so we could try some live fire with the pistol. He put targets out to the 1 o’clock and 10 o’clock and shooters in the driver and front passenger seats had to draw, engage the target on their side of the vehicle with a burst, do a reload in the car, then get out and cover the target. We rotated through and gave everyone a chance to shoot both sides. Then Eric turned the Toyota around and we did the same from the rear seats with targets to the 5 and 7 o’clock.
One thing that cropped up in these drills were the gun and fishing pole racks that Eric had installed on the roof of the Toyota. Eric’s short enough that he doesn’t really have to worry about these but some of us in the class were tall enough that these were real head biters if you weren’t careful.
Another recurring issue was people accidentally locking doors, particularly when they were operating from the front seats. It was easy to hit the door lock when you were leaning out the window then find yourself locked in when it came time to get out of the car.
After lunch we did the same sort of dry drills with long guns rather than pistols. With muzzle up being the favored direction when you’re handling the rifle, Eric’s preferred vehicle carry position is with the buttstock between your feet and the muzzle pointed straight up. The one exception to this is the driver. If the driver has a very short rifle, he can lay it crossways across his lap but this doesn’t work for anything much larger than a machine pistol. For longer weapons (even most AR pistols or folding stock AKs) Eric showed us how to stow it up against the driver’s side door, trapping it there with the left leg. This keeps it accessible if the driver needs to disembark, but out of the way of the pedals and steering wheel.
During dry practice I found the FS2000 very maneuverable in all of the vehicles. The one issue that did crop up a bit was the fact that the FS is rather tall for most of the length of the gun (as opposed to more conventional rifles which are tall in certain areas like mags and pistol grips, but have gaps between them where they are shorter). This created a few issues with shooting over side mirrors and the like.
During a break Eric talked a bit more about gear, including vehicle related uses for Tomahawks (both as rescue tools and for quickly disabling vehicles by popping tires with the spike). He also talked about vehicle med kits, advocating something relatively flat that could be slid beneath a seat or hung from a headrest or coathook and opened up for easy access.
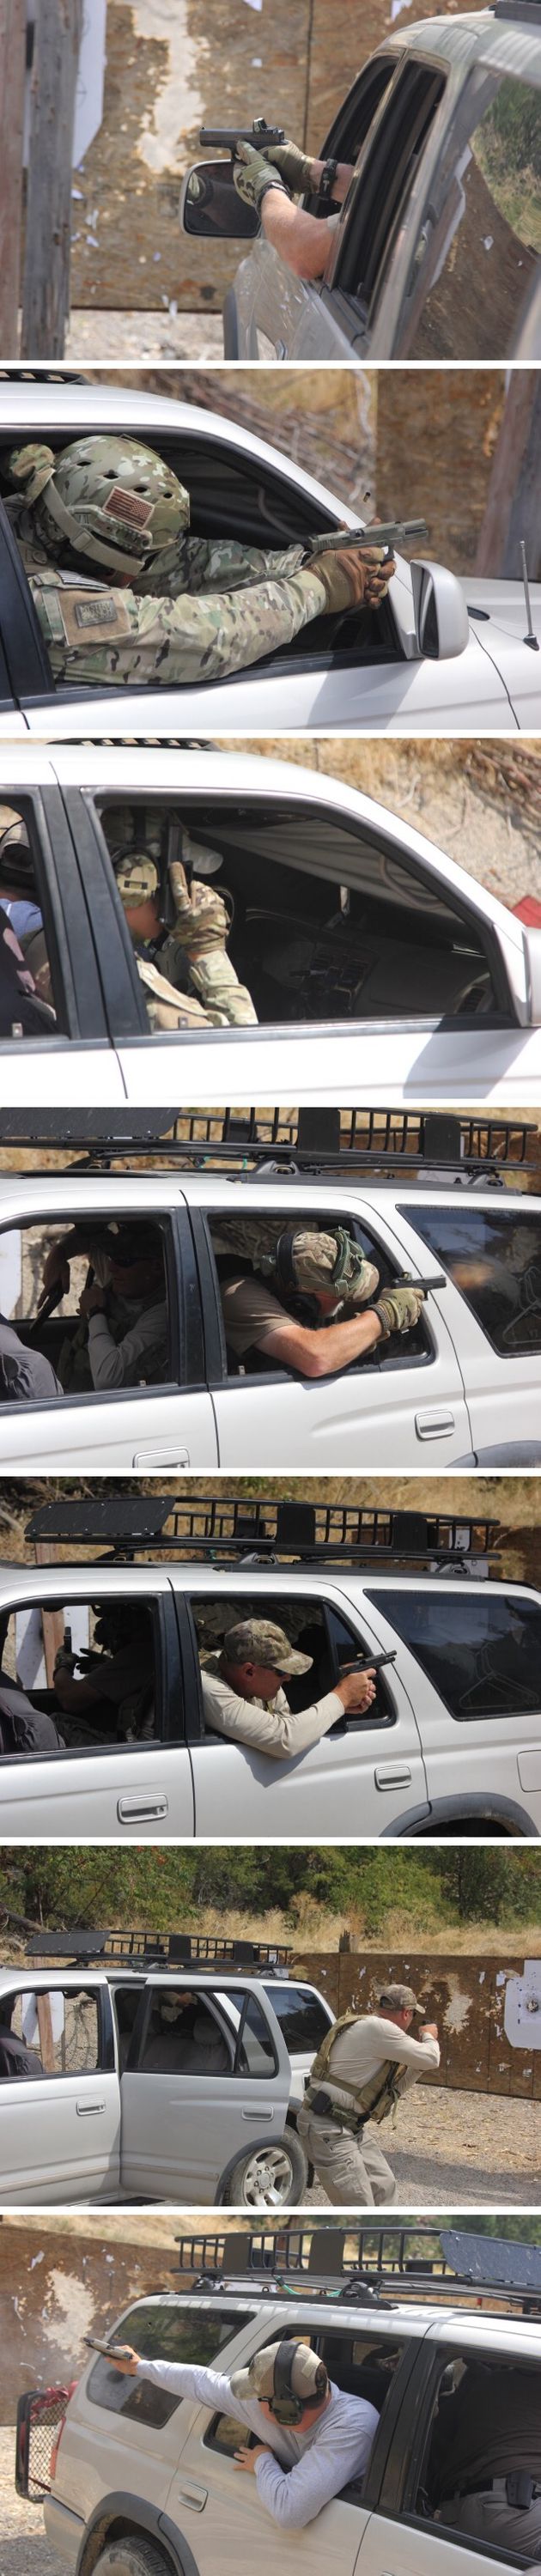
We went live with rifles. Since the driver is supposed to be concentrating on driving rather than shooting (and doesn’t have as much room to manage a full length rifle) Eric set it up with one shooter in the front passenger seat engaging a 1 o’clock target and one in the rear seat on the driver’s side engaging an 11 o’clock target.
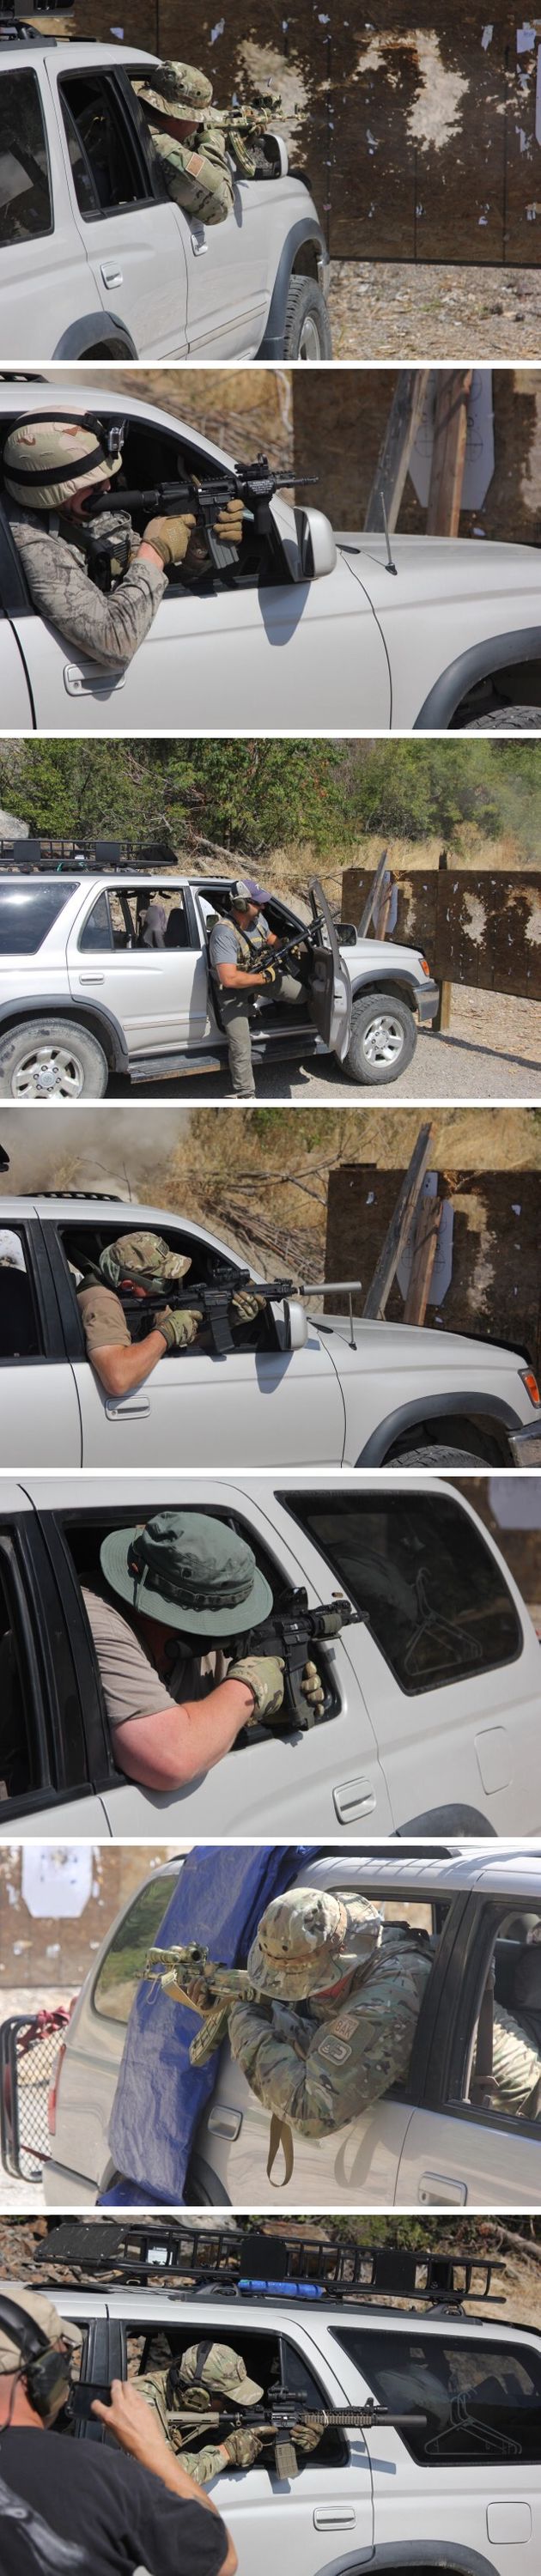
For targets to the rear, Eric only ran one shooter at a time, with targets at both 5 o’clock and 7 o’clock. The shooter started on one side of the rear seat, engaged target on that side, then slid over to the other side and engaged the other target, reloaded, and got out.
Eric talked a bit about different roles in vehicle operations. As mentioned earlier, the driver’s primary job is to drive. Unless the vehicle is disabled, shooting should be left to the other folks in the vehicle. Each vehicle needs a vehicle commander/team leader. Ideally, this person should not be the driver. They need to be able to cover a sector and shoot if necessary, but they’re also there to make decisions and coordinate with other vehicles. They may also serve as the navigator. They’re usually in the front passenger seat.
The other specialized role that Eric spent a bit of time talking about was the heavy gunner. Most of us don’t have access to full auto belt feds, but something like the heavy barreled FAL or G3 pattern rifle with a drum magazine mentioned earlier can provide more firepower than a regular rifleman (albeit at the cost of a less maneuverable weapon). Giving this to one of the guys in a vehicle is a real force multiplier.
Previously we’d talked about seating positions and sectors of fire with just a driver and 1-3 shooters. Eric spent a bit of time talking about how this changes when you throw a protectee into the mix. He also talked about how to get protectees loaded into the car while keeping an eye on the surrounding area for any threats. This has obvious applications to executive protection, but it can also apply to a CCW situation when you’ve got kids or other non-combatants to deal with.
In the CCW-type situation, if you’ve got a driver and a shooter, the driver handles starting the car and loading up while the shooter provides overwatch. If you’re running solo, filling both roles, you’ve got to keep an eye on the surrounding area as you load up kids (using door locks as you load if you have more than one kid to deal with).
Eric talked a bit about verbiage for communicating within vehicles. These can basically be divided into three categories: the driver speaking to others in the vehicle, contact reports given by anyone in the vehicle, and commands from the vehicle commander to the driver or others in the vehicle. Most of the driver’s communication is going to be about what he’s doing or about to do (“under way”, “stopping”) or about the state of the vehicle (“disabled disabled disabled!”).
Contact reports are similar to what you might use in dismounted small unit tactics (“contact front”, “contact left”) but they may be more important and require more detail because others in the car may not have a good view of what you see. In an infantry environment if you start returning fire to the front others can see what you’re doing and what you’re shooting at so they can react appropriately. In a vehicle if you start shooting out the right side of the vehicle, the guy in the driver rear seat may not have any view of what you’re shooting at and he has a lot less situational awareness generally. So something like “contact right, 20 meters, shooters on the rooftop” provides a lot more useful information.
The vehicle commander will be making decisions about when to get out (“dismount”) or get back on (“load up”). Commands from the vehicle commander to the driver are particularly important when in contact (“drive drive drive!” or “reverse reverse reverse!”). This sparked a bit of a digression into whether it’s better to reverse out of a situation or turn the vehicle around. The other very important command for a vehicle commander is a decision to bail out (“bail bail bail!”).
We moved on to getting out of vehicles, first in a non-contact situation. For a short stop, such as a security halt, each shooter gets out of the vehicle and stands or kneels nearby covering a sector similar to what they had inside the vehicle. The driver remains in the vehicle, but can cover a sector out his window while the vehicle is halted (this requires either a pistol or short long gun that he can manage from inside the vehicle). Depending on terrain and the duration of the halt, you may push out further from the vehicle and seek some sort of cover.
This segued into some discussion about changing tires. If you have four guys in the vehicle, it’s probably best to dedicate two to changing the tire and two to providing security. Many vehicles tend to stow their spares in rather inconvenient spots; you don’t want to have to unload a ton of crap from the cargo area to get at the underfloor spare. So in a tactical situation consider having an extra spare (or two, preferably full sized) in a more accessible spot. A better jack is a good investment as well.
Back to debarking vehicles, Eric talked about getting out under fire. This really depends on the direction of fire. The basic principle (assuming four people in the vehicle) is for the two closest to the enemy provide cover fire while the two further away debark and seek a position of cover, then for those two to provide cover while the other pair debarks the vehicle. So for contact front the driver and front passenger initially provide fire while the driver rear and passenger rear get out, then the driver rear and passenger rear provide cover while the driver and get out. Similarly, for contact left the driver and driver rear initially provide cover while the passenger and passenger rear get out. For contact from the left or right you generally want to get out of the vehicle on the side away from the enemy if possible, even if that means climbing across the center console.
One of the subtleties of this is when to close doors and when to leave them open. If another person in the car is going to be using that door to exit after you, don’t shut it in their face. On the other hand, if the open door is going to be in way of the next guy moving around outside of the vehicle, then you probably should shut it.
We ran dry drills out of the various vehicles with threats in all the different directions. It pretty quickly became evident the driver bail out the passenger side of the vehicle in the event of contact left ranged from difficult (in a large truck or SUV) to impossible (in a smaller sedan). Being under actual fire would probably give you some substantial motivation, but even then getting out the passenger side of Eric’s Honda would probably be physically impossible for me.
After everyone had a chance to experience these drills in the different vehicles we packed up and headed out. After a quick stop back at Eric’s we rendezvoused at Quinn’s for some excellent food and great fellowship. A few of us got together back at Eric’s place afterwards and spent the rest of the evening in conversation (aided by some liquid refreshments).
Sunday
Sadly, the Butcher’s Nook is closed on Sunday, so another student and I stopped at Quinn’s on the way to the range for an excellent (if expensive) breakfast.
Before we commenced the festivities, Eric took up an issue several of the guys running AK under folders had ran into the previous day. While the AK will run fine with the stock folded, the underfolder does obstruct access to the safety. Eric pointed out that extended safeties, such as the ones made by Krebs, can ameliorate this problem.
Our first order of the day was to break out a bunch of auto components that Eric had sourced and do some ballistics demonstrations. We started with windshields. Eric had a couple of them so we were able to test a wide variety of ammo.
One thing that quickly became obvious was that rifle rounds are very vulnerable to disruption. Even big rounds like the .308 often yawed substantially by the time they hit a cardboard target behind the windshield. .223 rounds, particularly hollowpoint and soft point bullets, often broke apart. Pistol rounds, on the other hand, tended not to display as much evidence of disruption (though some of this may just be that yawing is less obvious with a stubby little pistol bullet).

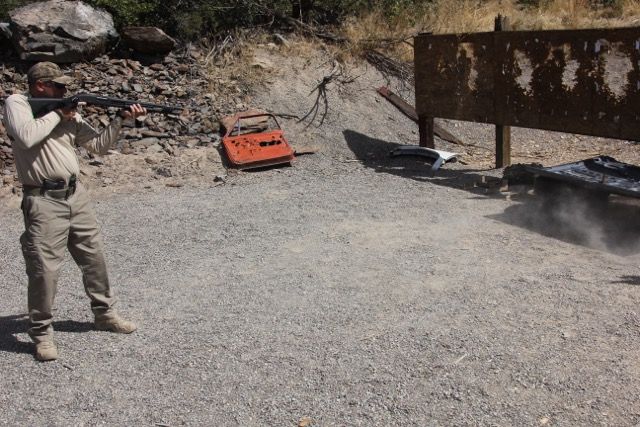
On a similar vein, Eric demonstrated how a few rounds of birdshot could leave a windshield almost impossible to see through as the pellets tear up the glass even though they don’t penetrate or crack the windshield all the way through glass (notably because this affects the outer layer, it works on bulletproof glass as well).
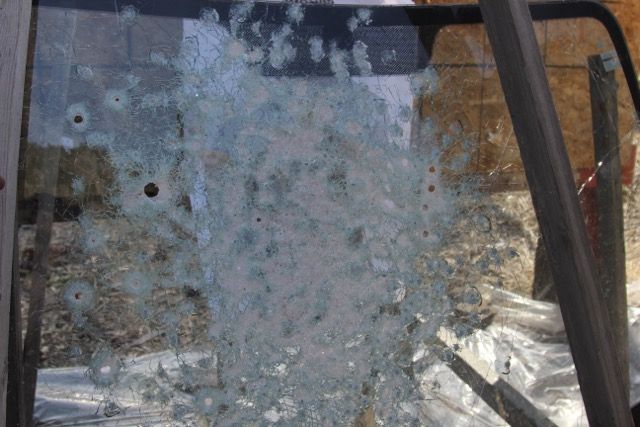
The birdshot pretty much ruined the first windshield for more shooting so we broke out the second one. Eric oriented this at a steeper angle to demonstrate some of the effects that windshields can have on bullet trajectory. First we set it up to simulate shooting into a car and if anything the effects on rifle bullets were even more substantial than in the first test, yawing heavier rounds and breaking up .223 FMJ.
Turning the windshield around we set it up to simulate shooting out of a vehicle at someone at about the front bumper. Eric did a couple of precision pistol shots to show the effect on the trajectory. The deflection can be substantial, about 4-5 inches at these distances, and it is in the opposite direction from what you might think. Windshield glass actually deflects bullets up (when shooting out) so the trajectory gets closer to perpindicular to the glass (think of the bullet biting into the glass). To compensate at these sorts of distances you need to aim a bit low: aim for the mouth to hit him between the eyes.
Of course, all of these effects, yawing, bullets breaking up, changes in trajectory, are going to be most pronounced with the first round to go through he windshield (in a particular spot). As the structural integrity of the windshield breaks down it will have less effect on subsequent rounds. Volume of fire compensates for many problems.
Next Eric dragged out a door from an old pickup truck. This is probably quite a bit more substantially built than most modern car doors, so it represents a bit of a worst case scenario. The results were highly variable, depending on exactly what part of the door you hit and what angle the hit was at. We had pistol rounds blow right through and shotgun slugs fail to penetrate (the crank mechanism for rolling the window up and down was really tough). Rounds hitting the door at an angle might experience significant deflection or even fail to penetrate completely. Buckshot was not very impressive against the door (most was stopped by the interior panel).
Eric also set up a demonstration of skipping buckshot under vehicles (similar to what he did during the shotgun portion of the Total Gunfighter class back in April).
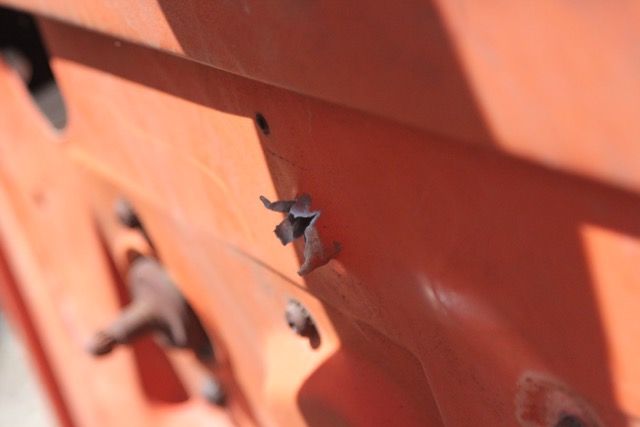
We did some shooting at an aluminum transfer case from a 4-wheel drive vehicle. This was supposed to simulate more substantial parts of a vehicle’s mechanical systems, but the transfer case itself was not very resistant to bullets. Even pistol rounds punched a hole into it and rifle rounds blew right through the other side. The gearing inside was much more substantial however.
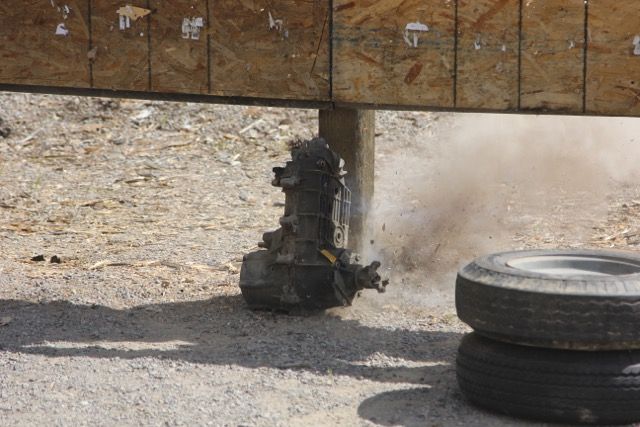
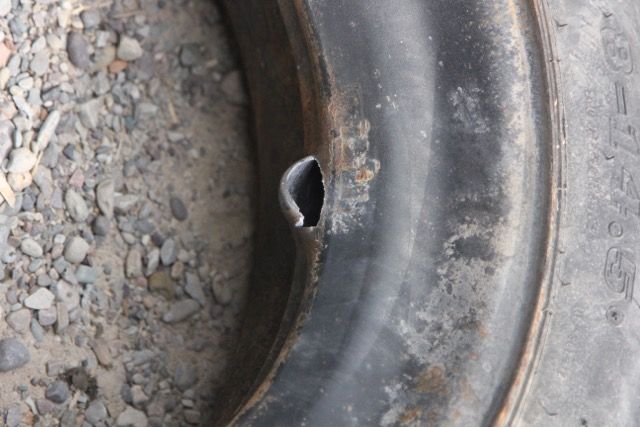
Our last terminal ballistic targets for the day were tires. We found that bullet holes in rubber tires tend to squeeze shut to a much smaller diameter than the round that made them, leading only to very slow air loss. If you want to deflate a tire quickly, the way to do it is to put a round through the rim, which won’t close back up. However, this only works if your round has enough penetration to bust through the rim. Pistols did not get good results here, only rifle rounds and shotgun slugs penetrated.
With that we broke for lunch.
Eric spent a bit of time talking about multiple-vehicle operations. He talked a bit about how to position multiple vehicles during a halt, taking into account facts like where drivers and any protectees are sitting (since they contribute less, or not at all, to outgoing fire).
Next up, and our subject for the remainder of the day, was cross deck rescues. A cross deck rescue is what you do when one vehicle becomes disabled and you have to get the crew out of that vehicle and into an operational one. There are variations depending on how many vehicles you have to work with. We concentrated on the 3-vehicle version both because we had three teams and because that allows a nice clean separation of roles. For simplicity’s sake we concentrated on the scenario where the lead vehicle was disabled.
Essentially one vehicle pulls up a ways behind the disabled vehicle and provides covering fire. The other operational vehicle pulls up next to the disabled one (preferably on the side away from incoming fire). The crew transfers from the disabled vehicle to the rescue vehicle. Depending on the configuration of the rescue vehicle you may be using running boards, hopping into truck beds or cargo areas, or piling guys on top of each other inside the vehicle. Then the rescue vehicle gets out of there, followed by the covering vehicle.
We started out with each team working on their own, practicing each role (disabled, rescue, and covering). Once everyone had a chance to practice through all the roles as individual teams, Eric brought the three teams together and had us run it as one big three-vehicle drill. We ran the drills multiple times to give each team a chance to rotate through the different roles.
After several iterations, Eric talked a bit about “officer down” rescue drills. He laid out how to do this with three rescuers: one to drive one to slowly roll the vehicle up between the injured individual and the threat while two more walk along using the vehicle as cover. One of those then helps the injured individual into the vehicle (or drags them bodily into the vehicle depending on how badly injured they are). Then you reverse out, with one or both of the rescuers providing cover.
After the teams had a chance to play with this a bit we integrated injured crewmembers into the cross deck rescue. In most of the iterations the injured guy said he just had a arm or leg hit, so all he needed was a bit of help into the rescue vehicle, but on one run I did go full bore, grab the guy from behind and dragged him into the back seat of the rescue vehicle.
Finally, we finished off with a cross deck rescue drill where we integrated the i355 radios I’d brought. Frankly, the comms part of the drill was a bit of a cluster. I think we really needed a bit more time to get folks up to speed and practice with them before using them in a drill that we really didn’t have at the end of the day. That aside the rest of the drill ran pretty well. I think the level of smoothness we achieved really showed how dramatically students progressed with these skills during the class.
We did a big debrief not just on that exercise, but on the entire class, discussing what we’d learned and answering any last questions that people had. After that we got all our gear packed up. Some folks had to head out right away, but several were able to stick around for dinner and a nice long evening of fellowship at Eric’s place.
Conclusion
This was a great class. Eric did a really good job of taking everyone from the basic building blocks (undoing your seat belt) up through some very advanced skills like the 3-team cross deck rescue. He’s definitely got a gift for teaching these complex tactical concepts.
If there’s anything I could criticize about this class it’s that it isn’t long enough. There would definitely be room to make this a couple of days longer and do more advanced drills, better integrate stuff like vehicle to vehicle comms, practicing security halts, tire changes, etc. Maybe even get into some rolling convoy work driving around the back roads in Montana.
Most of my gear worked well. As I mentioned earlier, the height of the FS2000, especially with the VFG installed, did cause a few issues with rearview mirrors and the like. The Velocity Systems chest rig worked out well. I was really happy with having the additional pockets for some first aid gear, water, etc., especially considering I was already sacrificing one of the mag pouches to carry my pistol.
Part of this is me being a big guy, but I think everyone in the class ran into issues cramming ourselves into and getting out of vehicles with all our kit on. This was obviously worse with the smaller vehicles (Eric’s little Honda would be a pain to operate out of) but even the bigger vehicles like my Explorer had some issues. Getting my big, booted feet out of the rear doors in a hurry caused some problems. In a lot of ways the ideal vehicle for this, at least in terms of getting in and out, would be a minivan with big sliding doors in the rear. While I doubt I’ll have many chances to bust out of a vehicle in full tactical kit in my everyday life, this class will still cast things in an interesting light next time I go shopping for a new car.
Regardless, every vehicle has its own individual issues, and these interact differently with your gear, body type, etc. The only real way to figure out how well a particular vehicle works for this sort of thing is to try it out and the only way to get good at operating out of a vehicle is to practice a lot.
After the Class
The end of the class was not the end of my adventures in Montana. The next morning after a nice breakfast with Eric and a few of the students at the Butcher’s Nook I headed down to the Anaconda-Pintler Wilderness for a backpack on the Continental Divide Trail.

I had a chance to hook up with Eric and his family again later in my trip. We had a nice dinner at a restaurant in Kalispell (sauerkraut is surprisingly good as a pizza topping).