Gear
In early December I attended the Intermediate CQB class taught by Eric Dorenbush of Green Eye Tactical. I took Eric’s CQB Fundamentals class last spring; that left me eager to come back for the follow-on course.
My primary rifle for this class was my usual 14.5” AR with a Leupold Mark 6 1-6x variable scope. One change from the last class is that I’ve put the optic in a taller 2” mount. This allows a more upright head position and makes certain things easier in CQB, but it does compromise your cheek weld a bit for precision shooting.
I’m running my AAC Mini4 suppressor and a Viking Tactics quick adjust sling. This class has a low-light component, so for those evolutions, I’ve got a Surefire M600 scout light and a BE Meyers MAWL IR Laser/Illuminator.
Unlike the CQB Fundamentals class, which was rifle only, the intermediate class includes handguns. I brought a Glock 17 with RMR. For low light shooting, it’s got a Surefire X300 light on it.
One unique thing about the gear list for Eric’s CQB classes is his requirement for rifle rated body armor. The CQB Fundamentals class requires a rig with front and back plates, while the intermediate class adds on side plates and a ballistically rated helmet. This is not so much for ballistic protection in the class as it is a way for Eric to encourage students to equip themselves with this sort of gear.
As with the previous class, I brought a Velocity Systems Scarab Light plate carrier. It’s got Level III+ front and back plates (which are rated against .223, but not .30 AP) and Level IV side plates. I brought a couple of Tru Spec combat shirts to wear under the plate carrier.
For the helmet, I bought a Crye Airframe. Rather than use the Crye pads, which I didn’t find very comfortable, I kitted it out with a Team Wendy Epic Air helmet liner and their Cam Fit retention system. I wanted helmet mounted hearing protection, so I got a pair of MSA Sordin electronic earmuffs and attached them with the Unity Tactical MARK and SARA adapters. For the low light portion of the class, I mounted a Wilcox shroud for attaching my NVG. To provide a counterbalance to the weight of the night vision cantilevered out in front of my face, I used the Crye helmet cover to provide a place to velcro on the TNVC Mohawk (though I replaced their lead counterweights with extra batteries).
I brought a couple of options for carrying extra mags. The most minimalist option (and the one I used in the CQB Fundamentals class) is just a panel with two mag pouches and a tourniquet holder. If I needed to carry more, I could replace that with a full chest rig that can clip into the plate carrier. However, the setup I most wanted to experiment with was running a belt rig in combination with a slick plate carrier. This takes the weight of your ammo off the shoulders and supports it on the hips. In this case, I had an AWS Light Assaulter Belt, kitted out with Tyr Tactical mag pouches, a dump pouch, trauma kit, tourniquet, knife, multitool, and a dropped and offset holster.
As mentioned this class has a low-light component. For that portion of the festivities, I brought my PVS-14 night vision monocular. To attach it to the helmet I have a Norotos INVG Mount and their dual dovetail adapter.
Finally, Eric encourages students to take video during the class to help them retain the torrent of information that he puts out during the lectures and to be able to go back through what they did during the exercises. I made some upgrades from the previous class here. I’m still using a GoPro Hero 6 as my main camera. During the fundamentals class, I had some issues getting it on when I wanted it on. When it’s in a head mount, it’s hard to check to see if it’s running. In one instance I lost video by turning it off when I’d intended to start recording. Another time I had it in time lapse mode rather than video, so I ended up with a series of still images. GoPro makes a remote control that includes a small LCD that shows the camera status (whether it’s recording, what mode, battery percentage, etc.). I also got a helmet mount for it that attaches to the NVG shroud. The other upgrade I made to my video setup was to replace the old Tachyon Ops picatinny rail mounted camera with a GoPro Hero 5 Session in a Sidekick rail mount.
As you can probably gather, this is a pretty gear intensive class. That’s not even counting stuff like clothes, the cooler full of food, etc. My little SUV was loaded up pretty heavy.
Thursday
I left Wichita after lunch on Friday for the drive down to Weatherford. Driving time is about six hours, but throwing in a couple of pit stops and a WalMart run I pulled into the hotel around 9:30.
Friday
We all rendezvoused at the front gate to the range complex, and Eric led us into the area where the class would be held. The road in was kind of muddy and slippery in places, but I made it in even in my little 2WD SUV.
This was a new part of the range that I hadn’t shot at during previous classes with Eric. It’s a small bowl-shaped valley that provides a 360-degree backstop. While we had to designate a non-shootable angle where the vehicles were parked (and where the folks not participating in an exercise could stand) we would still have well over 270 degrees of shooting.
Eric handed out the waivers and had all the students introduce themselves. Probably about a third of the class were people I’d trained with before. Everyone had trained with Eric before (that’s a hard and fast requirement for this course). There was a wide variety of backgrounds, some law enforcement, some former military, but the majority of the class were armed citizens.
Before getting started on the safety brief, Eric talked a bit about his training philosophy, focusing on the core tasks associated with CQB. His strong focus on the fundamentals is one of the reasons I like the way he teaches.
He went through the four rules of gun safety. Eric has a slightly different take on some of these, and the reasons for those differences are on full display in this class. For instance, his interpretation of Rule #2 (commonly described as “Don’t let the muzzle cover anything you’re not willing to destroy”) emphasizes that you don’t unnecessarily point your rifle at your teammates.
Two elements to this would make those who follow a very strict interpretation of this rule nervous. First, people other than your teammates will get guns intentionally pointed at them a lot. (In this class, those people will be represented by paper targets, but as Eric would later emphasize in a different context, we should think of every target as a living, breathing person). Eric teaches doing target discrimination through the sights. You are pointed in at the target before you’ve decided whether or not they’re a threat that needs to be shot. Unless you only ever encounter shootable threats, that means some people who you don’t intend to shoot will get a gun pointed at them.
Second, even your teammates may get muzzled when it’s necessary. That doesn’t mean you stack up with your rifle pointed right at the guy in front of you, but it means the second guy in the stack may raise his rifle as the first guy is clearing the door, covering the first guy’s trailing leg. Or when deliberately taking a four-way intersection, the rear guy may sweep the front guys’ arms as he brings his rifle up to cover down the hallway. This is not a license to muzzle sweep the hell out of your teammates. The key is to do so as little as possible and only when necessary to accomplish the task. In a combat environment, it would be far more dangerous not to cover the hall than to briefly sweep your teammates.
Part of the reason Eric is willing to accept this risk is that he mitigates it by insisting on absolute discipline with the trigger finger and mechanical safety. You must keep the trigger finger straight and angled upward and keep the manual safety on until three conditions are met: You have identified a threat, made the decision to engage that threat, and your weapon is pointed at the target. Only then can you disengage the safety and move your finger to the trigger. This is not an impediment to speedily shooting someone. The mental process of discriminating the target and making the decision to shoot takes far longer than it does to disengage the manual safety.
Once you’ve finished shooting the target, your trigger finger comes off the trigger. The safety can remain off while you continue to scan for additional threats, relying just on trigger discipline. However, once you’ve finished clearing and reclearing your sector, before that rifle drops even one millimeter, the safety goes back on. No exceptions. Eric has found that if you allow folks to slack even a little on this, it doesn’t take long before their rifle is all the way down before they engage the safety.
Moving on to administrative gunhandling, Eric generally asks students to clear and flag rifles between drills or exercises, particularly when we’re going to be coming out of the house or off the line. When you have your rifle slung, and your firing hand is not otherwise occupied, keep it on the pistol grip with a thumb on the safety lever to confirm it’s position. Pistols can remain loaded between drills, but they must stay in the holster. The only acceptable locations for a pistol are in the holster, held in a ready position, or pointed in at a target.
Eric also mentioned the possibility of squib loads, when the primer of a round goes off, but the main powder charge does not. The primer can have just enough power to dislodge the bullet from the case and drive it into the barrel. When you try to fire a subsequent round, this obstruction can cause catastrophic damage to the gun (and the operator).
He emphasized that everyone in the class was a safety officer. Anyone can call cease fire, stop, or freeze if we see an unsafe condition. If you hear any of these, or a sustained whistle blast or air horn, freeze. Don’t take a step, don’t lower your rifle, don’t do anything except straightening your trigger finger. The call may have been made to keep you from entering someone else’s line of fire or otherwise exposing yourself (or someone else) to an unsafe condition.
Eric talked about the medical plan if someone got injured. When he asked who had trauma medicine training, more than half the class raised their hands. We had two doctors in the course, so they would be the primary medical responders for anyone who got injured.
This class would include some long days, and Eric stressed the need to stay hydrated and fed.
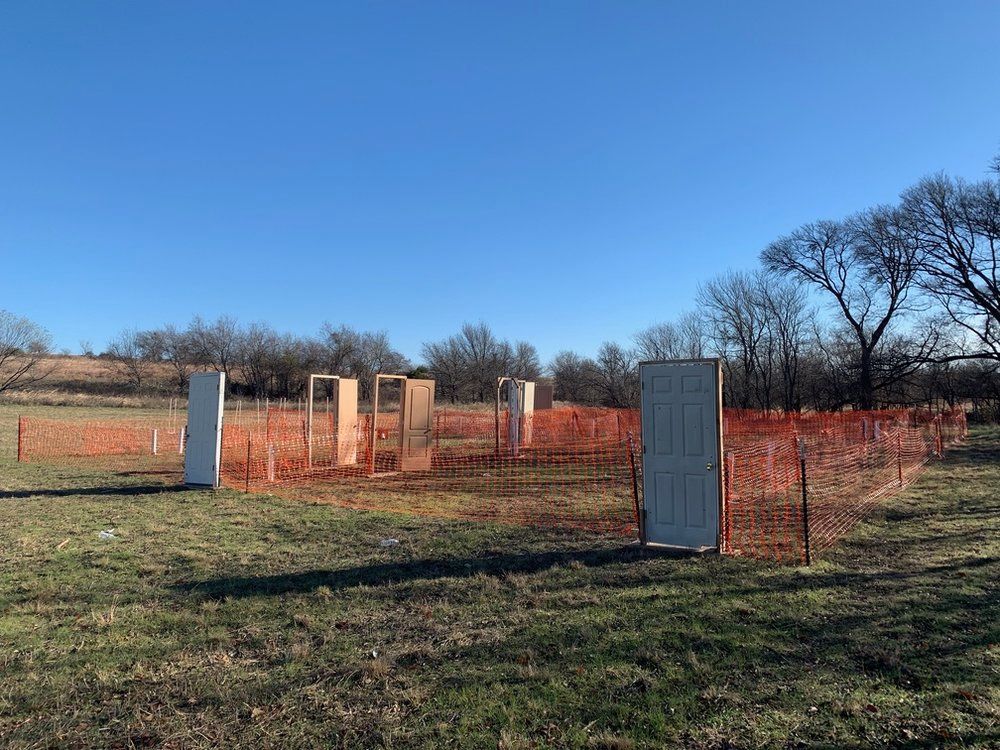
The “shoot house” for this class is a floor plan made up of orange construction fencing and doorframes with doors in them. This allows unobstructed visibility into the house for safety purposes. Obviously, the plastic mesh fencing isn’t going to stop any bullets, so we stepped out to the shoot house, and Eric pointed out the range fan (delineating the directions you can shoot).
Finally, Eric finished off the safety brief with a demonstration of how to clear a rifle. We would be clearing and flagging rifles between drills and he’s got a particular procedure he likes to use. Unlike some clearing methods, it’s designed to be equally usable during the daytime and at night (gunhandling that carries over to low light is something that Eric is big on in general).
With that, we uncased and cleared our rifles and Eric came by and checked out everyone’s kit.
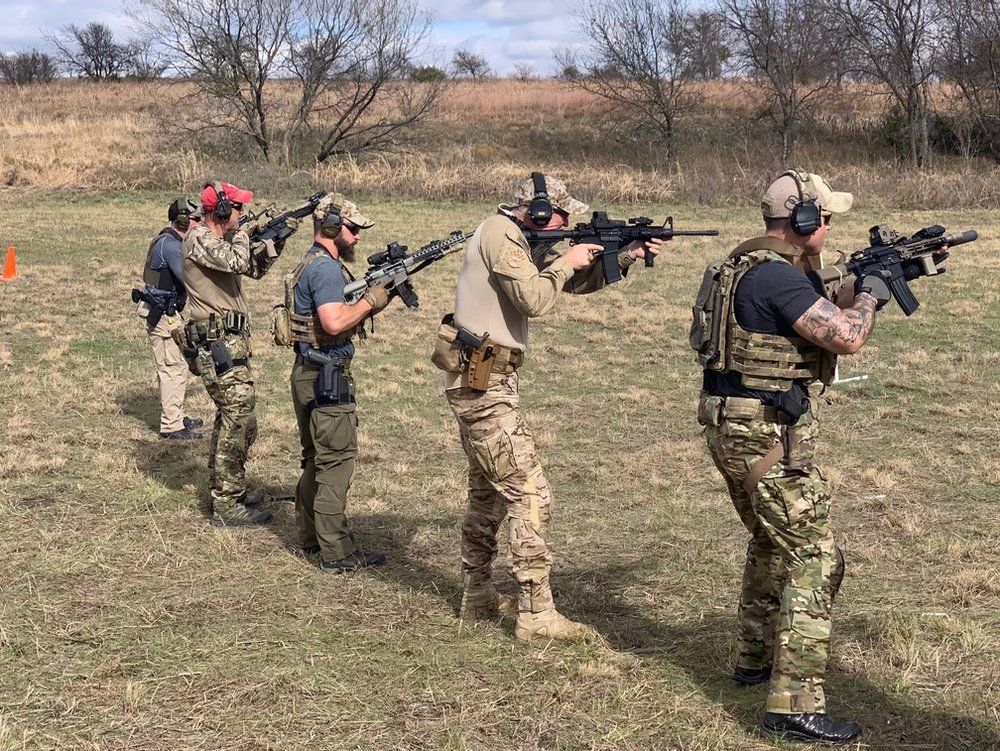
To start the shooting portion of the class, Eric opened it up for the students to do flat range drills for whatever skills we thought we needed to work on. This portion of the class is very student driven; it’s on us to decide what we want to work on and set up the range to work those skills. After a bit of discussion, we quickly gravitated to doing some square range shooting to check zeroes and CQB holdover and doing some lateral movement drills.
We set up a line of targets for checking zeros and holdover. A few students needed to make some adjustment to get their rifles on target, but for most of us, this was a matter of reminding ourselves how much we needed to hold over to put rounds at the exact spot on target where we need them. The rifles that everyone is using in this class have sights several inches above the barrel, so at close ranges we need to compensate for that. Eric’s preferred method to train for this is to hold your sight on a marked aiming point on the target and fire a group. Take a look at how far below your aiming point that group is, then lift your sights to compensate for that offset and shoot another group which should hopefully be right on the mark, rather than below it. This was particularly useful for me because this is the first class I’m taking with the taller optic mount, so I need to hold over a bit more than I’m used to.
For the lateral movement drills, we set things up much the same way Eric does in the Close Quarters Marksmanship class (and the compressed version of that material in the CQB Fundamentals class): a line of targets going across the range, with some cones to channel students shooting the drill. You start by moving directly downrange, but upon reaching a line of cones you start walking right to left (or left to right) down the line of targets, engaging each one as you pass. The key is to keep your toes pointed in the direction of movement while shooting the targets off to your right (or left) side. This requires a fair amount of flexibility and getting your shoulders pointed at the targets requires bending at the waist, hips, and knees. It’s particularly challenging for a right-handed shooter moving to the left since you can’t “cheat” and angle the rifle across your body the way you can moving to the right (vice versa for a left-handed shooter, of course).
One of the new elements that Intermediate CQB introduces is transitioning to pistol in the even your rifle malfunctions or runs dry. Eric doesn’t allow pistols in the CQB Fundamentals course, in part because they are much easier to inadvertently point in the wrong direction than a rifle is. He talked through how he does a pistol transition and demonstrated the technique, then had everyone do the drill a few times. To train these, Eric has students load one round in the chamber of their rifle, then insert an empty magazine. On command, the student fires the round in the chamber, attempts to fire a second shot with the rifle, then drops the rifle and draws and shoots with the pistol. This ensures that the rifle is, in fact, empty when you drop it, so there’s no chance of it catching on some piece of gear and unintentionally discharging. After shooting with the pistol, Eric had us carry on with the drill by holstering, fixing the rifle, and firing another pair of shots with it. This emphasizes that the goal here isn’t just to get to your pistol, it’s to get the rifle back up and running. We didn’t spend a ton of time working this; it was more of a safety gate to make sure everyone could safely perform the transition and draw their pistols.
At this point, we took a break for lunch.
After lunch, we moved over to the shoot house and began reviewing some of the material from the CQB Fundamentals course. We started with the fundamental building block from that course: clearing a center fed room (one that has the door in the middle of one wall, rather than near the corner of the room). Along with reviewing how to clear a room, Eric also gave some insight into how he places targets to reinforce particular lessons. For instance, targets in the hard corners of the room (the ones to either side of the door) help ensure that the first two guys in the stack go right to those corners, rather than getting distracted by the rest of the room. I found this pretty interesting (maybe it’s the fact that I’m still an instructor at heart).
One of the big points of emphasis in the CQB Fundamentals course that carried over into this class was on slowing down. The limiting factor in a CQB environment isn’t how fast you can move; it’s how fast you can process the environment, make decisions, and discriminate targets. For those of us just learning this stuff, that’s not very fast.
Eric also reviewed pre-assault procedures. The team gathers at the Last Covered and Concealed Position (LCC), where they can conduct final gear checks (and for range safety purposes in the training environment, load rifles). Once they’re ready, the team leader reports this to command (in this case represented by Eric). When instructed, the team moves to the breach point and reports that they’re ready to breach. Command does a short countdown, which would allow coordination between multiple teams, snipers, and other elements, ending with a coordinated breach.
A significant difference between the shoot house we used in this class and the one from CQB Fundamentals is that the Fundamentals shoot house is just four rooms, with one room leading into another. This shoot house is built along a long central hallway, with six rooms and two side hallways leading off of it.
The other new element that the hallway introduced was the distinction between “push and go” doors and “pull and hold” doors. A push and go door opens inward; it’s easy for the lead man to open the door and enter. A pull and hold door opens outward. Not only does this rob you of some momentum, it can also cause the lead man to get hung up on the door. (Things get even more complicated when you introduce self-closing doors). A better way to handle this is for one team member to open the door, hold it while the other team members enter, then the door holder enters as the last guy. Eric talked about a couple of ways to stack up outside the door to facilitate this.
With this extensive review out of the way, we loaded up and did some very simple single room clearances live fire. There were twelve students in the class, which divided nicely into three 4-man teams. We worked both center fed rooms and corner fed rooms.
These clearances went fairly smoothly, so we moved back a step and practiced entering from outside the shoot house into the central corridor, and from there into the adjoining rooms. Eric talked about techniques for moving down the hall as a team and how to move smoothly from hallway movement to stacking up on a door.
When you get down to it, this class doesn’t introduce a whole lot of elements beyond the basic room clearing covered in CQB Fundamentals. The only additions are hallways, corners, and intersections (plus a few minor things like pull and hold doors). However, just these few elements can add a lot of complexity because they add options. In CQB Fundamentals there’s really only one sensible next thing you can do at a time: stack up on the door of the first room, enter the first room, clear the first room, do your post-assault procedures in the first room, stack up on the doorway of the second room, enter the second room, etc. As soon as you introduce a hallway with multiple doors, suddenly you’ve got to start making decisions about what to do next. Door on the right or door on the left? Bypass this closed door to take an open one further down the hall or take the closed door?
For a team of guys to deal effectively with these options, they need to communicate. This can be broken down into two distinct elements: calling out information to get everyone in the team on the same page and communicating a decision about what the team is going to do. Team members need to call out what they see, especially when there are team members who aren’t in a position to see these things. This could be because those team members are in the back of a stack or because they’re otherwise occupied (checking the guys you just shot, for instance).
When there are multiple possible courses of action available, someone needs to decide which one the team is going to take. Decisions may be made by the team leader or the #1 guy in the stack, depending on the situation. The one thing it can’t be is made by committee. Once the decision is made, it has to be communicated to the rest of the team.
This whole process can be very quick. It may be as simple as the #1 guy saying, “Closed door right, closed door left, going right.” What he sees, followed by what the team is going to do. Easy enough in isolation. However, when you’re trying to layer it on top of all the other stuff you’re trying to do in a stressful environment it can very quickly end up sucking up all of your available mental bandwidth. Throughout the class, communicating effectively was a struggle.
We did some dry runs, then geared up and went live, clearing the front four rooms of the shoot house. A couple of runs at this took us through the end of the day. The last team through got a jump on the night iterations; it was dark enough they used their weapon lights during target discrimination.
After debriefing what we’d done, we took a break to eat dinner and let it get dark enough to do our night exercises.
Eric talked a bit about how to do CQB at night. He emphasized the need for commonality between the way you do things in low light and the way you do them during the day. We tend to practice and train much more during the day than we do at night, so anytime you have a special nighttime procedure or technique, you aren’t going to practice it nearly as much as your daytime technique. Much better to have a daytime technique that also works in low light.
When running white light, it’s pretty simple. If you can’t see, use the light.
Eric also went through a compressed version of the lecture he does in the Night Vision Operator class. He’s a real fan of using your NVG to look through your red dot optic as your primary aiming method rather than using an IR laser (not really an option with a magnified optic like mine, so I’ve got to use the laser). Since there was some interest from the folks in the class who did not have NVG yet, he talked some about what to get and what to look for when buying night vision optics.
As far as gear setup goes, the one thing that Eric really emphasizes is that you need to be able to run your white light (and IR laser/illuminator) without compromising your normal grip on the rifle.
During dinner and the lecture, we’d watched thunderstorms roll by to the northeast. It was quite the light show. As we got geared up, we started to get a few drops of rain, so many of us thew on ran gear before donning our armor.
We started out over on the flat range where everyone tried out shooting using their weapon lights. Those of us with NVG (about half the class) were able to have a go using our night vision gear as well.
Moving over to the shoot house, each team did a dry run through the same four-room clear that we’d just finished doing during daylight, using our weapon lights for illumination. This all went pretty smoothly, so we went live clearing the same four rooms.
About the time we went live, the rain went from a few random sprinkles to fairly steady. During some of the other team’s runs, it shifted to a complete downpour (since my team wasn’t shooting, we retreated under the tailgate of an SUV). By the time we came back out to do some more shooting, it had slackened considerably.
Finally, the six of us with night vision did it as one big team under NVG. I found that my NVG had fogged up considerably during the rain, so I had to get those cleared off to see well enough to run the drill.
While we hadn’t done any multi-team exercises in the class so far, the six of us fell fairly naturally into operating as two 3-man elements, clearing rooms on either side of the hallway simultaneously. When we cleared the fourth room, Eric had us do a free flow backclear back to the breach point. This was something we’d done in CQB Fundamentals but hadn’t yet done in this class. Nevertheless, everyone remembered what to do well enough to do it pretty smoothly, even under NVG.
During the night evolutions, the higher mental load meant we saw mistakes that people probably wouldn’t have made during a daytime iteration. Lots of folks (including me) either didn’t move far enough into the room to reach our point of domination or moved beyond our point of domination putting us in the wrong spot. There were also a lot of missed calls, particularly “last man” calls to let people know that the team was leaving a room or a position (if anything these are more important at night, especially under NVG where your situational awareness is more limited).
By the time we got done with the NVG run it was close to 10 pm, so we called it a night. We agreed to reconvene at 10 am the following day, starting a bit later because of the late night. Little did we know it was about to get even later.
The recent downpour had made slippery spots in the road even worse and turned areas that had been pretty solid kind of slippery. On the way out one of the guys slowed down enough to force the guy behind him to stop. He had four-wheel drive, so he was able to get going again, but the next guy in line had a two wheel drive pickup, followed by me in my little front wheel drive SUV. Neither of us was able to get moving again. We were just spinning our wheels in the mud.
A couple of guys gave me a push, and I was able to get out of the ruts and over onto some grass where I had at least half decent traction. At that point, I figured the best thing I could do for everyone was to was to get from the little dirt track to the main, nicely graded gravel road without getting stuck again and needing another push. I tried to keep on the mowed grass on either side of the dirt track as much as possible and didn’t stop till I got to the gravel. I waited there to make sure everyone else got out, which took quite a while (in addition to the pickup that had been ahead of me, they had to push some of the folks behind me out as well).
We held up until Eric made it out as well, then headed back into town. I grabbed a burger as a late second dinner. By the time I got back to my hotel and racked out it was almost midnight.
Saturday
After the late night last night, I slept in a bit on Saturday morning. I hit Walmart for some food and headed down to the range. The road in had dried out some from the previous night, but it was still kind of sloppy. I kept to the grass as much as I could and made sure not to slow down too much in the muddiest parts. I was able to make it in OK.
When everybody had rolled in, Eric briefly summarized the day’s agenda. We’d be learning about corners, T-intersections, and four-way intersections and incorporating those into our clearing drills.
He asked everyone for two individual tasks and one team task they thought we needed to work on. Lots of people brought up communication-related issues: calling out what you see, making decisions, and generally coordinating actions among team members. There were also quite a few folks who mentioned remembering to hit their proper points of domination when clearing, which was something that had popped up multiple times in the low light exercises the previous night.
Much like on the first day, Eric gave us the opportunity to start off with some student-driven work. In this case, all of us chose to do dry work in the house, working flow drills as 4-man teams. During these drills, we worked hard on proper communication and coordinating actions among the team members.
One thing Eric pointed out is that while there were times where we weren’t communicating enough (missing calls, failing to call what we see, etc.), there were other times where we were communicating too much. You don’t really want to have an extended discussion in order to have a meeting of the minds.
One of the fundamental principles in CQB is “Find work.” It’s probably #3 in importance after, “The #1 man is never wrong,” and, “Go the opposite direction of the man in front of you.” If you’re not doing anything at a particular moment, look around and see what work is available. Provide security, cover a door, if the door’s already being covered, stack up on the guy covering so that you’re ready to go. Don’t wait to be told what to do, just see what needs to be done and do it.
The corollary to this is that there shouldn’t be a bunch of discussion about what particular team members should do. They should take the initiative and find that work themselves.
One place where this approach can create a problem is when you see a job, but you think it makes sense for someone else to be doing that job. For instance, Eric mentioned that after you clear a room it often makes the most sense for the team leader to be the one covering the guy who’s searching the targets you just shot because that role provides the most situational awareness of what the whole team is doing. However, the team leader shouldn’t be micromanaging his team saying, “you search the bodies, you cover the door, you stack up on him.” Rather, the way this is supposed to unfold is that one guy takes the initiative and finds work doing the searching, a second guy then finds work covering him, a third guy finds work covering the door, and a fourth guy finds work stacking up behind him.
To solve this problem, Eric talked about the “pregnant pause.” The team leader can hold up for a moment letting another team member find work by taking up the role of the searcher. Then the team leader jumps in immediately to take the covering role. He lets the other two team members find work covering the door and stacking up. Essentially, by not jumping right on a role you’re implicitly delegating that role to someone else. The key is that this delay is only momentary. If you see work an no one else jumps on it in short order, it’s better to go ahead and take that job yourself rather than standing around waiting.
While the example above uses a team leader, other guys can use this technique as well. For instance when you come to a pull and hold door, after calling it the lead guy can hold up on the near side, implicitly inviting the guys behind him to move to the other side to provide cover down the hallway and stack up on the other side of the door.
Moving on to live fire, Eric had us do some single man entries, entering rooms as the #1 man without any #2, #3, or #4 behind us. He set up three targets, one in the hard corner, and two further into the room. The goal was to shoot the target in the corner and get rounds on the next target before you get to your corner. This required both getting rounds on the first target quickly and moderating your speed so that you’re not all the way to the corner by the time you finish engaging that first target.
Eric ran everyone through these drills in both center fed, and corner fed rooms, then we broke for lunch.
After lunch, we covered L-intersections, T-intersections, and four-way intersections. L-intersections (basically a 90-degree bend in a hallway) are the simplest case, so Eric started with those. He divides techniques for taking a corner like this into taking it deliberately and taking it dynamically.
We started with deliberate clearance. Eric showed how to get two guns pointed down the hall at almost the same moment by having one guy kneeling down and another guy standing behind him. He emphasized the need for the standing guy to get far enough forward that his rifle was directly above the kneeling guy’s head, not behind it. This way if the kneeling guy were to stand up unexpectedly, he would whack his head on the standing guy’s rifle, rather than taking a bullet to the back of the head (the possibility of getting whacked on the head with a rifle and the muzzle blast from having a gun go off directly above your head are part of the reason Eric requires helmets in this course).
One thing Eric emphasized is that the guy who’s kneeling can’t just decide to stand up. He needs to stay kneeling until someone “picks him up” by giving him an upward tug on his kit. Anytime you wind up in a lower position, whether it’s because you take a knee or slip and fall, standing up carries with it the danger of putting yourself into someone else’s line of fire. Stay down until you get picked up.
Taking a corner dynamically is much simpler. You basically just come sweeping around the corner. The only moderately tricky bit is adjusting your speeds so that the inside guy and the outside guy stay in sync.
We moved on to T-intersections. When you’re coming across the top of the “T”, a T-intersection is very much like an L-intersection. The only additional element is the need to cover any potential threats down the hallway as you handle the corner.
Coming up the stem of the “T” is rather more complicated. Here, you effectively have two L-shape intersections back to back. This creates problems of space and coordination. If the hallway is wide enough (like the hallways you find in many public buildings), you can treat it like two L-intersections, with one guy kneeling and one guy standing on either side. The coordination problem crops up because you need to get both sets of guys popping out at the same time.
In narrower hallways, typical of residential construction, you may not have room to have two guys on either side. In this case, coordination is actually easier, because one guy will be signaling both kneeling guys to pop out, then picking a side and becoming the high guy in that direction. In even narrower hallways, there may not be room for a guy to squeeze in between the two kneelers at all.
A four-way intersection is a lot like coming up the stem of the “T” at a T-intersection, with the added complication that you have to be worried about possible threats coming from down the hallway to your front.
As we were working all of these dry and live we did run into some issues. In one case we had the standing guy suffer a malfunction just as the kneeling guy ran his rifle dry. A reminder to transition to pistol was required.
At a four-way intersection, I was one of the guys kneeling down, and I got bumped and toppled into the intersection. Eric had mentioned that bending your primary side knee too much could leave you without much margin to recover if you get bumped and this was a good illustration of that. It also illustrated what can happen if you try to stuff four guys into a hallway that’s not quite wide enough for that.
After working intersections in isolation, we incorporated them into a larger exercise, clearing from the front door of the house, down a long hallway to a T-intersection, then clearing a room beyond it.
During these exercises, one of the muffs on the MSA Sordins I had attached to my helmet came loose. When we had a break, I took it apart to try to get it reattached, but I found I’d need a very small Torx bit to get the circuit board out of the way in order to do so. Since I didn’t have one, I ended up pulling the Sordins off the helmet entirely and finishing out the day with a pair of Peltors that I’d brought as a backup.
As the sun dipped below the horizon, we took a break for dinner.
Our low light work the previous night had focused on the fundamentals: from basic shooting under white light and NVG to clearing rooms. Tonight we’d be putting it all together in a larger exercise. We’d move from the far end of the parking area to the LCC via a somewhat circuitous route (getting in a bit of practice moving at night on the way), approaching the shoot house, and clearing the building.
Again, Eric divided folks up into a white light team and an NVG team. Because of the length of the exercise, each team would only get one run. The white light team went first, so the NVG crew just hung out while they were doing their run.
While Eric briefed everyone on the basic structure of the exercise beforehand, he updated with additional elements over the radio as the team was moving to the LCC and from the LCC to the breach point. As part of this, he’d previously asked another student and I (both with suppressors on our rifles) to each simultaneously put a round into the berm to simulate a sniper shot taken as the white light team was moving up to the shoot house.
Interestingly, the other guy with a can on his rifle had a failure to fire when doing this (one of the reasons you might want to have two snipers on a target in real life). At the debrief afterward, he explained that he’d done a press check after loading his rifle and didn’t get the bolt all the way back into battery. Shows how important it is to make sure you get that bolt seated and to know what a seated bolt feels like (and then feel for it) so you can be sure that you’re in battery even in low light.
Once the white light crew was done with their shooting, Eric had those of us running NVGs step off for the trip to the LCC. We had a bit of difficulty finding a good place to cross the small creek that ran along the range. Once we got across we followed the treeline back up past the shoot house to a place where a dirt road crossed the creek that served as our LCC (for once the LCC was actually covered and concealed from the shoot house). While we were moving up, we got updates on the scenario over the radio, including a hostage we were supposed to rescue (represented by a police officer target) and the possible presence of explosives.
Eric did a simulated sniper shot, similar to what he’d done with the white light crew. This time, however, he simulated a missed sniper shot, calling the miss over the radio and placing a target outside the shoot house for us to engage before entering.
The room clearing still had some issues but went more smoothly than the previous night. We ran into some trouble at the T-intersection. In low light coordinating so that the guys facing either direction pop out at the same time was a lot more difficult than during daylight. The other issue was that one of the guys kneeling and leaning out had chosen to switch shoulders (so he would expose less of himself out beyond the corner) without considering that he was running a monocular night vision setup and wasn’t equipped to shoot from the support side shoulder.
These issues aside, we were able to clear most of the shoot house reasonably effectively. When we got to the last room, which contained the hostage we were supposed to be rescuing things fell apart a bit. It also contained a target with a suicide vest. The #1 guy in that room called out the presence of an improvised explosive device (IED), but he initially used the wrong codeword, which confused things for a bit. Eventually, we got the IED call sorted, and everyone booked it out of the building. However, nobody grabbed the target representing the hostage we were supposed to be rescuing, so not exactly the strongest finish.
Both the white light and NVG teams congregated for the debrief where we talked through some of these issues. With that, we broke for the evening and headed home (about an hour earlier than the previous night). Everyone made it out without getting stuck this time. I grabbed a late dinner and headed back to the hotel for a somewhat longer night’s sleep.
Sunday
Before class on Sunday, I stopped at Home Depot and picked up a small Torx screwdriver so that I could fix the MSA Sordins on my helmet. With that, I was able to pop the circuit board out and get access to the mount that had come loose.
Out at the range, Eric started out by reviewing some of the CQB Procedures in the 3-ring binder full of written material he hands out at his classes. I’ve had a copy of this ever since the Night Vision Operator class I took back in 2017. Now that I’ve gone through CQB Fundamentals and Intermediate CQB I feel like I understand enough of the context to really grasp this material and reviewing it like that did a nice job clarifying certain details.
In addition to going over the written material, we also got onto some other topics, like permissive vs. non-permissive environments and the proper employment of flash-bang grenades.
One of the reasons Eric went through this stuff is to prepare us for free-flow CQB. Free flow is really the ultimate expression of the principle of “finding work.” Rather than just finding work within your own team, you find work within the assault force as a whole. If you have four guys stacked on a door, go. It doesn’t matter if they’re from the same team. This helps eliminate pauses and dead time and creates a faster pace.
Many of us had been exposed to this in the CQB Fundamentals class (though Eric has said he doesn’t always get to free flow in that class). After a break for lunch, we kitted up and did a dry run through of the house in free flow. Those who hadn’t been exposed previously picked up the concept pretty quick.
We went live. This time rather than having everyone come up in one big conga line, Eric had the three teams move to the house from separate LCCs. We still all entered through one breach point (it’s very hard to set up a non-ballistically rated shoot house for a multi-point breach), but the rendezvous at the door was still pretty slick.
On this drill, I found myself all by my lonesome out in the hall at one point. We had cleared the first room, two of my team members were checking the targets, and I moved out into the hall to find work, only to find nobody there. After a bit of indecision, I ended up tucking into a room until there were other guys ready to move on to the next room.
Talking to Eric afterward it was clear I had gotten a bit too “free” with my free flow. I should have either waited for a squeeze from the guy behind me or made sure there was a team out in the hall I could join up with.
This became the pattern for the rest of the day: multiple teams converging on the breach point followed by free flow CQB. However, Eric still had plenty of curves to throw at us.
He started putting a radio blasting music at high volume into one of the rooms. This wasn’t so much intended as a distraction as it was a tool to get students to increase the volume of their verbal communication. Combat gets loud, and if you want to be heard, you have to use your command voice.
On another drill, he simulated a comms failure on the countdown. If that happens, you’re supposed to keep counting in your head and go at the appropriate time. We handled it so smoothly Eric didn’t even bring it up in the debrief after the drill.
Eric also threw in a simulated casualty on one of the drills, which we handled a lot less smoothly. There was quite a bit of faffing about, both in terms of getting the casualty treated and moved, and in what the other teams should be doing to provide security. To get us moving Eric had to put some pressure on us by reporting a large enemy force closing on our position.
I think at least part of this confusion was because while we had individual team leaders, we didn’t have anyone in the assault force in overall charge of the operation. Having an on-scene chain of command would have made clear who was supposed to be making decisions in situations like this.
One thing that came up several times in drills on Sunday was people interpreting accidental contact as a squeeze or a pull-up, leading them to go or stand up when that’s not what was intended. It’s crucial to make it squeezes and pulls distinctive. Squeezes seem to work better when they’re done on the outside of someone’s shoulder rather than squeezing the shoulder strap of their plate carrier. Conversely pulling up on the plate carrier is an excellent way to signal someone to get up.
On the last drill of the class, I missed a target visible through an open door when I was posted up at a 4-way intersection. This was a clear example of the tendency to look at openings like doors and windows and see the opening, rather than what’s visible beyond it.
During this last drill, one student had a squib load in his rifle. Thankfully, he realized that it had felt different and didn’t try to fix the malfunction and fire the rifle again. After the drill, he cleared it and had to tap the bullet out with a rod.
Eric handed out the certificates, and we did a debrief of the class. I got my stuff packed up and headed out.
As usual for Eric’s classes, for Sunday night I got a hotel room north of Dallas, so I wouldn’t have to deal with the Monday morning traffic on my way home.
Conclusions
As usual with Eric, this was a great class. While it only introduces a few new physical elements, like hallways, corners, and intersections, it really layers on the teamwork and communication in much more depth than the CQB Fundamentals. By the end of this class, it felt like everyone had a grasp of how to function as a team in the CQB environment.
While I may never hit a building with a team of guys, I think the team-based aspect has benefits for individual CQB skills as well. For one thing, it forces you to have your individual skills very solidly ingrained. If you don’t, you’ll never have the mental bandwidth necessary for communication and teamwork. Doing this with a team, especially live fire, also pushes your ability to process the environment and make decisions under a certain amount of pressure, both of which are vital skills doing this individually.
Gear
Wearing a ballistic helmet is something that takes getting used to, but I think the Airframe with the Team Wendy pads and retention system makes it as comfortable it can be. Despite the issues I ran into with the mounting system, I really like having helmet mounted ear protection.
I do think the helmet does a better job mounting NVG than the Crye Nightcap that I’ve used in the past. The helmet mount is more solid and stable. The Nightcap has the edge in size and weight though, so it’s a tradeoff. This class emphasized again for me just how much I like the night vision and white light setup on this rifle. It ran well for both the white light and NVG iterations.
The Scarab Light plate carrier still carries nicely. I did find that I’ll need to rearrange some stuff on my belt rig, so it works better when I use it in concert with the plate carrier. There were a few places where the overhang from the plate carrier interfered with drawing mags from the belt.
The higher scope mount on my rifle worked well. It definitely makes certain things easier, especially when moving laterally. I think I’m sold on the concept.
The one piece of kit I brought to this class that didn’t work out was the GoPro remotes. The little displays on the remotes were difficult to see, so it was hard to use them to check the status of the camera. The intervals between exercises were long enough that the remotes went to sleep and when they work up they didn’t always connect with the cameras. I ended up just using the buttons on the GoPros themselves (taking my helmet off if necessary).