Gear
Recently I had the opportunity to take a CQB Fundamentals class from Eric Dorenbush of Green Eye Tactical. Eric is a former Delta operator, so CQB is definitely right in his wheelhouse. I previously took his Close Quarters Marksmanship class, which is a natural lead-in to CQB Fundamentals.
For my primary rifle, I brought the 14.5” AR that I’ve used in several recent classes. It’s got a Leupold Mark 6 1-6x optic on it and, I’m running an AAC Mini4 suppressor.
This is a rifle only class. This is for safety reasons since it’s easier to keep folks from muzzling teammates with a rifle than a pistol (pistol work is included in the follow-on Intermediate CQB class). However, I brought along my usual carry gun (an RMRed Glock 17) for any social encounters during the trip.
One of the gear requirements for the class is body armor with rifle plates. This is less for protection during the class and more because Eric believes that armor is something that students at this level really ought to have in their loadout. I brought a Velocity Systems Scarab Light plate carrier with Level III+ SAPI plates (as well as Level IV side plates). The Level III+ plates are rated against M193 & M855, but not .30 caliber AP ammo. They’re about 2/3 the weight of the standard Level IV plates, so I think that’s a good tradeoff.
Since I won’t be running a pistol, the rest of my support gear setup is pretty minimal. One belt-mounted kydex mag pouch backed up by two mags on a shingle attached to the plate carrier.
In his pre-class email, Eric mentioned that this class was a bit of a firehose and suggested bringing a GoPro or some other helmet/head/gun cam to record both lecture material and some of the drills. I brought a GoPro Hero6 with a head mount and a Tachyon OPS camera mounted to my rifle. The Tachyon OPS is nice and small, but it’s pretty old and low res (I’ve got my eye on a GoPro Session 5 if having a guncam proves useful in this class).
Everyone in the class was running an AR (though one student also had an MP5 clone). Two of them were AR pistols. Most students had red dots, but three had ACOGs on their M4s. Mine was the only low power variable optic.
Friday
I left Wichita around noon and got to Weatherford early that evening. Between leaving a bit earlier and Daylight Savings Time I was able to arrive before dark.
Saturday
I rolled out of bed early and arrived at the gate to the range complex around 7:30. Once the rest of the class (save one) arrived, we convoyed in a few miles to the range we would be using.
This was a full class, with twelve guys in it. The majority were armed citizens, but two were cops, and we had three USAF Security Forces NCOs who came down from Minot AFB for the class (they enjoyed the 80-degree temps quite a bit).
Eric had everyone sign the safety waivers. He out three-ring binders with a bunch of written material that supplements the class content. This starts with basic stuff like shooting fundamentals and malfunctions, but it also includes material on CQB procedures (which made more sense after this class) and maintaining night vision equipment. This is a living document that he’s continually updating (he added a section on verbiage for use during CQB entries since the version of this I got last December at the NVG course).
Eric spent a bit of time inspecting everyone’s kit, particularly the plate setups that everyone had brought.
He demoed his preferred procedure for clearing a rifle: lock the bolt to the rear and inspect the chamber, bolt face, and magazine well for the presence of any ammunition (or any debris or damage). He noted that you can do this by feel in low light if necessary, which is not true of all clearing procedures.
Next up was the safety briefing. Eric covered the usual four rules of gun safety, but he has his own take on them, particularly Rule #2 (muzzle discipline) and Rule #4 (background). Rule #2 is often phrased “Never let your muzzle cover anything you are not willing to destroy.” Eric teaches doing your target discrimination (deciding whether or not a target needs to be shot) through the sights with the rifle pointing in at the target. This is important when operating in low light situations with your white light or IR illuminator mounted to the rifle. After taking this class, I also realized how important this is in a CQB environment. The ability to go from deciding that a target need shooting to aligning the sight with your desired aiming point without having to raise the weapon is huge. The upshot is that you will be pointing the rifle at potential targets before deciding whether or not they need to be shot. The key to doing this safety is absolutely rock solid trigger finger discipline.
When discussing Rule #4 (be sure of your target and what is beyond it), Eric emphasized the possibility of people moving between you and your target (a significant danger in CQB). He also segued from the discussion of overpenetration into a lecture on terminal effectiveness and producing immediate incapacitating injury. He’s a big advocate of central nervous system shots (for both the head and torso). This is a topic that we’d return to a bit later in the day.
Eric emphasized that everyone in the class was a safety officer. Anyone can yell “cease fire” if they see an unsafe condition. If someone calls “stop,” “freeze,” “cease-fire,” or you hear a sustained whistle blast or an air horn, you freeze immediately. The only move you make is to straighten your trigger finger. Don’t take another step, don’t look around, don’t put your safety on. Just freeze.
Eric conducted a medical brief, describing what would happen in the event of someone getting injured. About half the class raised their hands when Eric asked who had any trauma care training. We had an MD in the course, so unless he was the one who got shot, he would be the primary responder.
The first third of the class (through early Saturday afternoon) was basically an abbreviated version of the Close Quarters Marksmanship course. Out on the range, Eric started by talking about natural point of aim and close quarters shooting. He’s a big advocate for squaring up to the target and mounting the rifle near the center of the chest, under the dominant eye.
This is also where Eric introduced how he wanted us to use the manual safety on our rifles. The safety does not come off until you are pointed in at a target and have made the decision to engage. If this is a multiple target engagement, it remains off until you’ve done your target discrimination on all targets, cleared and recleared them (all of which is done through the sights). Before that rifle drops even a millimeter, the safety goes back on.
We started with a CQB holdover drill. Eric put an aiming point on each target and asked us to fire a group, keeping our sights on that aiming point. Then we used the distance between the aiming point and where our rounds landed as a reference. After a few iterations, everyone was doing a decent job of dealing with their mechanical offset.
The next drill was doing some controlled pairs from the ready. Eric explained the difference between a controlled pair and a double tap (a controlled pair has a separate sight picture for each shot, the double tap is one sight picture followed by two shots and hopefully the gun is still aligned with the target when you press that second shot. He also talked about the context of the controlled pair. If you only have one guy who needs shooting, pound a bunch of rounds into him. However, if you have multiple targets that need to be discriminated (and possibly shot), each only gets two rounds before you move on to the next target. The key is after you’ve addressed each target, you need to come back to the guy who only got two rounds and see if he needs to get shot some more.
After talking a bit about reloads (since this came up during the controlled pair drill for some folks), we moved on to linear movement. As in the CQM class, Eric went into great detail on the footwork, breaking it down and explaining how each individual element contributed to sight movement as you walked. He talked about how to use sight movement, and where your shots wind up on the target, to diagnose footwork problems.
Eric had us start about 30 yards out and move straight in towards the target. We did a couple of dry runs before going live. Even when we went live, he asked us to establish our footwork first, only raising the rifle when we had the foot movement down and not pressing any shots until we had the rifle steady on the target as we moved.
The time I put into dry practicing this stuff since the CQM class paid off. Not only did I keep all of my shots in the A-zone of the IPSC target, after the first couple of runs you probably could have covered most of them with an index card. On our last run, I ramped up the cadence of my shooting. My group expanded a bit, but I still keep all of them in the A-zone (practice works!).
Rounding out the shooting on the move module, we did some lateral movement. Eric wants students pointing their toes in the direction of movement, no sidestepping. However, he also still wants you squared up with the target for shooting. Accomplishing this requires getting as much rotation out of your torso and hips as possible. However, for most of us (unless you’re unusually flexible), this still won’t be enough. The solution is to bend your knees and get that last bit of rotation in your legs.
As in the CQM class, Eric set up the drill to have students start walking forwards, then make a 90 degree turn to the right with your lower body while keeping the upper body oriented towards the berm. We engaged each target along the line as we passed it. For right-handed shooters, this is the “easy” direction (we did have a couple of lefties in the class). After a couple of runs from left to right, we reversed directions and ran it the hard way, from right to left.
I hadn’t done a whole lot of dry practice specifically on lateral movement since the CQM class, but the time that I put in on my linear movement footwork did help somewhat.
That was the end of the movement block, so we took a break for lunch. While folks were eating Eric brought out some photorealistic targets and talked a bit about shot placement. He teaches using anatomical cues to place shots very precisely to achieve central nervous system hits (both in the head and the torso).
He segued into a discussion of target discrimination. I really like how Eric teaches this. Lots of instructors talk about what gets someone shot, but I haven’t run into one that explains the process anywhere near as well as Eric does. It starts with a quick assessment of the entire target; then you zero in on the hands. People generally have two, and you want to see both of them. If you see a weapon in one of those hands, trace the arm back to the body (this is important in hostage situations, or if two people are tangled up). Once you’re back at the body, select your aiming point, account for mechanical offset, and press the shot. Repeat as necessary.
By this point, everyone was done eating. We headed out to the range and replaced the IPSC targets with some photo targets to practice target discrimination and shot placement. We split into two relays, so each student had two targets to discriminate (meaning this was also a multiple target engagement drill). Eric does these drills with a set of laminated hands, containing threats (guns, knives, lead pipes, hand grenades, etc.) or non-threats (empty hands, phones, badges, etc.). While one relay faced uprange, the other pasted these hands on the targets to change whether they were threats or not. Once everyone was back behind the line, the shooting relay turned around on command and had to discriminate their targets. After shooting anyone who needs to be shot, the student has to reclear the targets. In real life this would involve looking at the results of your shooting (did they fall down, drop any weapons, etc.) and reassessing anyone who was initially not categorized as a threat to see if that has changed. With paper targets that don’t fall down or draw previously hidden weapons, the reclear involves reassessing the picture on the target, confirming whether you needed to shoot (or deciding to shoot a target you did not previously categorize as a threat) and looking to see if your bullet holes are in the right place. If a target needs (more) shooting, you fire again until you’re happy with the results.
We ran this live a couple of times for each relay, enough to give everyone a taste before we went into the shoot house.
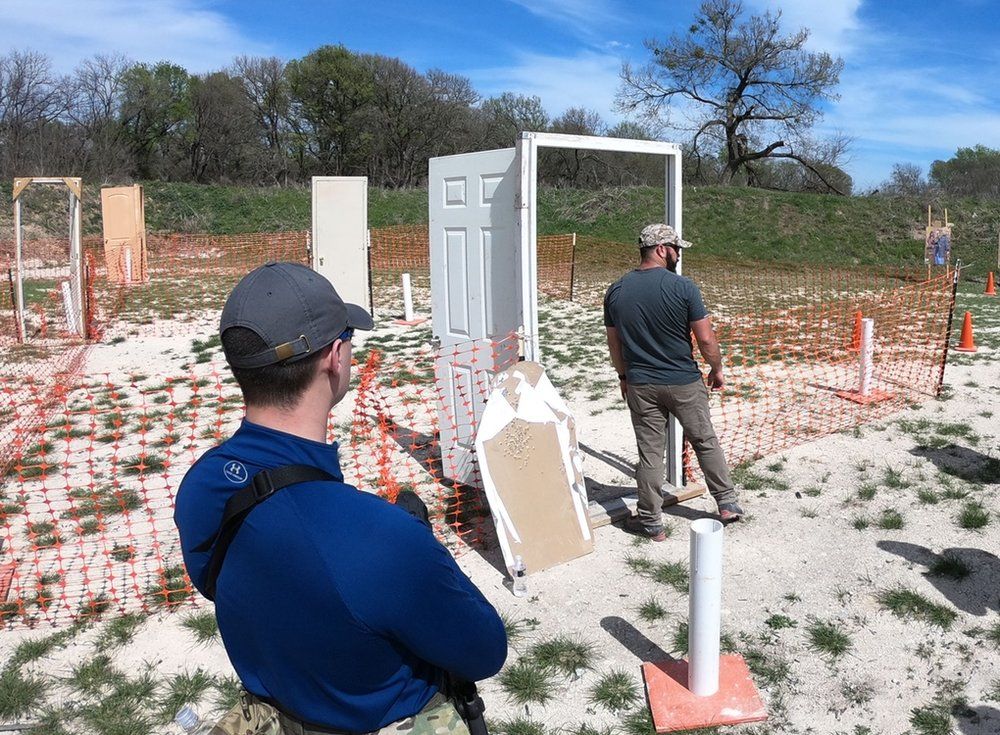
Speaking of the shoot house, Eric’s setup uses waist high orange construction netting for the walls, with doors in doorframes at regular intervals. This gives Eric full visibility into the house while standing outside the room. For this class, he set up a simple 4-room house in the middle of a wide, deep bay with full side berms, allowing 270 degrees of shooting. With some care in target placement (and hard limits on where students could stand when observing) every round would end up in the berm.