As I mentioned in my review of Advanced Carbine 1, immediately after that class I signed up for the follow on Advanced Carbine 2 class.
Gear
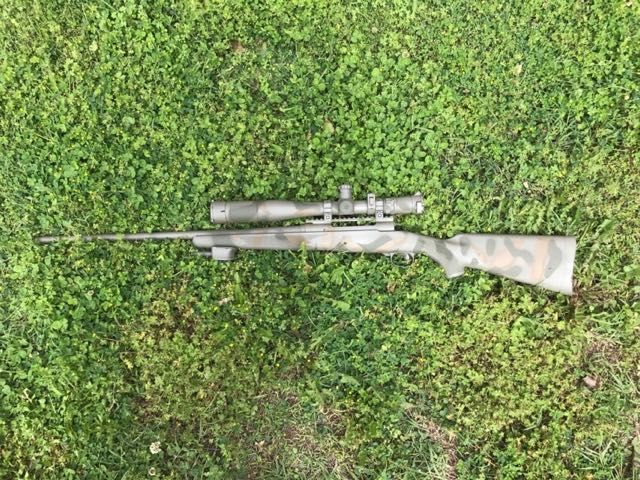
I ran the same rifle for this course that I did for the last one, a 14.5” AR with a Leupold Mark 6 1-6x scope and my Mini4 suppressor.
My AWS Light Assaulter Belt arrived the week before this class, and I was eager to try it out. Rather than a big mass of padding and MOLLE loops that wraps around the outside of your body, like my old HSGI war belt, the AWS is one of those rigs that has an inner belt covered with Velcro loop material that goes through the belt loops of your pants and an outer belt, with Velcro hook material on the inside. The inner belt secures everything in place on your body while the outer belt holds your gear.
One difference between the AWS belt and some similar systems is that rather than putting MOLLE loops on the outer belt, AWS provides MOLLE panels that attach to the outer belt. This allows you to place MOLLE on the belt just where you need it. My only complaint is that they only make these panels two MOLLE columns wide. I really could have used a three-column one for my dump pouch.
I kitted out the belt with Tyr Tactical Happy Mag pouches. These are similar in concept to the HSGI mag pouches I had on my old war belt, but with two significant improvements. First, they have a u-shaped metal insert that provides tension when there’s a mag in the pouch, and keeps the pouch from collapsing when empty. They’re also lined with a grippy, rubberized material that helps provide additional retention (they also have bungee straps for mag retention if you want to use them). I ran three rifle mag pouches and two pistol pouches, all on the left side (there wasn’t room for my usual “cheater” mag pouch on the right rear).
On a tactical setup like this medical gear is important as well. I ran a Chinook Medical IFAK pouch back at 5 o’clock and a SOFTT-W in an 1110 case up front at 1:30. Rounding out the war belt I had a Safariland AWS holster for my red dot Glock, an EMDOM dump pouch, a Glock knife, and a Leatherman MUT multitool.
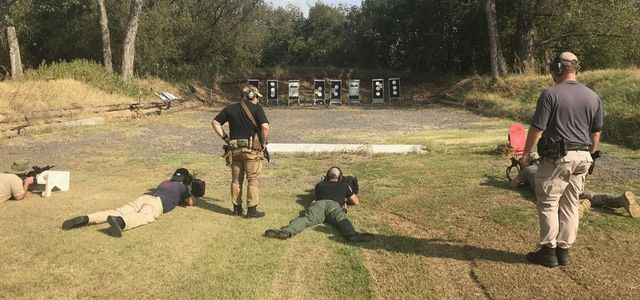
As with the last class, all the students were running ARs. Most had red dot sights (a mix of Aimpoints and EoTechs, many also with magnifiers), though one was running irons. Pistols were a mix of striker fired double stack guns. Most students had war belts, occasionally supplemented by a chest rig. I ended up loaning one of the mag pouches I’d used the previous week out to a student so he could run off his belt rather than the chest rig that he’d brought.
The Course
Again, we met up at a local restaurant, then convoyed over to the range. Our start time was a bit later than normal due to an issue with the range.
I dragged my gear over to the benches and got all kitted up. For the benefit of an AK shooter who was shooting an AR for the first time in this class, Dave went through some AR malfunction clearing (since I was shooting an AR I refrained from cracking wise about how he didn’t need to know how to clear malfunctions when he was shooting an AK).
After the safety brief, we moved out to the range to get the new AR shooter zeroed, and to give everyone else a chance to verify their zeroes. Once that was taken care of, Dave had us leave our rifles on the bench and head out to start off with some handgun drills.
At this point my first problem of the day reared it’s ugly head. As I brought my gun up for the first handgun drill I found my RMR didn’t have a visible dot. I shot the rest of the handgun drills (shooting 2” dots at about 7 yards using a combination of two-handed, one-handed, and weak hand shooting) using the backup iron sights. After the drill I examined it more closely and found the dot was there, just very faint. I borrowed a hex key set and popped the RMR off to swap the battery out (afterwards I realized that I did have my own hex set in my cleaning kit; forgetting it was there tells you how often I break out the cleaning stuff in class).
Lesson #1 from this is to check my kit more carefully before class. Lesson #2 is that I need to change this battery out on a regular schedule, rather than letting it die (especially because this Glock is my EDC).
We brought the rifles back out and did some drills from Carbine 1 as a warm up: coming up and shooting from low ready and doing 90° and 180° turns at about 10 yards. I had put in some dry practice on the footwork for the turns since the last class, and I think it paid off here. We worked these with both singles and controlled pairs.
We were shooting these drills on a vaguely humanoid target made up of a paper plate for the head stapled up above of a large sheet of paper (11x17 or maybe a bit bigger) representing the torso. After a few iterations Dave started having us shoot at the paper plate head rather than the body by calling out “Threat! Head!” about half the time. After we’d put about 20-30 rounds downrange Dave pointed out the size of our groups on the body (probably about 10” for most of us) and told us he wanted a higher standard of accuracy. That might have been a better discussion to have up front, rather than halfway through the series of drills (communicating accuracy expectations up front is an area I think a lot of instructors need to work on).1
Now that we’d emptied out a couple of mags on the warm-up drills, Dave had us load two mags with three rounds each (or one in the pipe and two in the mag). We ran some drills where we fired three rounds to shoot the gun dry, reloaded, shot three more, then transitioned to handgun. I’m generally “bring it up into your workspace guy when it comes to reloads, but running a two-point sling wrapped around your body running under your support side arm makes this difficult, so I did the reloads with the gun pointed downrange.
I had to feel around a bit to find the appropriate rifle mag on my belt; my new war belt setup placed the front mag (which was the one with three rounds in it) further forward than I’m used to when I run rifle mag pouches on a regular belt. When the time came to top off my pistol mag I also found that the rifle tended to hang right over the pistol mags, obstructing access to them a bit.
After a few reps, Dave had us incorporate some movement into the drill. We started off moving up towards the targets and when Dave called, “Threat!” we stopped and shot, then either sidestepped or took a knee while reloading.
Next, Dave laid out two staggered rows of cones leading towards the target and had us slalom around the cones while shooting on the move as we moved in towards the target. This drill is to get you used to rotating your upper body to get the gun on target while keeping your feet pointed in the direction you’re moving. We started out running it dry a couple of times, then ran it live with pistols (which is quite a bit easier than doing it with the rifle) before building up to doing it with rifles.
Dave really emphasized the footwork here, particularly making sure you cut back using the outside foot when you change direction. That’s something I do pretty naturally when moving more dynamically, but I had some difficulty trying to incorporate it into this sort of controlled movement.
For a right handed shooter, going at an angle to the right is much easier than going to the left. I’d normally just swap shoulders, but running a two point sling wrapped around the body makes that much more of a production, so this was my “when in Rome” moment for the day. I found that sliding my hand a bit further back on the handguard helped. After we’d run the drill a couple of times Dave mentioned that rotating the rifle about 45° inboard can make it easier when you’re going in the difficult direction. In this case, you’re keeping the optic (or sights) aligned with your eye and kicking the rest of the rifle out to the right. It makes an interesting contrast to the point shooting technique when you rotate the scope inboard so you can align down the handguard.
Next up was what Dave called the Monty Python drill. “Run away! Run away!” He set up a steel target and had us start at 25 yards. We shot from there, then ran back to 50, shot, ran to 75, shot, then ran to 100 and shot. Then we did the same thing in reverse, running up to 75, to 50, and up to 25.
Dave set out a four barrels ranging from about 45 yards up to 25 and had us do the slalom drill again. Obviously the distance was much longer and the fewer, more widely spaced barrels made each leg of your movement longer between direction changes. Much like in the Advanced Carbine 1 class, moving and shooting at the 40+ yard range is really beyond my effective capabilities (and beyond what I think the realistic range for this technique is). As I got closer in I did find that rotating the rifle inboard 45° did help with the upper body position when moving to the left.
After a few reps, Dave kept the barrels in the same spot, but changed up the drill, having us post up and fire from behind each barrel. We weren’t really using them for cover (yet), more as an indicator of where to stop and fire from.
We moved into some 2-man bounding drills, with one shooter providing cover fire (represented by a single shot) while the other moved up, using the “moving” and “move” verbalizations to keep both shooters in sync.
After a couple of reps everyone was doing the 2-man team drill Dave introduced us to a scaled down version of a squad level flanking drill. One 2-man team would do the same bounding drill we’d just done, moving towards the target. The other 2-man team would run off to the right, and then parallel to the range, then mount the side berm and bring the target under fire from the flank (rather than shooting at the same steel target, they engaged a paper target on the opposite side of the range). In real life, the covering team would shift fire, then lift it as the flanking team assaulted across the objective, but doing something like that live fire would be a bit much for a class like this. We ran the flanking drill a couple of times to give everyone experience in both team roles.
Dave set up a pair of barrels next to each other on either side of the range, representing cover. The drill was to shoot three rounds from the barrels on the left side of the range, cross to the other side and shoot three rounds from cover there, then cross back, shoot three rounds from the left side. Then transition to pistol and shoot five rounds, move to the other piece of cover, shoot five more, move back, and shoot five more.
I managed to completely blow the pistol portion of this drill. From the first pistol position I shot three rounds instead of five, and even though Dave was yelling I didn’t catch on to my mistake until I was already on my way to the other piece of cover. Then, after all that, I did it again, fired three and started to move. This time I cottoned on to my mistake after just a step or two and went back and fired the last two rounds. For the third string of pistol fire I managed to prove that I can, in fact, count to five. Then Dave had me run back and pick up the last two shots.
After everyone had shot the drill, Dave pointed out that most of the students (except for me) had shot around the left hand side of the piece of cover on the right (and vice versa for the left-handed student), exposing far more of their body than they needed to. They really should have been shooting around the strong side of their cover like I did and exposing a lot less.
To give everyone a chance to use cover correctly, we shot the drill again (this time using a pair of barrels stacked on top of each other representing a tall piece of cover like a column). This time I managed not to botch it.
For the class’s penultimate drill, we set the rifles down on the bench and switched back to handguns. The goal was to draw and put five rounds on steel at 7 yards in less than 3 seconds. I fumbled the draw a little bit (need to practice drawing from the ALS retention holster more), but I ripped through the five rounds pretty quick, coming in at about 3.5 seconds.
Much like Advanced Carbine 1, the final drill was a competition between students and the course of fire was a doozie. It started off with a tomahawk throw, then a run back to the 100 yard line. You had to hit four steel targets from 100, run up to 75 and hit the same targets from there, then do the same from 50 and from 25. Transitioning to pistol you had to hit those four targets again, plus two more pistol targets. Move up to 20 yards and sweep those six targets, then transition to rifle and make a precision shot (on a clay bird stuck up on a target stand to give you a reactive target), then run up to about 10 yards and do it again.
I managed to miss the 3’x4’ board entirely with the tomahawk (which basically means I can’t hit the broad side of the barn). That was worth a 30 second penalty. I did pretty well on the rest of the course, only missing a couple of times. My raw time was actually the best out of all of the students, but once you added in the 30 second penalty for the tomahawk throw I wasn’t in the running.
Since two of the students were within 5 seconds of each other, Dave decided to settle it with a shoot off (seems a little dodgy to me). He had some tannerite, so we set that up and moved back to 50 yards and whoever could blow theirs up first would be the winner.[^2] After mixing the tannerite he had a little left over in a third container, so I got a chance to shoot that as a “test”. The student who had the faster time managed to hit his tannerite container first, but I guess he only winged it because rather than exploding, it just burst open and spread the stuff all over the berm. The other one blew quite nicely though.
We debriefed the class, packed up our gear, and headed out.
Conclusions
This was a fun class. I don’t think we went quite as far off script as we did in the Advance Carbine 1 class, but we did march through the drills Dave planned fairly quickly, so by the end of the day he was adding additional drills beyond what he’d originally planned. I appreciate that kind of flexibility. Despite starting a bit later than usual, we went long enough (until about 6pm) that I definitely felt I got my money’s worth.
I had a couple of issues in the class. I’ve already mentioned the (almost) dead battery in my RMR. I need a reminder to change that regularly.
A couple of times today I failed to readjust the optic back to 1x after cranking it up to 6x (once when I confirmed zero and once when I shot the tannerite). I really need to ingrain going back to 1x. I would much rather have it on 1x and need to crank it up to shoot at long range than need to make a close range shot and find myself on 6x. Thankfully I never found myself on the wrong setting when I was under time pressure in a drill.
The rifle continues to run well. I think I’m at a point where I’d trust it for self-defense uses. The optic is definitely a tad slower than a red dot (even at 1x) but it’s serviceable. At longer distances its definitely superior, even before you crank up the additional magnification.
I really like the AWS belt. It was very comfortable and the weight rides nicely on the hips. The Tyr Tactical Happy Mag pouches worked very well. They were nice and grippy to retain magazines, so I never felt the need to use the bungee straps. I had some trouble finding the front rifle magazine when working the reloads, but that’s just a matter of practice.
One area where I may need to change my setup is pistol magazines. I found that with the two point sling the rifle wanted to hang right in front of the pistol magazines, which is exactly the time when I’d want to reach those mags. I also ran into an issue on one of my pistol draws. The front sight snagged on the flap of a pouch in front of the holster holding my multitool. Not only did this disrupt my draw, it’s the kind of thing that could lead to an ND if I were going fast and instinctively clenched down on the pistol when it got hung up in something. However, I may be able to solve both these issues with one change. I’ve swaped the multitool pouch with one of my mag pouches. The mag pouch doesn’t have a flap on top for the front sight to get caught up on and that location is far enough forward that I could easily reach across and retrieve a pistol mag from there if I needed to.
I came out of this class with some things to work on. Besides practicing reloads from the new belt rig, I also need to work on pistol draws from the AWS holster. My controlled movement skills and footwork need some work too. I don’t really have access to a place where I can do that live fire at the moment, but I think some time put in with a rifle mounted laser would pay some dividends.
This was a good class. My recommendation of Dave Bonn and APA Training stands. I’m planning on attending Advanced Carbine 3 sometime in the future, but due to my schedule it’ll have to wait until sometime next year.
One instructor who’s really good at doing this is Roger Phillips, is in part because he tends to have very different accuracy standards (everything from “put all your shots in one hole” to “any hit is good for you and bad for him”) depending on the drill and the tactical situation that a particular technique is intended for.↩