Gear
When I took the Night Vision Operator class with Eric Dorenbush of Green Eye Tactical last year, one of the things that really impressed me was the way he taught target discrimination. Obviously, that’s a class that emphasizes other things, but Eric mentioned that he does a lot more of the target discrimination stuff in the Close Quarters Marksmanship class. Last month I had the opportunity to go back down to Texas and take the CQM class.
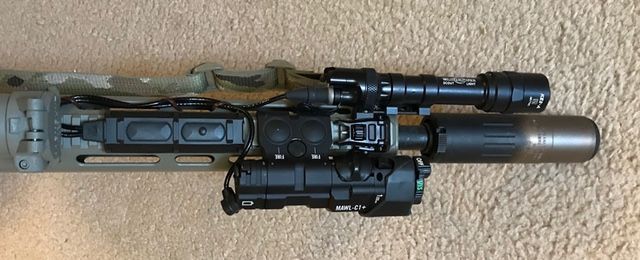
My main rifle for this class was the 14.5” AR that I’ve taken to the last few classes. It’s topped by a Leupold Mark 6 1-6x optic. I’ve still got the Surefire M500 and the MAWL-C1+ IR Laser/Illuminator that I used in the NVG class on the rifle. My handgun for the class (and any social encounters on the trip) I brought my usual G17 with RMR optic.
For support gear, I brought my AWS Light Assaulter Belt, kitted out with Tyr Tactical Happy Mag pouches to carry my magazines. It’s got a Safariland ALS holster for my pistol and an EMDOM dump pouch for spent mags.
With forecast temps in the low 30s and a chance of rain all weekend, clothing would be critical to enjoying the class (or just making it through). I brought merino wool long underwear, fleece, and lots of Goretex.
All the other students were running ARs. Most had red dot sights, but one other student brought a low power variable optic.
Friday
I left Wichita in the early afternoon, arriving in Weatherford (west of Fort Worth) that evening.
Saturday
It was about 30 degrees on Saturday morning and would remain at about that temperature all day. A stiff breeze and a lot of moisture in the air gave it even more of a bite than usual for 30.
We met out at the gate off of the main road and convoyed in to the range. After everyone signed the waivers, Eric gave the safety brief. They included his take on the four rules, which is a bit different from what you might get in other classes. Most relevant to this class was his deconstruction of “don’t point a gun at anything you aren’t willing to destroy.” He advocates doing target discrimination through the sights, pointing in as you decide whether a target needs to be shot. This is especially important in low light when your illumination tool is mounted on your rifle.
Eric covered what to do in the event of a medical casualty. When he asked if any students had any tactical medical training, a majority of the class raised their hands. He also emphasized that everyone is a safety officer in this class. Anyone can call for a cease-fire if they see an unsafe condition. If you’re shooting and anyone yells “cease fire” or “stop”, don’t take another step, or stand up and look around, or anything other than taking your finger off the trigger.
Finally, Eric demonstrated his preferred method for clearing your rifle. Lock the bolt to the rear, inspect the chamber, bolt face, and source of feed. Obviously, you’re looking for an absence of ammunition in the rifle, but this is also your chance to inspect for any debris or damage to the weapon.
We set up some targets and got to work with a drill to illustrate mechanical offset (height over bore), as well as verify we all had a reasonable zero. One thing Eric emphasized was mounting the rifle under the dominant eye, near the centerline of the body. This really helps with keeping the gun on target during recoil. Since everyone was on target (at least well enough for a close range class like) this, we spent some time practicing holding high to compensate for mechanical offset. As some folks had run dry during the drill, Eric talked a bit about his philosophy for reloading the rifle.
Moving on to pistol, Eric had us draw and slow fire a string of shots. This was mainly to make sure everyone was safe and competent with their handgun before moving on to transitions.
At this point, we broke for lunch. Most folks (including me) made a beeline straight for our vehicles to crank up the heaters as we ate.
After lunch, we headed back out to practice transitions to pistol. I like the way Eric sets these drills up, with one round in the gun so the student truly shoots the rifle dry before transitioning. This is much safer (and more realistic) than trying to do a reactive transition with the rifle still in firing condition.
During this drill, I experienced an excellent example of why we rigorously observe Rule #3 (don’t put your finger on the trigger until the sights are aligned with the target). I went to put my finger on the trigger, and with two layers of gloves and half-frozen fingers the gun went off before my mind even registered that my finger had contacted the trigger. Because I was observing Rule #3, the round still hit the target (albeit a few inches from where I had intended it to go).
This is a good example of why we have the rule. The vast majority of the time when its warm out and I have bare fingers or simple shooting gloves I could probably get away with putting my finger in the trigger guard and prepping the trigger even as I’m bringing the rifle up. In conditions like these, I didn’t have anywhere near my usual ability to feel and manipulate the trigger. Because I waited until the gun was on target before putting my finger in the trigger guard, it turned something that could have been catastrophic (or at least embarrassing) into something that wasn’t even a big deal. Even though Eric was standing right next to me, I don’t think he even noticed what happened.
Someone may be able to get away with cheating Rule 3 a lot of the time. Eventually, they’ll need to perform under adverse conditions (bad weather, fatigue, adrenaline dump, etc.) and any sloppiness will bite them in the ass.
Next up we started with some shooting on the move. Eric really did a great job of explaining the footwork in detail. He talked a bit about shooting too, but really it all comes down to the footwork. In particular, he talked a lot about how different issues with your footwork can affect how your sights are bouncing around on the target. He can look at your feet as you move and tell you what your sights are probably doing on the target. On the flip side, after this lecture, I could look at what my sights are doing and use that feedback to diagnose issues with my footwork.
We ran linear movement drills (moving straight in towards the target). Eric started us out at a significant distance (35 yards or so) so that we could get our footwork going before we even raised the rifle, much less started pressing off shots. We ran it dry a couple of times, but even during the live fire iterations, he encouraged us not to shoot if we couldn’t get the sights to settle down on target. The goal was to keep everything in the A-zone of an IPSC target. I threw a couple on my first run, but after that, I managed to keep them all inside (though I was definitely using the entire A-zone).
Next up Eric talked a bit about anatomical targeting. At CQB distances he’s a very strong advocate for central nervous system hits (spine or brain stem). He talked about how to use anatomical reference points to get these hits. I really like his attention to the fact that humans are three dimensional, rather than just flat paper targets.
This segued into a lecture on target discrimination: deciding who needs to be shot. Eric really has an excellent way of teaching this stuff. Hearing this lecture in the Night Vision Operator class last year was really the deciding factor in getting me to take this class because I wanted to get more of this.
The target discrimination process starts with a quick overall assessment (“that’s a potential target that I need to discriminate”). People generally have two hands, so that’s what we look for. We want to see both of them before assessing someone as a non-threat. If you see a weapon in a hand, the next step is to trace that arm back to the body. This may seem unnecessary, but when you have two people tangled up (grappling, someone holding a hostage, etc.) it may not be inherently obvious which person the hand with the weapon belongs to. Once you’re back at the body look for anything that may change your decision that this is a threat (badge, uniform, etc.) and shoot if necessary.
Eric trains discrimination and anatomical targeting using photo targets and a set of laminated hands that allow you to turn a threat into a non-threat (cover up the gun with a hand holding a cellphone, for instance) or vice versa. One relay loads and makes ready, then stands facing uprange while the other relay changes up the targets using the laminated hands. Once everyone is back behind the line, on command the shooting relay turns, goes through the target discrimination process, and shoots (if necessary).
He sets up three targets per student, so this is also a multiple target engagement drill. He’s an advocate for two rounds per target to start with. After you’ve assessed every target as either a threat (and shot them twice) or as a non-threat, then you come back and reclear each target to see if they need additional rounds (or if a target that was a non-thread has become a threat in the meantime). Obviously in real life you’re going to be observing the effect of your rounds (did the target fall down, run off, or drop their weapon?), but with paper targets all we can do is take a look at our holes in the target and see if we put them where we wanted to.
After each series, Eric debriefs each target and talks the students through their decision-making process. To really get the most out of it, you really have to own your mistakes and talk forthrightly about why you made the decisions you did.
One thing that came up during one of these debriefs was the use of verbal commands. Of course, these are static targets, so you don’t get any reactions from the target, but Eric is a real big advocate of using verbal commands in a confrontation. They can help both to help discriminate targets (getting a view of those all-important hands) and serve as a “good guy” signal to responding police officers and any other armed citizens. With multiple targets, you don’t want to become too fixated on getting into a conversation with one target while there are other targets you haven’t cleared yet. Eric’s solution is to start issuing verbal commands to the first target on a loop (“show me your hands, show me your hands, show me your hands”), but to move your attention on to the next target and assess it. Come back to the first target when you reclear and reassess whether they need to be shot based on their response (if any) to your commands.
Our last subject of the day was lateral movement. As with linear movement, this really comes down to footwork. Rather than angling the gun across your body, Eric really wants you to get your upper body oriented towards the target with your shoulders squared up. The flip side of this is he also wants your toes pointed in the direction of movement. This means that your shoulders and your feet have to be at a 90-degree angle from each other (in some circumstances, maybe a bit more than that). Depending on how flexible you are, you can get about half of the necessary rotation using your core, but the rest of it has to come from the knees.
We ran the drill one student at a time. Eric set up the course of fire so you started off moving straight ahead, then made a 90 degree turn to take you laterally across the range. This emphasized keeping your upper body in the same orientation and redirecting your feet. As we moved across the range, we engaged the same photo targets we’d been using for the target discrimination drills from about 3 yards. We could go as slow as we wanted, but not stop. Rather than the entire A-zone that we’d used on the straight-in linear movement drill, Eric asked for the same standards of aiming and precision as he had when we were standing still (so about 2”). This was pretty challenging.
We first ran the drill from left to right, which was the “easy” direction for most of us (though we did have one student in the class shooting left-handed). Then we reversed directions and went right-to-left, which was considerably more difficult.
At this point, I think everyone was more than ready for the end of the day. The cold and damp really sapped our energy, and I know the lateral movement put some stress on my core muscles that don’t normally do this much work.
At Eric’s suggestion, I hit a local restaurant called the Mesquite Pit, which was fantastic. Steak and home-cooked sides were just what the doctor ordered, as was the nice hot shower back at the hotel.
Sunday
Sunday morning was even colder, starting out at about 24 degrees. Around the time I left the hotel to drive out to the range a light freezing rain started. I drove very carefully, with the defroster going full blast to keep a clear patch on the windshield. I didn’t realize quite how slippery it was until the time came to slow down for the turn off the pavement onto the gravel road to the range. Despite not going very fast and braking very gently the ABS was working overtime to get me slowed down to make the turn.
Once everyone was out at the range, we started with some review of previous material to get warmed up. We did the holdover drill and some controlled pairs with the rifle and some slow fire and pairs from the holster with the pistol.
We worked some linear movement, straight in towards the target, starting with the same rifle drills we did yesterday. Then, Eric had us sling the rifles and do the drill again with pistols. Doing it with the handgun was a lot harder. I actually got better hits with the pistol, but only because I waited until I was very close and could keep the dot on target as I moved before I pressed off any shots.
We rounded out the linear movement drills by starting with the pistol, then transitioning to rifle after we had moved halfway to the target. This wasn’t because this is something you’d expect to do on the move in the real world, rather it was a training tool: using the higher difficulty level of shooting on the move with the pistol to get us to slow down our movement, then maintaining that slower pace with the rifle and concentrating on accuracy.
Next up was lateral movement. We did the same drill as yesterday, starting in the easier left-to-right direction, then switching to the more difficult (for right-handers at least) right-to-left iteration. When shooting towards my right, I found that floating my support hand back to the rear part of the forend or the magwell helped release some tension. With the heavy clothing I was running in the cold weather, I also ran the stock in a notch from where I usually run it (frankly this is something I ought to have been doing for the whole class).
We took a break for lunch (again, most folks hopped into their vehicles and cranked up the heaters to warm up a bit).
After lunch, we started work on turns. Eric emphasized orienting your body towards the target and using your natural point of aim. While NPoA is a concept that mostly gets trotted out in precision shooting classes (particularly for position shooting), he applies it to CQB shooting by emphasizing a very squared up stance (hips and shoulders square to the target, with the rifle mounted under the dominant eye close to the centerline of the body). Much like with long-range shooting, he advocates moving the rifle by aligning the body, rather than muscling the gun around. You use your feet and legs to get your hips aligned with the target, and everything else will follow.
Eric had us run some turning drills turns using these principles, then went back to target discrimination. This time rather than having all three targets right next to each other, Eric spaced them out further. He also had them spaced more irregularly so that two targets required a moderate swing between each while the third target had a larger turn.
We worked target discrimination and target to target transitions for a while, then moved back to lateral movement. This time Eric set up the the targets in two rows, one about six feet further back from the others, so that as you moved down the line, the front targets masked the back ones (and the back targets sometimes presented a bad background for the front ones). Before doing this he had everyone turn around and face uprange until it was their turn to run the drill, so everyone came into it cold.
The mental load from all of this managed to mess quite a few people up, including me (though I at least realized the potential for shoot throughs and tried to avoid them). After everyone ran through it the first time, Eric pointed out the shoot throughs. He also pointed out that the best way to shoot these targets may not just be in order left to right. Shooting windows open and close for different targets at different times as you move down the line. It may be advantageous to shoot a target that’s further ahead, then come back to one that was masked by another target or had a bad background earlier. I had completely failed to do this on my first run through, and it had definitely impacted my performance.
Eric offered everyone a chance to do a walkthrough before we shot the drill again. After everyone formed a conga line and did their walkthrough, he switched things around and had us go from right-to-left rather than left-to-right (let’s just say I saw this one coming and spent some time thinking how I would shoot the course going the opposite direction while other folks were doing the walkthrough).
Despite the added challenge of going in the more physically difficult direction, the previous experience and the insight that Eric gave when we did the debrief definitely helped.
For our last drill of the day, Eric set up some targets that required some big turns to engage. He put two up against the berm near one side of the range, one up against the side berm, and one up against the side berm on the opposite side, so we had 90 degree and 180 degree turns to engage all of the targets. After I shot the drill, Eric pointed out the consequences of the fact that I did not get fully squared up after I did the 180-degree turn, and this lack of a proper natural point of aim resulted in recoil pushing my rifle off target between shots.
The target on the side berm on the opposite side of the range was also the longest shot we took in this class, probably 25-30 yards. This is not all that long a shot, but it did expose an issue with how one student was using his reticle to compensate for holdover. Even in a Close Quarters Marksmanship class it’s important to push the distance occasionally to reveal issues like this.
With that, Eric handed out the certificates and everyone packed up and headed out. I had a bit of a drive ahead of me, as I was planning to spend the night in Gainesville, Texas about two hours north to get a jump on the drive back to Wichita.
Conclusion
This was a great class. It served to cement my conclusion that Eric is one of the best instructors I’ve had the privilege to train with. These days I’m usually satisfied if I get one or two really good learning points out of a shooting class. With this course, I got a lot more than that.
The target discrimination exercises where my primary motivation for coming to this class and it really delivered on that score. This is a skill that most instructors say is important, but don’t really dedicate a lot of time to. Eric explained in a very clear fashion and the exercises he runs in this class really help develop these decision-making skills. I liked the way that the target discrimination was integrated into later drills that focus on other skills like turns and lateral movement. Deciding who needs to be shot is going to be a critical part of any deadly force encounter in the real world, it makes sense to build it into many drills, rather than just slicing it off as a separate subject.
Eric really did a great job of teaching shooting on the move. I’ve had a fair bit of instruction on shooting during controlled movement, but none has broken it down in such detail. The way Eric taught this went beyond “do it this way” to giving me the tools to diagnose my own issues when I practice this stuff. The material on turning movements was similarly clear and detailed. These segments of the class alone would have been worth the price of admission for me.
These are all areas where I’ve had previous instruction (and for some of them I think I came into the class with a pretty decent skill set). Eric was able to explain them clearly and in great detail, in a way that gave me the tools to improve my performance going forward. It’s not an easy thing for an instructor to bring so much value to a student who’s already fairly knowledgeable, but Eric really does.
My rifle and pistol ran fine. I did run into some issues with my support gear where I found myself digging around under my Gortex rain gear trying to get to a magazine or dump pouch. One disadvantage of war belts that attach to your belt loops like the AWS Light Assaulter Belt I was running is that you can’t really put them on over your rain gear. At some points, I wished I’d thrown my chest rig in the car so I could have tossed that on over my rain jacket.
Another weak point for me was my gloves. I found that my REI gloves didn’t provide enough traction to reliably manipulate the safety, so I spent most of the class wearing my (uninsulated) Overlord tactical gloves over either a thin pair of warm gloves or glove liners. The double layers inhibited dexterity a bit and they still weren’t as warm as I would have liked. I need to find some insulated tactical gloves. Eric had a big box of chemical hand warmers, which I (and most of the class) took advantage of. I have a few of these in my emergency kit, but I ought to get a bigger supply for future courses where the instructor doesn’t have them available. The cold and damp probably made this one of the most challenging courses I’ve been to, weather-wise.