Advanced Pistol and Pistol-Carbine Operator with Larry Vickers
 Last weekend I took Advanced Pistol and Pistol-Carbine Operator from Larry Vickers. These classes were hosted by Dave Bonn, who regularly brings some big name instructors to the Wichita area.
Gear
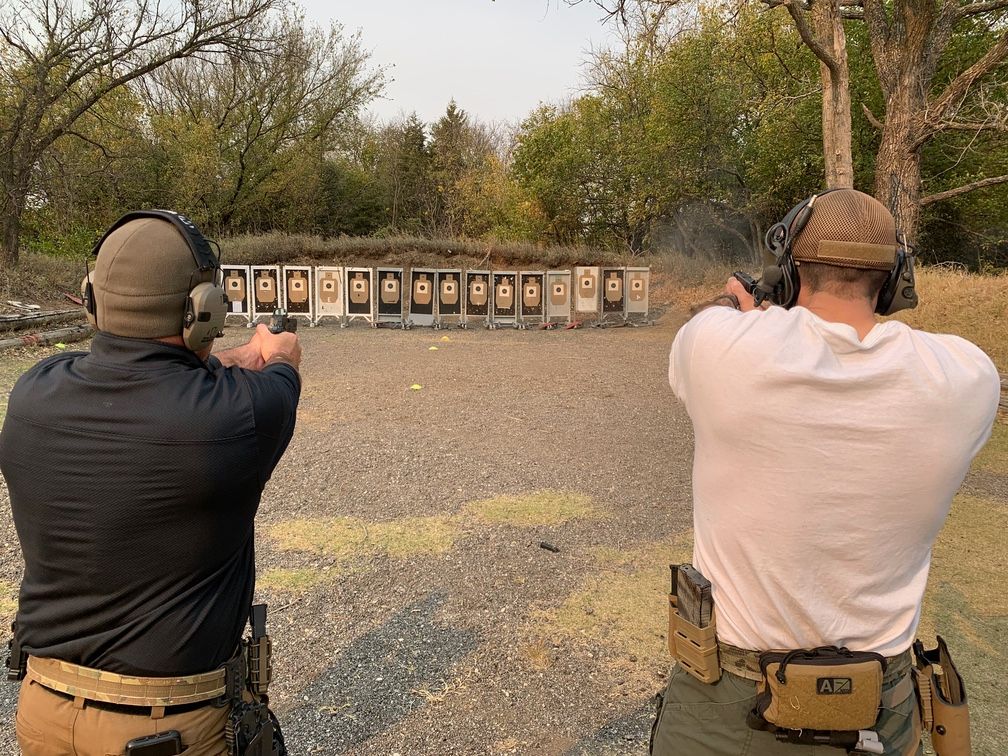
One of the issues with this class is that Larry doesn’t allow appendix carry in his classes. I’ve been carrying appendix for a while now, so this put me in a bit of a quandary. I considered a belt-mounted OWB hip holster, but the reality is I never carry like that. In the end, I decided to run the tactical belt rig that I usually run for rifle classes, including a dropped and offset Safariland ALS holster. This may not seem like a very practical rig, but I do carry this way somewhat regularly. In addition to training, I use a dropped and offset holster like this to carry a 10mm Glock when I’m hunting or hiking in bear country.
The choice of holsters in turn dictated my choice of handgun. This holster is set up for my Glock 19X with a KKM comp, Trijicon RMR, and Streamlight TLR-1. As a backup, I brought both my carry gun and a second G45, both set up with a shorter comp, RMR, and Surefire XC1-Blight (if necessary, I could have swapped out the light and made the gun work with the holster).
I took advantage of the fact that since we were only doing one day of rifle in the class, the round count wasn’t very high and brought my .300 Blackout SBR. This is a build I put together myself with an 8.5” barrel and Dead Air Sandman-K suppressor under an Aero M-LOK handguard. I like the way the Aero handguard bolts directly to their enhanced upper receiver. I’m running an Aimpoint Comp M5 red dot on the Unity Tactical FAST mount. The FAST mount allows a very erect head position and has a built-in rear sight, leaving room for a magnifier behind the optic.

In this case, I’m running an Aimpoint 3XMag-1 magnifier in the Unity FAST magnifier mount. Unlike most magnifier mounts, the FAST system is tall enough that it can flip down rather than off to the side, leaving it hanging off the rifle.
After a good experience with the Geissele SSA trigger I installed in my 14.5” AR before No Fail Rifle, I went ahead and swapped out the JP Modular trigger in this gun for another Geissele.
As a backup gun, I brought along the aforementioned 14.5” AR. Since that’s a .223, I took stringent precautions to make sure I never wound up with any .300 Blackout ammo in the .223 or vice versa. I ran two entirely different sets of magazines (black Lancer mags for .300 Blackout versus FDE PMAGs for .223) and never had both types of ammo out of the car at the same time.
My main support gear for both the rifle and pistol was the belt rig with the dropped and offset holster, two pistol and two rifle mag pouches (I stuck pistol mags in the rifle pouches during the pistol class), along with a dump pouch, multitool trauma kit, and tourniquet. I had seen a lot of people running the Nubmod at No Fail Pistol a couple of weeks ago, so I added one to my setup and gave it a try.
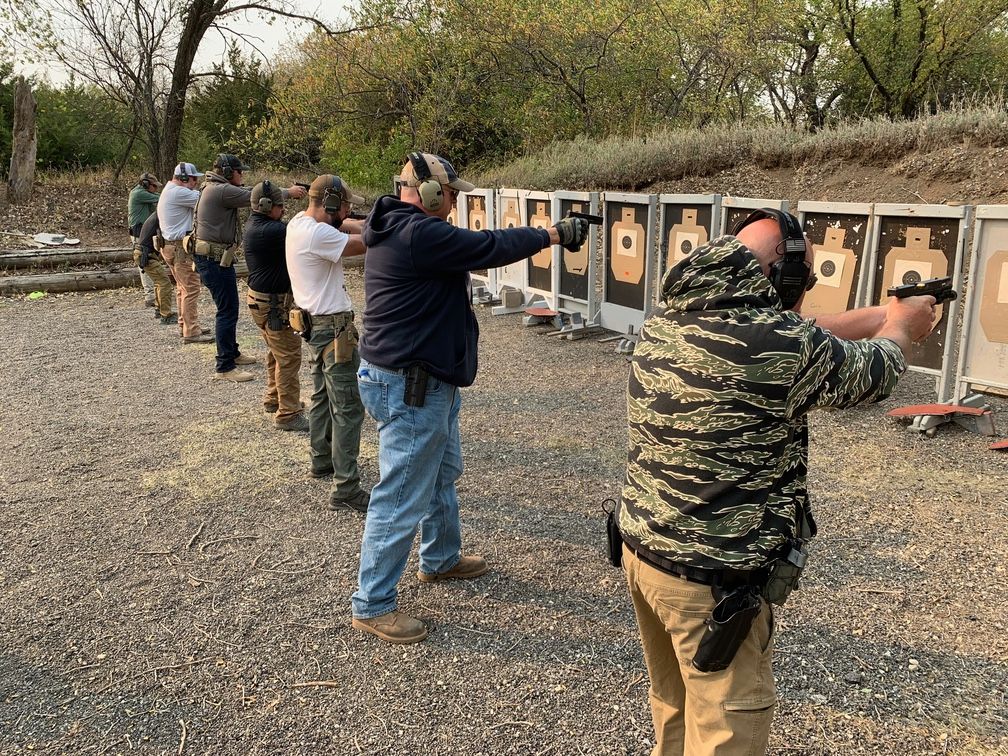
Among the other students, by far the most common guns were Glocks of various flavors. The second most common was the SIG P320, but there was also an M&P, XD, Beretta 92X and 92F, and a CZ. There were a substantial number of red dots, but mine was the only comp. One student was shooting .40 (and LEO with an issued gun whose agency provided his ammo). Everyone else was running 9mm.
On the rifle side, most people were shooting ARs of one flavor or another, but there was one SIG MCX and one Galil. About a quarter of the class had cans on their rifles.
A few folks were running OWB belt holsters, but most had some sort of tactical belt rig.
Thursday — Advanced Pistol Day 1
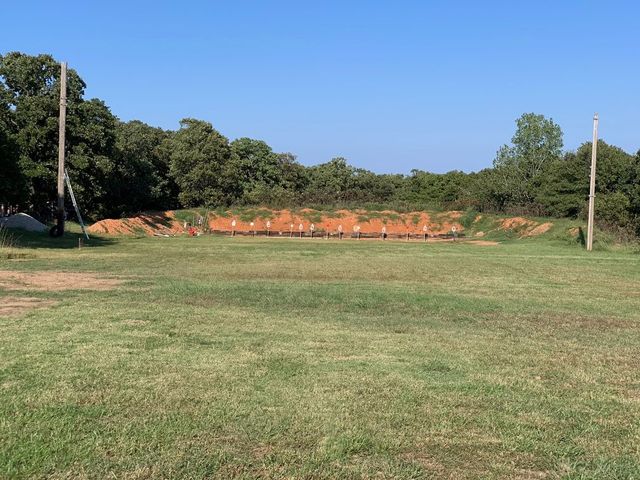
We assembled at the range at 8:30. As I carried my gear from the car to the bench, I saw a row of target stands with B-8 repair centers stretching across the range, which produced some flashbacks to a couple of weeks ago.

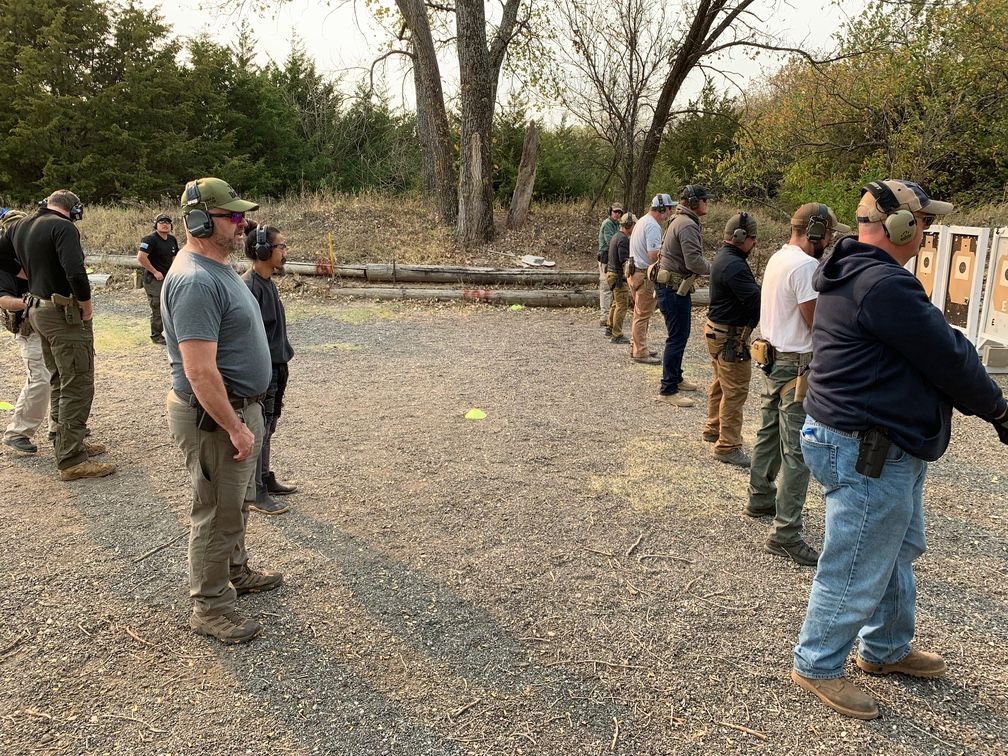
Once everyone was there, we started with a range safety brief and medical plan, followed by Larry’s safety briefing. He used the standard four rules, emphasizing the difference between range training and real-life and how to apply the safety rules in the real world. He did not come at this not from the simplistic, “big boy rules” you hear from some folks on the internet. Instead, he pointed out how people often fail to follow the rules on the range, but the range environment allows them to get away with it.
For instance, many people don’t practice good muzzle discipline, but they can get away with it on the range as long as nobody is forward on the line. In the real world, there will very often be someone you don’t want to shoot in front of you. Similarly, many shooters don’t truly treat all guns as if they are loaded; if they genuinely believe the gun is unloaded, they treat it like a piece of plastic. When guns are unloaded in a cold range environment when not actively shooting, they can often get away with this. In the real world, where guns used for self-defense are loaded even when not shooting, it’s a different story. In contrast to “big boy rules,” the real world requires a more disciplined approach to safety than the range.
With the safety brief taken care of, we headed out to the range. First up was slow fire on a B-8 target at 10 yards. My group merited a “very nice” from Larry.
After he’d seen everyone’s results, he talked a bit about recoil anticipation (he uses the phrase “jerking the trigger”). One thing I like about his explanation that I haven’t heard from other instructors is pointing out that jerking the trigger is the default. It’s absolutely what you would expect in response to a firecracker going off next to your hand. Recontextualizing it like this is pretty helpful.
In Larry’s opinion, sight alignment is often overemphasized, while trigger press is underemphasized. After all, there are many different ways to get the gun aligned with the target (iron sights, red dots, lasers, point shooting), but there’s only one way to make it go bang. All the emphasis on sight alignment can also lead to people psyching themselves out when it comes to their wobble zone. Human beings are incapable of holding a pistol absolutely still. It’s going to wobble. The key to shooting accurately is to accept this, ignore the wobble, and concentrate on trigger press.
To help us learn how to do this, we did some dry fire with a penny balanced on the front sight. Despite having a pretty good trigger press, I found this pretty tricky since my front sight is fairly narrow, and its sides are beveled for about 2/3 of their length.
Larry talked a bit about his philosophy for the class. He does a lot of different drills to deliberately try to get students out of their comfort zone. Indeed, as class wore on, I often saw him run 2-3 different drills, all reinforcing the same skill in different ways.
While these slow fire drills are a useful tool, in a way, they’re not very realistic when it comes to defensive shooting. As Larry noted, the bad guy’s behavior determines when you pull the trigger, how many times you pull the trigger, and how long you’re follow-through is. We reran the penny drill, using the beep of a pro timer as our start signal.
Transitioning this to live fire, we ran a ball and dummy drill (dry) firing on command from the pro timer. Rather than using dummy rounds, Larry used the variant where a partner sets up your pistol with either an empty chamber or a live round, so you don’t know which you’re going to have.
From there, we move into several drills that had us shooting at various distances (all the way back to 20 yards). Notably, rather than going from the holster, or even punching out from the ready, Larry had us start all of these pointed in with our finger on the trigger and all the slack taken out, isolating just the shooting portion of the drill.
Next up, he introduced multiple shots into the drills. Again, Larry had us do several different drills on the same underlying skills, shooting pairs in some drills and strings of up to four rounds on others. During these drills, he also had us starting from low ready and introduced par times (previously, he’d been using the timer as a start signal but not requiring any particular time standard).
Larry noted that people tend to do their gunhandling slow and their trigger presses fast. They take an age getting the gun up to the target, then mash the trigger. You want to do the exact opposite. Get the gun up quickly, then take your time on the trigger press. This can be surprisingly hard. Trying to do the gunhandling faster often leads shooters to speed up the trigger even more, rather than using the extra time to get a better trigger press.
Our last drill before lunch was one I thought was particularly interesting. It was just pairs from low ready, but with a continually decreasing par time. If you missed or went over time, you had to stop shooting and step off the line, so it was a bit of a competition. I got down to 1.5 seconds. Then we reran it with the choice to either shoot pairs using both hands or shoot a single shot strong hand only. I chose the single strong hand only shot and got down to 1.3 seconds.
After a break for lunch, we headed back out to the range and continued working multiple shots. One drill had us shooting increasing numbers of rounds at various distances culminating in five rounds at 15 yards in five seconds. We ran it twice. The second time through, I ran the drill completely clean, with every round in the black.
One of the things I found was at the greater distances and longer strings of fire, this drill ended up being a test of recoil control. Five rounds in five seconds may not seem like a recoil challenge compared to, say, getting very fast splits on a bill drill. However, much like what Larry said earlier about doing the gunhandling fast and the trigger press slow, I found the more I concentrated on recoil management and getting the dot to come back to the same spot every time, the more time I could dedicate to my trigger press rather than getting the gun realigned with the target.
Larry talked a bit about the drawstroke. Something he noted that I haven’t heard elsewhere is that one source of trouble with the draw is humans’ natural instinct for one arm to mirror what the other is doing. To draw as efficiently as possible, we need our left and right arms to do different things at the same time. This particularly affects how early in the draw we can bet both hands on the gun and get our grip locked in.
We ran several of the same drills we’d done this morning again, this time going from the holster rather than low ready.
Our next big subject was reloading. This is probably the area where Chuck went into the most fine-grained explanation of the technique. He put a particular emphasis on not relying on the slide flying forward on its own when you smack in a mag (as can happen with some polymer pistols). He stressed that hitting the slide release was a separate step of the process, not something you do as the mag slams home.
We worked through some reload drills. I’ve been working on my reloads quite a bit in dry practice, and I think mine were pretty smooth. However, I tend to let the mag slamming home and hitting the slide release blend together, so I tried to concentrate on separating the two.
Last up for the day was some drills working different starting positions for our trigger finger: on the trigger with the slack taken out, on the trigger but just barely touching and no slack taken out, and straight along the frame. Larry noted that somewhat counterintuitively, having your finger just barely touching the trigger made for a more challenging shot than straight along the frame. It’s much easier to jerk the trigger when you start from just barely touching it than when you start with the finger off of the trigger completely. We worked a couple of variants, including doing this ball and dummy and throwing in some strong hand only and support hand only shooting.
For our final exercise, we shot for accuracy on a small square of tape Anyone who hit the tape got into a shoot-off where you had to do it strong hand only, and those who hit strong hand only did a second round shoot-off weak hand only. I made it into the first shoot-off but not the second.
That concluded the training day. We got packed up and headed out.
Friday — Advanced Pistol Day 2
We convened again at 8:30. It was a bit chillier this morning, but not too bad. After everyone got geared up, we headed out to the line.
Larry talked a bit about trigger control issues selecting grip sizes on handguns (he prefers to err on the small side). This segued into a discussion of 1911s, a subject that Larry is very well versed in.
Our first drill of the day had us balancing a penny on the front sight. Picking up on another thread from yesterday, we worked it starting with our finger on the trigger and all the slack taken out, with the finger just touching the trigger, and with the finger straight and angled up along the frame. As with yesterday, I found this pretty difficult, owing to my narrow, beveled front sight. We repeated these same finger positions in the ball and dummy drill before throwing in some strong hand only and weak hand only work.
Moving on to live fire, we did two-handed, strong hand only, and weak hand only at various distances back to 15 yards.
Now that we were thoroughly warmed up, Larry dropped the Humbler on us. The Humbler, also known as the 700 point aggregate, emphasizes accuracy, with some time pressure. Delta shot the drill from 25 yards with highly accurized 1911s. In class, Larry tends to choose a distance based on the class’s skill level and the inherent accuracy of the guns they’re shooting. We shot it from 15 yards.
As we shot it in class, the drill consisted of:
- 10 rounds slow fire
- 5 rounds from the holster in 20 seconds
- 5 rounds from the holster in 20 seconds
- 5 rounds from the holster in 10 seconds
- 5 rounds from the holster in 10 seconds
- 5 rounds slow fire weak hand only
- 5 rounds slow fire strong hand only
- 5 rounds from the holster strong hand only in 20 seconds
- 5 rounds from the holster strong hand only in 10 seconds
- 5 rounds slow fire kneeling
- 5 rounds from the holster and drop to kneeling in 20 seconds There’s also a prone component, but Larry skipped that for this class.
After every ten rounds, you walk forward to score and tape your target. You can score it using the scoring rings on the B-8 target, but Larry prefers a simpler (and somewhat more forgiving) scoring standard where any round in the black is -0, around outside the black but still on the B-8 repair center is -1, a round on the cardboard is -3, and a miss or round over time is -5.
I did pretty well on this drill—only three rounds outside the black, so -3 by Larry’s standard. Using the stricter scoring rings, I was -15. Most of those points down came on the timed strong hand only strings.
Larry looked at my score and said that I needed to start shooting this drill from 20 yards, which was a bit ego-inflating. Don’t worry; the next drill cut me back down to size.
Larry had us shoot what he called the Humbler V2. This version trades out some of the slow fire for more timed drills, some of which had very short par times (stuff like singles starting pointed in with just 1 second, or one-shot draws in two seconds). I did not do nearly as well on this (guess I know what I need to practice).
However, I did manage to pull off one trick that I’m fairly proud of. During a string of 5 rounds from the holster in 10 seconds, my gun ran dry due to some poor ammo management on my part. I was able to do a reload, get back on target, and throttle up my shooting pace to get all five rounds in before the buzzer while only dropping one of them out of the black.

When we took down the bullseyes after a day and a half of shooting, the accumulated shot group on my target backer was pretty tight.
We took a break for lunch, then headed back out to the line. We spent the early part of the afternoon shooting many drills that emphasized shooting strong hand only and weak hand only. Larry is pretty creative about how he does this. Sometimes he simply tells students to do one rep each two-handed, strong hand, and weak hand. Sometimes he lets students decide how each of us wants to shoot the drill, then makes us shoot the drill a second time, requiring us to shoot it with a different hand. For one competitive drill, he gave us the choice of shooting pairs from the holster, singles from the holster strong hand only, or singles from the ready weak hand only. Doing it from the ready had the potential to be quite a bit faster if your weak hand only shooting skills are up to snuff.
We shot a couple of standards drills: Hackathorn’s Ace drill (6 rounds from the holster at 6 yards in 6 seconds) and The Test (10 rounds from the ready at 10 yards in 10 seconds). During the latter, Larry pointed out that several students, including me, were trapping the trigger to the rear and resetting it after the gun was back on target, rather than resetting during recoil. Doing this can lead some shooters to jerk the trigger. While it wasn’t having that particular effect on me, it’s still an issue I should probably try to train myself out of. In that vein, Larry talked about a couple of dry and live-fire drills to help cure this problem. After the drill, I tried firing some pairs and bursts into the berm and found that when I was shooting quickly, I was resetting the trigger on the recoil, so this may just be something that crops up when I’m shooting more deliberately.
Our last major subject for the day was shooting on the move. Larry started out talking about the mechanics of shooting while moving. For the most part, this was a very clear, concise explanation of stuff I’ve heard before (roll heel to toe, short steps on a narrower track, bent knees, unlocked joints, etc.). However, something Larry pointed out that I had not heard previously was that if you’re doing all this right, your sights should trace a shaky, horizontal figure eight (easiest to see if you’re running a red dot). If you’re getting checkmarks or lines, you need to fix your movement before pressing that shot.
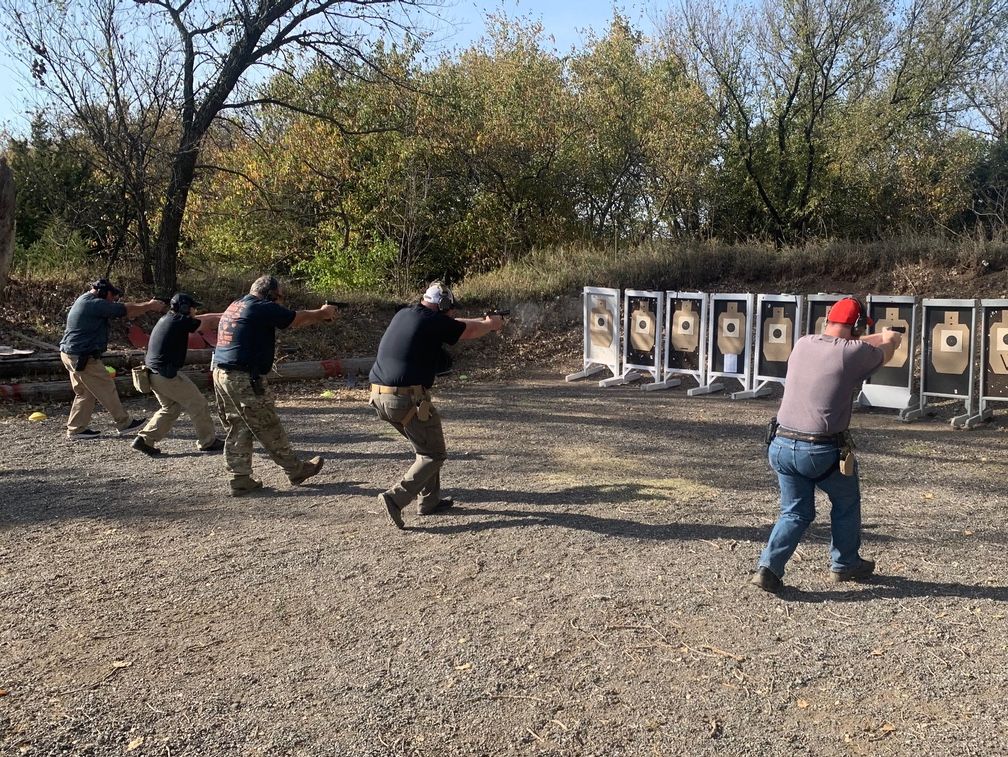
We split into relays, and everyone had a chance to run this multiple times, moving both forward and back. I did pretty well, keeping most of the rounds in the black when shooting on the move between 8 and 2 yards. I’ve been putting in a bunch of dry practice time with this since taking Close Quarters Marksmanship a couple of years ago, and it seems to be paying off
Once again, we finished up the day with a competitive single round drill on a bit of tape. Compared to yesterday, a lot fewer people hit the target two-handed to make it to the first shoot-off. I think after two days of training, fatigue was setting in a bit. I managed to hit the tape both two-handed and strong-hand only, making it to the third shoot-off. However, I missed a weak hand only, and Larry and another student beat me out.
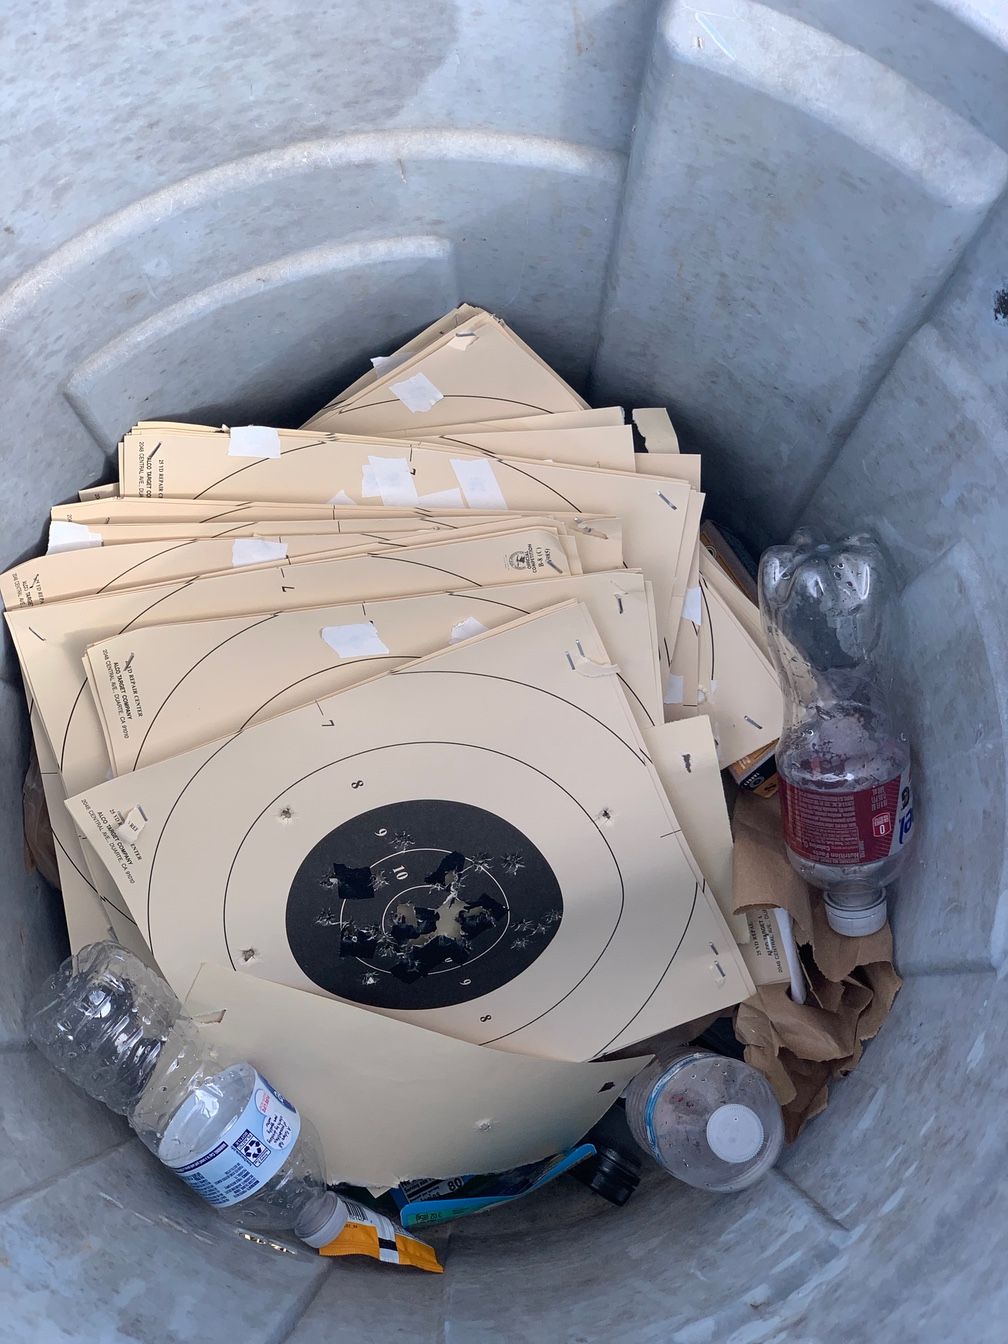
We killed a lot of B-8s in this class.
Saturday — Pistol-Carbine Operator Day 1
It was back out at the range again at 8:30. It wasn’t quite as warm as yesterday, but the wind was blowing pretty hard, something that would continue throughout the day.
We had lost a couple of students from Advanced Pistol who couldn’t make the Saturday-Sunday classes but gained half a dozen new faces. Since we had some new folks, Dave went over the range medical brief again, and Larry did the full safety brief.
Once again, we started with a mag of slow fire at 10 yards to get everyone warmed up and give Larry a sense of everybody’s skill level. This drill gave him some examples of recoil anticipation that he used during his first lecture.
While the lecture’s overall thrust was pretty similar to what we’d heard on Thursday, Larry clearly takes cues from what he sees the students doing on the line. Some new faces gave him some new material. In this case, a student’s locked elbows and heavily rolled shoulders sparked a discussion.
Larry says he usually sees this when students are trying to reduce their wobble zone. All that tension often ends up increasing it. As Larry put it, there’s a difference between being aggressive on the gun and being tense. It can also cause issues with recoil control. Recoil is not something you can eliminate. Humans are not bench vises. What you can do is manage the recoil so the gun consistently returns to the target so you can press the next shot with minimal adjustment.
We moved on to the penny drill, first pressing when we were ready, then on the buzzer. This time I was paired up with a student who matched my height, so putting the penny on his gun was a bit easier. Once again, I had issues with my narrow, beveled front sight, and the strong wind made it even more challenging.
After we were done with dry fire, Larry talked a bit about the trigger press, and in the process, he gave me my biggest light-bulb moment of the class. He pointed out that in a Glock, the trigger does more of the work cocking the striker than most other striker-fired guns, making it more of a mini double-action trigger from the shooter’s perspective. For many years, I’d known that the Glock trigger was doing more work compressing the striker spring than in later striker-fired designs, but I hadn’t connected that fact to the idea of using a different technique to manage the trigger.
This was revelatory to me in part because I’d already stumbled on to the fact that I shoot a Glock well when I manage the trigger more like a double-action (trying for consistent rearward movement) rather than a single action (emphasizing continually increasing pressure to overcome the sear and/or prepping the trigger to the point just before the sear breaks). Just about every instructor I’ve trained with who did a deep dive into trigger technique talked about it from the single-action perspective, so when that didn’t mesh with what I was experiencing, I figured I was doing it wrong somehow. Thanks to Larry’s insight, I’m going to be embracing the idea of rolling through the Glock trigger like a double action.
Transitioning to live fire, we ran the partner ball and dummy drill. During this drill, the Magpul magwell that I had installed on my G19X broke. My partner, who was loading my Glock at the time, felt very bad about this, but I’d had to Dremel on it quite a bit to get it to fit with the medium backstrap, so it breaking was not necessarily a surprise. I made clear that I didn’t blame him in the least.
We did a couple of drills involving shooting singles at various ranges out to 20 yards. All of them had us starting pointed in with our finger on the trigger and the slack taken out to emphasize wobble zone and trigger control. On one of these drills, I came up for the first shot and got a click instead of a bang. I figured I had forgotten to chamber a round, so I cycled the slide—another click. Finally, I went into full-on malfunction clearance mode and did a tap-rack. It turns out when I swapped mags in the holster I hadn’t fully seated the mag.
Next up was shooting multiples. After Larry called me out yesterday for trapping the trigger rather than resetting on recoil, I paid particular attention to that aspect. I found that I was shooting fast enough at 5 and 10 yards that I defaulted to resetting during recoil, but at 15 yards, I slowed down enough that I was trapping the trigger. It definitely seems to be a speed-related thing for me. This confirms that I need to work on resetting on recoil even when I’m shooting more deliberately.
After this sort of rapid-fire, Larry likes to slow folks down and emphasize accuracy, so we stepped up to the 3-yard line and tried to shoot the smallest possible group on a square of tape.
We broke for lunch. When we came back, Larry had us warm up with a competitive drill involving ever-increasing distances and some time pressure.
After that, we moved on to the draw. Larry gave a brief lecture before we dived into various drills. As is Larry’s habit, he threw us quite a few curveballs. He had us shooting from the draw from three yards out to eighteen and doing everything from singles to 6 round strings.
Next up was reloads. Again, this was one of the most detailed explanations of reload technique that I’ve seen. When we moved on to reloads, I found myself bobbling more than usual. All my bobbles were associated with threading the magazine into the magwell. I attribute this to the loss of the Magpul magwell, which is a bit surprising. The Magpul magwell is relatively low profile, more of a carry magwell than a giant gamer-style mag funnel. Beyond that, most of my dry practice lately has been with a Glock 45, which has the stock Gen 5 flared magwell, which is an even lower profile than the Magpul. Even so, going back to the Gen 4 style magwell of the G19X had a serious impact on my reloads. I can get away with a lot more with a Gen 5 or aftermarket magwell.
We did some more drills starting from finger on the trigger with the slack out, finger barely touching the trigger, and finger straight. From there, we moved on to shooting pairs at various distances from 2 to 20 yards. During this drill, I tried to pay close attention to my trigger reset. Again I found at the distances where I was close enough to shoot quickly, I reset the trigger on recoil. Once we moved out far enough, I slowed down and switched to trapping the trigger and resetting after recoil. I definitely need more practice with this.
Our last drill of the day was shooting for accuracy on a bit of tape. I did pretty well, but the shooter who produced the smallest group was actually a student from Advanced Pistol who probably struggled the most on Thursday. That’s a testament to the student, but also to Larry’s instruction.
Sunday — Pistol-Carbine Operator Day 2
We were back out on the range at 8:30 again on Sunday. Today was a bit of a weird weather day. It started on the cool side, and rather than getting warmer, it got colder (bottoming out in the low 40s) alongside a stiff Kansas wind. I decided that rather than just throwing on a Goretex or softshell, this was enough merit bringing out my more “technical” cold-weather clothing (the stuff I’d bought after Eric’s Winter Warrior((http://www.gunfighting101.com/blog/2020/2/23/winter-warrior-with-eric-pfleger) class). I threw on a pair of First Lite zip-off long johns and a Sitka Medium Zip-T and Mountain Jacket. As the temperature dropped during the day, I added a Sitka Kelvin Active jacket.
We started with slow fire groups at 50 yards. This served as both zero confirmation and to give Larry a feel for our skill level. Like everyone else I’ve trained with who has lots of real-world experience, Larry is a big advocate of magazine supported prone. Get your body in line with the rifle (like a machine gunner), plant both elbows, and grab the forend along the line of the bore and pull it straight back into the shoulder.
He also observed that if you can shoot a gun to 50% of its inherent accuracy in field conditions, that’s pretty good. For an “M4” (or a generic AR), the inherent accuracy is about 2 MOA, so anything in the 2” range at 50 yards or 4” at 100 is more than reasonable, especially with a red dot.
We moved back to 100 and fired another couple of groups to help with the zeroing process and get everyone dialed in shooting from prone.
Once we were done with that, we shot a 400 point aggregate. This drill has you shooting from prone at 100, sitting at 75, kneeling at 50, and standing at 25. The par time starts at 60 seconds at 100 and drops by 15 seconds at each distance.
This drill is the first time I’ve done any position shooting with a magnifier on a red dot, and I had some issues in the sitting and kneeling positions. While sitting and using the magnifier at 75 yards, the rear of the magnifier bounced off my eye pro on recoil. At 50, I flipped the magnifier down and just shot with the dot. I found that even in the down position, it was bumping my eye pro. The more bladed positions are causing some eye relief issues.
Despite this, I shot pretty well. Almost all of my points down came during the sitting and kneeling strings, so I know what I need to practice.
After a break for lunch, Larry did some lecture on rifle and sling setup. One thing to keep in mind on sling setup is that Larry is cross-dominant and shoots rifle left-handed and pistol right-handed. That means the way he wears his sling isn’t something that you should duplicate unless you shoot rifle and pistol on opposite sides. He also talked a bit about the proper shooting stance with a rifle (he prefers slightly bladed). Finally, he went over some gunhandling, like how (and when) to operate the mechanical safety and properly loading the rifle.
We ran through a couple of drills that had us shooting pairs or multiples at various distances from 3 to 30 yards.
Next up was pistol transitions. Larry is very big on efficiency, so you can get the handgun out and rounds on target as quickly as possible. He’s willing to give up a second hand on the pistol for the initial shots to make this happen. After doing some drills to work the pistol transition, Larry set up a competition between the two relays seeing which group of guys could deliver two rounds from the rifle and two rounds from the pistol the fastest, shooting one guy after another. My relay lost by a significant margin, thanks to some poor shooting and one guy who started the drill with an empty rifle.
Larry quickly talked through how to fix rifle malfunctions, but we didn’t have a chance to do any malfunction drills (aside from the people who’s rifles gave them the opportunity to clear malfunctions while doing other drills).
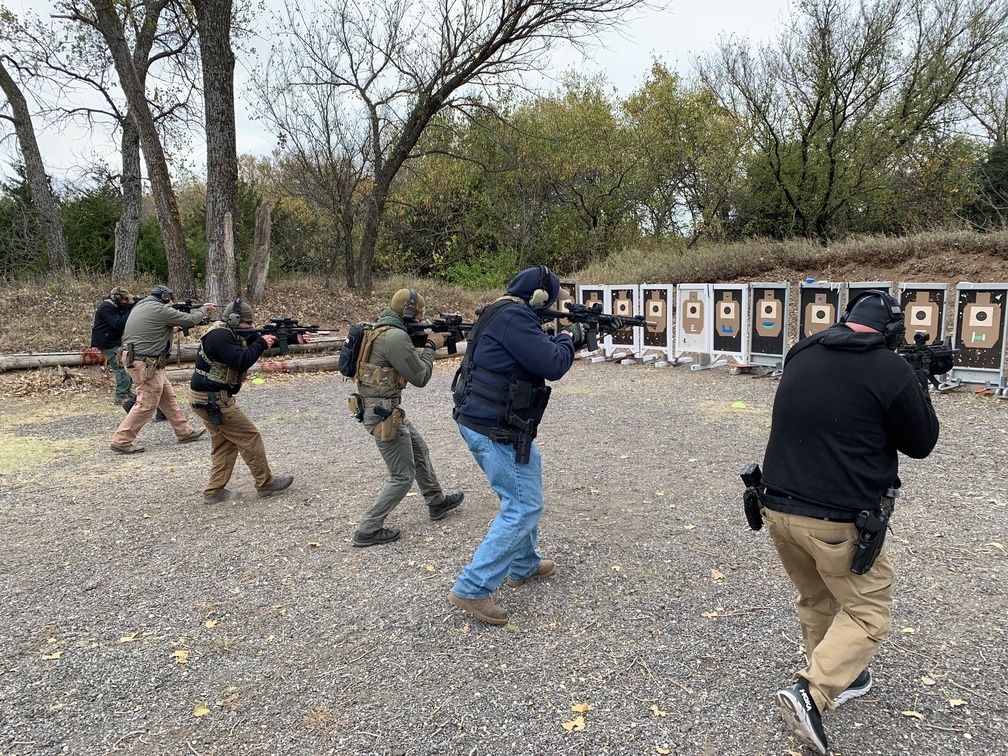
The last subject for the day was movement. Much of this overlapped with what we learned in the pistol class: roll heel to toe, lower base, narrower stance, etc. Something unique to the rifle that Larry emphasized was grabbing the forend in line with the bore and pulling the gun tightly back into your shoulder. We worked some drills moving both forward and backward.
That wrapped up the class. After some closing remarks and a class photo, we got packed up and headed out.
Conclusions
Larry is probably the biggest “name” instructor that I’ve trained with. One of the dangers with big names is that they don’t always live up to their billing. Larry more than lived up to his reputation as a trainer.
Larry is also an excellent coach. He does a great job picking up on students’ issues and offering advice on correcting them. Coaching is a distinct skill set from teaching, and not all instructors are good at it. Larry’s one who is.
When I first signed up for these classes, I wondered a bit about how the format would work: three days of pistol followed by one of carbine. Having the third day of pistol work was quite nice. It gave everyone who took both classes a chance to see their progress.
The single day of rifle did feel a bit abbreviated. I’d love to take a full 2-day carbine class from Larry in the future.
The one significant gun problem I had was the Magpul magwell breaking off my G19X. Again, this is probably directly attributable to all the Dremeling I did to get it to fit on a gun with the medium backstrap on it. My experience bobbling reloads after the magwell broke has convinced me that I need to replace it. I’ve got an Agency Arms replacement magwell on the way that’s both purpose-built for the Glock 19X and is intended to work with the medium backstrap.
The only other gear Issue I had was the fancy grip tape I’d added to the Numbmod on my ALS holster. Late in the day on Friday, I found that it was wearing on my thumb quite a bit. I still thought the grip tape would be useful when wearing gloves (which I am most of the time I run this rig with a rifle), so I didn’t want to take it off entirely. That night I slapped a piece of scotch tape over it to temporarily take the edge off. I found the scotch tape started to peel off about midday on Saturday, so I reinforced it with some electrical tape. Since we were shooting rifles on Sunday (not to mention that it was pretty chilly), I was wearing gloves, so I peeled the scotch and electrical tape off, exposing the grip tape. My delicate skin aside, I liked the Nubmod, and I think it will stay on this holster.
I have to say I love my .300 Blackout SBR. This rifle shoots and handles very well. I like the Geissele trigger too. I still have some work to do learning how to use the magnifier effectively, but as a CQB gun, it would be the first one I’d grab.
I don’t write these reviews to brag on my shooting. Indeed, more often, I point out where I’ve screwed up because I think those can be learning points for others. In this case, I’ll make an exception because I think it can also be a learning point: I was not one of the fastest shooters in this class. I was one of the most accurate shooters in this class. One of the most critical shooting skills is knowing how fast you can shoot. Take exactly as much time as you need to make the shot, no more, no less.
I have been doing more dry practice in the past year than I have in the past and I’ve seen the dividends in several classes, but none more so that this one. My accuracy, draws, reloads, and shooting on the move are all much improved from what they were a year ago.
Larry is a great instructor. I’d highly recommend training with him if you have the opportunity.