Last weekend I took Rifle for Gunfighters with Colby Rupert and Roger Phillips. Roger announced this class back in January at the Fight Focused Handgun IV class, where Colby was a student (and contributed a bit on the instructional side as well). This was not the first class I’ve had Colby as a fellow student in, and I’ve always known that I’d want to get in on it if he were to do some teaching. This class provided an excellent opportunity.
I brought my 10.5″ SBR AR with a Gemtech GMT-556LE suppressor on it. The gun is set up with a long Lancer handguard extending over the suppressor, giving both a short overall length as well as plenty of forend real estate. Aside from the can, the other notable feature is probably the fact that I’ve positioned the Aimpoint Micro about as far forward as it would go. This really optimizes the gun for something like Roger’s long gun point shooting class, so I was interested to see how it would do in a sighted fire class like this one.
I was running a new FailZero bolt carrier group. I’d tested it at a local range, but I hadn’t had a chance to run it hard, so I also brought along a BCM BCG that I’d run more extensively in the rifle.
Most other students in the class brought ARs (one SBR, most 16“, one 18”). There was one SIG 556R. The vast majority of students had red dots, but there were a few magnified optics (one Browe and a Leupold 2.5-8). One student brought a red dot but had issues with his zero and ended up shooting the class with iron sights.
For support gear I brought an Infidel chest rig. Chest rigs aren’t my favorite, but they do pack a lot easier than a battle belt, which is important when you’re flying to a class. I also ran a Dale Fricke rifle mag pouch on my belt, which served as my go-to mag for most reloads. My G17 rode in a Safariland dropped and offset holster and I ran a camelback (largely to balance out the chest rig).
Chest rigs and battle belts were the order of the day for support gear among the other students. Pistols tended towards Glocks, but there were a smattering of other types in evidence.
Saturday
We started off with a quick safety briefing from Roger (much shorter than his usual when he’s the one headlining the class). With that out of the way he turned things over to Colby.
Colby lead off by talking a little bit about his background. He proceeded this by asking us to “keep this shit off the internet”, so I’m not going to go through it in detail. I’ll say that he’s former U.S. Army and his service and deployments overseas gave him many opportunities to hone his skills in gunfighting with a rifle. He’s certainly got the expertise to speak with authority on the subjects of this class.
I’ll also add that I was very impressed by the way he got this information across. For someone of his background this easily could have turned into a big brag session, but that’s not what Colby did at all. This was definitely not any sort of ego gratification exercise; he was short and to the point, telling us what we needed to know to put the stuff he was teaching in this class in context.
Colby went through his own safety briefing, and put a bit of his own spin on the four rules. His take on Rule 1 and 2 were pretty standard, but Rule 3 stood out. The way he phrased it was, “Don’t point your rifle at anything you don’t have to”, acknowledging that at times you might end up pointing the rifle at things you don’t intend to shoot. Acknowledging this and calling for it to be minimized is a lot more realistic than the more black and white terms that this rule is often presented in. He also specifically noted that in a potentially hostile situation you should point your rifle at unknowns and “shoot/no-shoot” decisions were made with the rifle pointed in at the potential target.
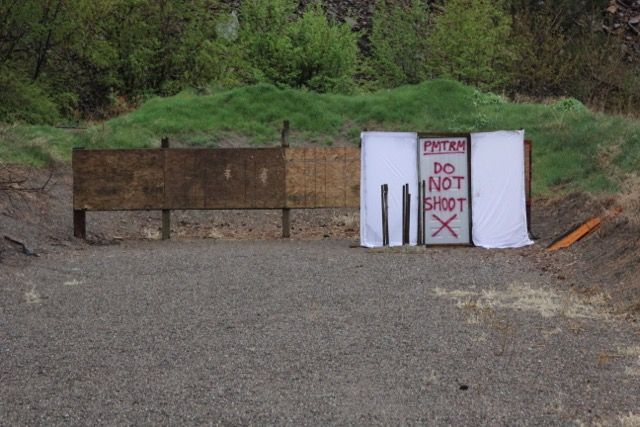
His take on Rule 4 was also quite a bit more comprehensive than the usual way you see it phrased: “Be aware of your target’s background, foreground, and things around it.” I like that this acknowledges that the area between you and your target may not be a sterile range environment; the foreground is important too. It also emphasizes that in the real world things potentially could move into your line of fire (very important when doing team tactics stuff, but also when there are potential non-combatants in the area). I think I may have to steal this one.
He followed up the safety brief by going through our medical plan, in the event someone got injured during the class.
We loaded up four mags of ten rounds each and headed out to the 100 yard line. Our first drill of the day was what Colby called the aggregate drill. You do four separate strings of fire at 100, 75, 50, and 25 yards. At each distance you start standing and have to assume the required shooting position: prone at 100, sitting at 75, and kneeling at 50, (you shoot from standing at 25). As you get closer, the time allowed gets shorter, going from 60 seconds at 100 yards, to 45 seconds at 75 yards, to 30 seconds at 25 yards, down to 15 seconds at 25 yards. We shot the drill on NRA B-8 pistol targets, which have a 5.5″ black bullseye. The goal is to get everything in the black, with points down based on the scoring rings anywhere outside of that.
You’ll find some versions of this drill on the internet that give 60 seconds at each distance, but I really like the way Colby has it set up. The times aren’t unreasonable, but they do provide enough pressure that you really have to have your fundamentals down in order to do well.
That said I did not do all that well when we shot this in class. I went over time, substantially, on a few of the positions because I didn’t really have a feel for how long I had to shoot each one. I think that to use this drill to get a feel for your true level of performance on the shooting skills would require shooting it enough so that time management is more second nature.
I was not helped by the fact that I had a couple of malfunctions during the drill, both failures to eject. I figured these might be due to the new BCG, so I went back to the bench and swapped it out for my old BCM BCG.
Next up Colby had us shoot Kyle Lamb’s Half and Half drill. This is intended to test trigger control and your stance’s ability to control recoil. There are three strings of fire, all from standing. From 20 yards you shoot 10 rounds in 10 seconds, from 10 yards you shoot 10 rounds in 5 seconds, and from 5 yards you shoot 10 rounds in 2.5 seconds. I did pretty good in terms of recoil control, though a couple of times my brain outran my trigger finger and I wasn’t able to keep up the cadence I wanted through the entire string of fire.
I had another malfunction at the end of one of my strings of fire on this drill, so while the other relay was shooting I went back and scrubbed the hell out of my chamber with a chamber mop and slathered some more lube on the bolt. These ended up helping some, but I still had to contend with the occasional malfunction through the rest of the day.
After shooting these “standards” drills Colby talked a bit about stance and it’s role in controlling recoil and allowing fast, accurate, close range shooting. Based on his experience and some studies the military has done, motivated bad guys can soak up a lot of rounds, even rifle rounds, before they go down. He talked about “burning guys to the ground” to the tune of half a mag or more. In order to do that as quickly as possible you need every advantage you can get in terms of controlling recoil.
Colby did a good job of describing recoil management as doing something with the energy that the rifle is imparting to your body when it launches the round downrange. You store that energy in your body, but you can only store so much before you end up off balance. The alternative is to transmit that energy to the ground, which allows much longer sustained bursts of fire. He talked about how to do this through foot placement and an aggressive forward lean.
The other aspect of recoil control that Colby’s a big advocate for is running the stock all the way out and gripping the forend fairly far forward (not a full locked elbow, shoulder rolled, C-clamp grip, but reaching out there most of the way). To demonstrate he had us shoot with the stock collapsed all the way, support hand on the magwell and standing straight up, then running the stock out, grabbing the forend and leaning in. After running the stock at full extension for most of this class I think I’m convinced that it’s a good way to go for me (at least on red dot equipped rifles where I don’t have to worry about eye relief).
Colby also talked a bit about trigger control, noting it’s the one thing you can’t cheat on. You can cheat on grip, stance, even sight picture in some cases, but not on the trigger.
Next up was reloads. Colby divides these into two categories: the speed reload an the emergency reload. Basically the speed reload is proactive (done when there isn’t an active gunfight going on at the moment) and done on a closed bolt. The emergency reload is reactive, when your gun runs dry, and done on an open bolt. The only real difference is that for the emergency reload you hit the bolt release to send the bolt forward. In either case he’s not a big advocate of the reload with retention. He’ll generally default to dropping the mag during the reload and retrieving it later if possible.
Some minor technique details that he emphasized: curling the pinky finger under the magazine to help give a better grip and seat the mag better and starting the mag into the magwell by aligning the back of the mag with the back of the magwell then straightening the mag and pushing it home. He also emphasized not slapping the mag into place, this can cause rounds to bounce out from under the feed lips and cause a malfunction. Finally, every mag insertion should end with a push-pull to make sure it’s seated.
One interesting thing that Colby talked about was reengaging the safety when doing a reload. This is something that he started retraining himself to do fairly recently. This is not based on any concern that he might crank off a round during the reloading process. Instead it’s based on some studies from the military that they were shooting guys who did not need to be shot because soldiers were coming off a reload and reengaging quicker than they were able to process how the situation had changed while they were concentrating on getting the gun up. I don’t know if it’s something I’m ready to adopt at this point, but it’s interesting.
We started out working some speed reload drills, shooting three, reloading, then shooting three more. During one of these drills Colby had us work through every magazine on our gear rather than re-setting up after each one. He emphasized that while we might have a favorite spot to reload from, we needed to practice reloading even from more inconveniently placed mag pouches.
After we’d worked this for a while we switched to doing some emergency reloads. We started with a round chambered and an empty magazine, we fired the round in the chamber, reloaded and fired three more.
Next up were malfunction drills. Colby categorizes malfunctions into four groups: simple, complex, catastrophic, and destructive. Simple malfunctions are those that can be cleared by immediate action (tap, rack), like failures to fire or a magazine that’s not seated properly. Complex malfunctions require locking the bolt back, possibly reaching in to dislodge rounds, and racking the bolt before inserting a new mag. These are things like double feeds and failures to extract. Catastrophic malfunctions are those that require tools to fix (prying rounds out, etc.). Destructive malfunctions are situations where the gun is broken and would require parts to fix.
One thing that he showed was a method for fixing the “bolt override” malfunction, where a case becomes trapped between the tip of the charging handle and the bolt on an AR. This is a pretty rare malfunction, but the clue that it has happened is that you cannot pull the charging handle as far back as you normally could. The simple no-tool fix for this is to lock the bolt to the rear and leave the charging handle as far back as it will go, remove the magazine, then slap the charging handle forward while bringing the muzzle down. The round should drop out the magwell. I’d seen this before, but it seemed to be revelatory for a lot of students (which I found a bit surprising given that many of them have trained with a lot of the same folks that I’ve trained with).
We spent some time setting up and fixing the various malfunctions, then broke for lunch.
After lunch we continued with malfunction clearance. Colby set up a pair of barricades at about the 75 yard line and had us set our rifles behind them, pointed downrange (relay 1 behind one barricade, relay 2 behind the other. He and Roger set up malfunctions in each rifle. Each relay lined up behind our barricade about 20 yards further back and one at a time we ran up, grabbed a rifle (other than our own) cleared the malfunction, and engaged a steel target until we got three hits. Then we ran back and the next student in the relay ran up and did the same.
Next up we moved on to some position shooting. Colby started by going through the traditional shooting positions. This is the sort of basic skill that an experienced shooter could easily pooh pooh, but Colby had some insights into effective prone shooting with an AR that were practically worth the price of admission all by themselves.
When I shoot prone with an AR I generally use the magazine for support if I can, grasping the front of the magwell with my support hand and resting my cheek on the stock. I generally shot it similarly to the way I would a precision rifle on a bipod, with as little body pressure as possible aside from solidly supporting the back of the stock with my shoulder. The two refinements that Colby taught were to move the support hand well out on the forend and use that to provide some rearward tension, and to push down and forward with the cheek at about a 45 degree angle (I find that to do this effectively I have to start with my cheek higher on the stock than usual so that when I bear down it will be at the right height). Muscling the gun like this might lead to a slight decrease in accuracy, but it definitely makes recovery from recoil a lot faster.
All that said, according to Colby he’d very rarely used the traditional prone position in combat. When he did it as almost exclusively from some sort of elevated position, either shooting across valleys or shooting from rooftops (usually after knocking loopholes in the parapet). Real world obstacles meant that prone rarely provided enough visibility.
For sitting, Colby demonstrated the stacked foot method, along with the more conventional cross legged and open legged positions. I’m not near flexible enough to get the stacked foot thing to work for me, so I stuck with the more normal positions. Again this is one that Colby said he rarely used, largely because of the time required to get into and out of it.
Finally, kneeling. No big revelations here in terms of technique, but Colby said this was by far his most common shooting position (outside of CQB). He did mention that he wasn’t really a fan of double kneeling except in situations where you had some sort of cover you could use to support the gun. Absent that he’d rather have the support that a raised knee could offer.
After people had a chance to practice each of these, we dragged out the barricades again at about 75 yards and talked about shooting from cover. There are times when the standard positions will work, but there are also times that will allow (if not demand) some modifications. The first of these we covered was reverse kneeling. Rather than raising the support side knee and using it to support your support side elbow (and ultimately hold up the rifle) you support the gun by bracing it against the barricade, raise your firing side knee and use it to support the firing side elbow. I’ve seen (and used) this position before, but as with prone Colby brought something to it that I hadn’t known before. He had us use our support side knee to put forward pressure on our firing side elbow (and ultimately the pistol grip). This is like putting the rifle in a vise, and it adds considerably to stability.
When bracing the rifle against the barricade Colby noted that you generally don’t want to put the barrel itself on there, lest you introduce some error by torquing the barrel. Even with a free float handguard (which almost every student in the class had) he wasn’t a real big fan of resting them directly on the barricade, he’d rather brace his hand on the barricade and then grasp the handguard.
One issue I had was that my suppressor was a bit too wide for some of the slots, so unlike some students who could project their barrel through the narrower slots I needed to create a bit of distance between the business end of my rifle and the barricade to keep it from contacting. One of the things I did to accomplish this was to collapse my stock, making it easier to reach out and grasp right at the end of the long handguard (being careful to avoid both the hot suppressor an the flight path of the bullet).
The barricades were modeled off of Kyle Lamb’s design, with a bunch of holes and slots at various heights and angles to challenge shooters. For the lower apertures Colby demonstrated some variations on prone to help us get down and effectively engage through them. He showed off SBU prone, rollover prone, and brokeback prone. SBU prone has your body in a relatively conventional prone position, but it involves rolling your rifle over on it’s side to help get as low as possible. This means you have to give up your shoulder support and float the buttstock in order to get your eye lined up with the optic.
Rollover prone has you lying on your side, with your body parallel to the line of fire rather than perpendicular to it (imagine a standing shooting position and then just fall directly to the right until you’re lying on your right shoulder). Behind many types of cover it would be best to pull your feet up into a bit of a fetal position to keep them from being exposed.
Finally, brokeback prone is essentially a double kneeling position with your upper body bent down almost to the ground to shoot through a very low opening (under a car for instance). While I’d seen this position before, what I hadn’t realized about it was that in some cases you’re basically using your head as one of three legs of a tripod to support your body. I’d stripped my hat off before I tried this, which was a mistake. The range gravel would have been much more comfortable with an extra layer of cloth between it and my scalp.
One issue with positions like these, or shooting through some of the horizontal slots on the barricade, is that rolling the rifle over on it’s side has a significant affect on it’s trajectory. When the rifle is upright (and zeroed properly) the path of the bullet starts out below the line of sight, but angled upward. It climbs up to or above the line of sight, then gravity takes over and it drops back down below the line of sight as it continues downrange. Roll the rifle over on it’s right side and all of this changes. The bullet will start off to the left of your line of sight but the path of the bullet will be angled towards the right. This means that the further out you get, the further right your bullet is going to hit. In addition, gravity will have it’s way with the bullet and without the initial upward angle it will happen even more quickly than when the rifle is upright. The end result is that at longer distances you need to hold to the left and high. Roll the rifle over the left and everything is a mirror image (hold to the right and high). A good way to remember this is when rolling the rifle over always hold towards the magazine.
Colby and Roger had us shooting through different combinations of slots and openings in the barricade, chosen to force us to use different positions to get effective hits. This was definitely a bit more of a challenge for folks with magnified optics who had to worry about eye relief. It was easier with a red dot, though my ear protection gave me a bit of a hard time. With the rifle rolled over in SBU prone or shooting through one of the horizontal slots I couldn’t get my head behind the optic with my eye in the right spot because of the thickness of my electronic muffs. I found that my angling my head and coming in from the side a bit I was able to get a somewhat decent sight picture.
Particularly sucky was hole #8, a 3″ square right on the ground. To shoot through it I ended up using a very low SBU prone with my rifle only a finger’s width off the ground.
After everyone had a chance to get familiar with the various positions and shooting with the gun rolled over at various angles and directions, we moved back up to about the 10 yard line and worked some pistol transitions. Colby generally likes strapping the rifle on with a two point sling, so I applied my “when in Rome” rule and did likewise. One point he emphasized was giving the rifle a twist as you lower it to make sure that the rifle ends up with the mag pointed to the rear. This helps keep it back along your side rather than sliding back around to the front where it’s in your way. The other point that he really emphasized was the proper order for the post-fight drills: making sure you top off your pistol first before dealing with whatever malfunction caused you to transition away from the rifle, since the pistol the weapon that you know works.
We practiced some transition drills, moving from the rifle to the pistol, shooting, reloading the pistol, then getting the rifle back into action. From this point forward Colby asked that if we had a malf or ran out of ammo during a drill and were within effective pistol range (whatever that was for us) we should transition to pistol and finish the drill.
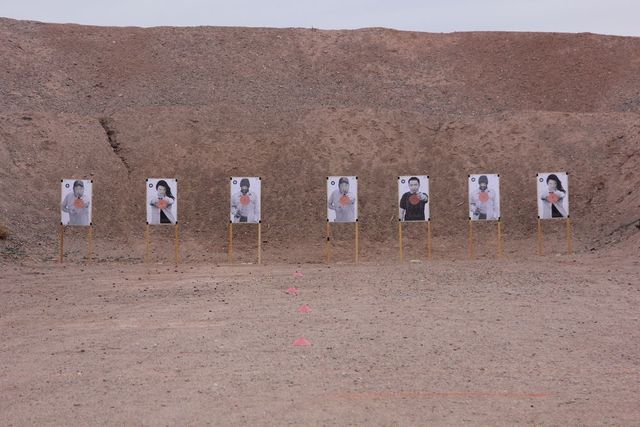
Next up was multiple target engagement. Colby’s a big proponent of moving the eyes to the next target first, then aligning the rifle into alignment with your eyes. In some ways this is an application of one of Roger’s point shooting mantras, “The bullets go where the eyes go”. In this case, the rifle goes where the eyes go. It’s much easier to direct the rifle to where your eyes already are than it is to try to move both the gun and your eyes at once.
Colby set up six targets and we had two shooters on line at a time, engaging three targets each. We started out delivering one shot to each target, then transitioning to the next. After everyone had run that for a couple of iterations, we moved on to firing one shot at the left hand target, two at the center, three at the right, four at the center, then five at the left. As I did in some of the morning drills involving longer strings of fire, a couple of times my brain outran my trigger finger and it broke my shooting cadence.
I also suffered a malfunction during the drill. Responding to Colby’s earlier instructions I transitioned to pistol. Because I’d unstrapped from my rifle after we were done with transitions, I needed to pick a transition technique to get the rifle out of my way. What I intended to do was to grab the junction between the receiver and the magwell and tuck the stock under my support side arm and draw my pistol one-handed. Things didn’t quite unfold as I had planned. We’d been shooting quite a bit in this drill and the big nut that the Lancer handguard attaches to right at the junction with the receiver had gotten quite hot. When my hand got back there it decided, quite on it’s own, “nope, I’m not holding on to this burning hot thing” and I dropped the rifle. Figuring holding on to the rifle was a lost cause that this point I let it drop and drew the pistol two handed to finish the drill. Colby had seen this and complemented me on it. First time I’ve ever been lauded by the instructor for dropping my rifle.
This drill capped off the day. Colby did a really nice debrief at the end, asking each of us to mention one thing we’d learned, one thing he should do differently, and one thing he should keep doing. This lead to some good discussion of learning points from the class. My “thing he should do differently” was to do some of the shooting with the rifles rolled over on paper before doing it on steel in order to get a better feel for the unique ballistics of these positions.
After my day of malfunctions, I talked a bit with Colby about it to see what he recommended. He suggested trying a heavier buffer weight (I was running an H buffer).
With that we headed out. Most of the class showed up at a local barbecue joint for a group dinner (we were also joined by the Glock Gal from the Paragon Pride forums, whose husband Georro was taking the class). It was a great evening of fellowship among like minded folks.
Sunday
After my day of malfunctions yesterday a student who had a heavier buffer in his carbine (also an SBR) offered to trade out with me for the day. So I swapped my H buffer for his heavier H2 buffer.
Our first subject of the day was failure to stop drills. Colby said that back in the 90s the units he was in had practiced the classic, two to the body, assess, one to the head pattern. By the early 2000s they’d gone to five to the body, one to the head. When high level bad guys in Iraq (mostly foreign fighters) had started showing up with hard armor, it prompted a change. Rather than going straight for the head, which was a very difficult target, they switched to the pelvis. With a rifle you have a chance to break the pelvic bone and get a mobility kill. Even if you don’t, it contains big nerves, arteries, and other stuff that makes for a pretty good target. Once you’ve anchored your opponent with some hits here, a headshot becomes much easier. We ran some drills, shooting five to the body, three to the pelvis and one to the head.
Unfortunately, the H2 buffer did not do the trick. Quite the opposite, really. I had malfunctions on every single iteration of the drill. I quickly swapped buffers back with the student that I’d gotten it from.
We did some barricade shooting on paper (talk about responsive to the suggestion I’d made at the debrief the previous day!). These went a long way to help us get a feel for the dynamics of how your trajectory behaved with the gun rolled over on it’s side.
Colby had us drag the steel back out and move the barricades to the 50 yard line. We did some shooting from that distance. Most of it was “self driven exploration” (meaning shoot what you’d like, but try to get something out of it) but he asked everyone to shoot from the #9 hole (about a 6” square right at the bottom of the barricade. One thing that struck me shooting through the #9 was the lack of situational awareness that a small aperture like that could bring. I was all lined up and ready to shoot when I thought, “this doesn’t look right”. I realized I was lined up on the fourth target (one allocated to the shooter on the other barricade) rather than the second like I thought. I got lined up on the correct target and shot.
When we moved back to the bench to ammo up, one of my fellow students offered a Carbine buffer that he had in his parts kit. If a heavier buffer made my problem worse, maybe a lighter one would help. I was willing to try just about anything at this point, so I took him up on the offer. It helped immensely. I did still suffer a couple of malfs later in the day when by gun was dry and getting crudded up (adding more lube seemed to help) but overall it was much better. It’s kind of surprising that a SBR with a can on it would shoot better with a lighter buffer, but the results don’t lie.
We headed back out and shot from the barricade at 75 and 100 yards. Doing the progressively longer distances like this was very helpful in getting a feel for how trajectories worked when shooting through some of the horizontal slots in the barricade. Then we broke for a slightly early lunch.
After lunch we shove the barricades aside for the moment and we did some shooting from the more conventional positions at 100, 150, and 200 yards. Colby asked us to shoot on steel from standing, kneeling, sitting, and prone at all three ranges. Doing these three distances in succession definitely showed off the increased degree of difficulty at the longer ranges. In particular my performance from standing degraded quite a bit as we moved further out. Even from the more stable positions 200 yards is definitely pushing the limits of my visual acuity with a red dot.
We dragged the barricades back out at 150 and 200 and did some shooting from the non-standard positions. It was useful to have shot the more conventional positions at these distances before trying the more difficult ones. One thing Colby pointed out is that in some ways the small, low apertures actually get easier further out, because the longer distance effectively gives you a bigger field of view around the target. That said, at this point when I had the rifle rolled over 90 degrees I had to hold completely off the target to get good hits. That made it hard to judge exactly how far over to hold, particularly with a red dot.
Moving up to the 10 yard line, we shifted gears and did some snap shooting. Colby had us start in what he called low ready (I’d call it contact ready, with the gun lowered just enough that you can see the target’s waist). We were to bring the gun up, disengage the safety, and press the shot. We ran this drill on a timer, with the par time set for one second. Colby said a good goal for this drill was half a second. We ran it both as a relay and a couple of times one shooter at a time to get some individual times off of the shot timer. I generally ran in the 0.6-0.8 range.
He also had us do a couple of reps pointed in, with our finger on the trigger and the safety off, so all we had to do was press the trigger on the signal. It should be pointed out this was not because he was advocating pointing in at someone with the finger on the trigger before you’ve decided to shoot, this was just a drill to isolate specific subskills and practice them. For this drill he also set the par time short enough so that the timer just gave off one continuous beep, to help train us to initiate based on the beginning of the beep rather than the end. This basically just cut the times down to human reaction time, about a quarter of a second.
We went back to shooting from the ready (finger off the trigger, safety on), putting what we’d learned in the finger on trigger drill to use. I did pretty well during these drill, but I did drop one shot a bit short. That shot, and the way Colby and I responded to it was a learning point worthy of an article of its own.
With that, we moved on to shooting some timed standards drills. The first was the modified navy qual: at 25 yards shoot 5 rounds standing, reload, 5 rounds kneeling, reload, then 5 rounds prone, reload. All in under 30 seconds. Both times we ran this I botched it by starting to go prone after the first reload, then catching myself and going back to kneeling (I was really kicking myself after the second time). Even absent that, I think this drill has a lot more time pressure than the other timed drills we were about to do.
We finished off the day with the same two drills that we started the class with: the the aggregate drill (10 rounds prone at 100 yards in 60 seconds, sitting at 75 yards in 45 seconds, kneeling at 50 yards in 30 seconds, and standing at 25 yards in 15 seconds. This time I (and most of the rest of the class) had the opposite problem with time management than I had when we did the drill on Saturday; I finished way early at most of the distances. I could have spent considerably more time refining my shots, particularly from prone and sitting. I also shot high at 100, 75, and 50. The odd thing was that I was high by about the same amount at all three distances so I don’t think it was an issue with my zero. Maybe something with my hold on the target?
I did quite a bit better from standing at 25, putting them all in the black in a bit under the required 15 seconds. This performance continued to the half and half drill (10 rounds in 10 seconds at 20 yards, in 5 seconds at 10 yards, and in 2.5 seconds at 5 yards). All of my shots were in the black at all three distances (though I was about a quarter second over at 10 yards). I felt pretty good about this part of my performance.
After this drill we packed up our gear and got the targets and barricades put away. Colby did another good debrief, similar to the one the day before. I suggested that he might get something like a shoot-n-see target for shooting with the gun rolled over on paper, but Georro suggested the targets with four bullseyes that he used for the aggregate drill, which I think is an even better idea.
After some good discussion Colby and Roger handed out the certificates and everyone headed out.
Conclusions
This was a great class. Colby really put his vast experience with the rifle in real wold settings to good use. However, there are plenty of shooters out there who have the shooting skills but not the teaching skills to impart their knowledge to others. Based on my experience with Colby as a fellow student in previous classes I figured he’d be a good instructor and he more than lived up to that expectation.
One thing I really appreciated was how he explained the context of various drills. He also did a good job at breaking things down into particular subskills and then presenting drills to hone those subskills. Even for very basic skills like prone shooting and good rifle stance I learned some tricks and nuances that will stand me in good stead.
I particularly appreciated the extended exploration of non traditional shooting positions, including those that forced you to roll the rifle over to one side or the other. I’ve done some of these in classes before, but it’s usually just one drill. That’s not enough to really get good feel for these skills, particularly for the dynamics of your trajectory when you’ve got the gun in anything other than a vertical position. Having a chance to try these out over a range of distances definitely lead to a much better understanding.
Overall, I got a feeling we only had a chance to skim the surface of Colby’s knowledge of rifle gunfighting. In particular I would love to take this class again with a 1-6x magnified optic. It would make some of the things at distance a little easier, but it would also pose a bit more of a challenge, particularly with some of the non-traditional shooting positions.
Roger did good work in this class as well, but he definitely let Colby take the leading role (I don’t think I’ve ever seen him so quiet). I think it definitely speaks well of him that he was willing to let another instructor take the lead like this and I really appreciate him bringing Colby in and organizing the class.
I also need to complement my fellow students. Everyone’s safety skills were definitely up to par and there was a lot of good discussion about various learning points in the class. There was also the great fellowship that comes when you get a group of like minded folks together like this. I’d trained with everyone in the class before and I’d happily do so again.